How To Easily Clear The Cache In Windows 11
We may receive a commission on purchases made from links.
While cache files help a computer remember specific usage patterns and deliver a smooth user experience, too many cache files can clutter your storage. Further, corrupted cache files can cause your system to glitch, slow down loading times, and degrade the overall performance. Do you have to live with a rather slow PC, or is there something you can do about the cache files?
You can do many things to maintain Windows 11 computer's speed, and clearing out the cache is one of them. Before we begin with the ways to clear the cache on your Windows 11 PC, let us walk you through the basics of cache, what it is and why you need to remove it. As per PC manufacturer HP, the cache is a term used for the storage (called cache memory) that contains temporary files created by a computer. These files help computers access information faster than if they accessed it directly from the RAM.
Over time, your PC generates cache files. However, the problem starts when your PC accommodates a large number of such files, occupying more space on your drive than you would think. As the free space on your computer goes down, so does its performance. As your system creates new cache files, the old ones might get corrupted, resulting in errors and glitches. Clearing the cache also frees up a good amount of storage on your hard drive.
Use the Settings app or Disk Cleanup tool
One of the easiest tricks to speed up Windows 11 is to clear your cache. You can clear the cache of your Windows 11 computer using the Settings app.
- Press the Win + I key to open the Settings app.
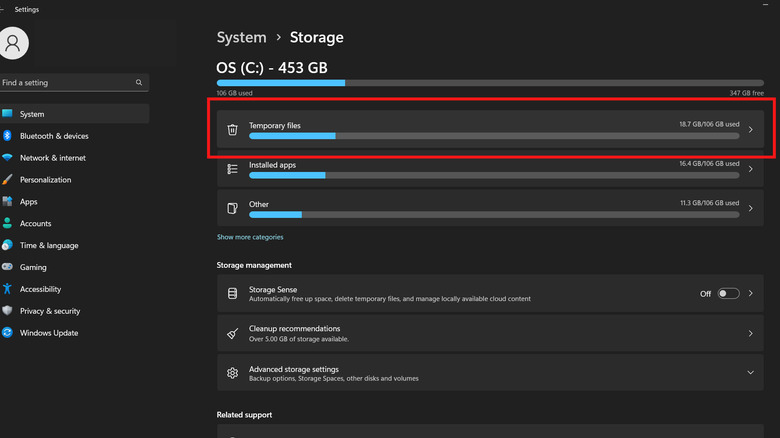
- Click "System" on the menu on the left.
- Click "Storage" and then click "Temporary files".
- Your PC will take some time to determine the size of all the non-permanent or cache files created over time.
- In a few moments, you will see all the cache files on your system, including Temporary Internet Files, Thumbnails, and more.
- Tick these and click "Remove files" at the top of the list. In the prompt that comes up, select "Continue" and that's it. You've successfully deleted the cache files.
While the Settings app allows you to clear the cache files from over your PC, the Disk Cleanup tool will enable you to look for temporary or unnecessary files in different drives.
- Press the Windows key, type Disk Cleanup in the search menu, and select it.
- Select the drive you want to clean up in the dialogue box.
- The tool will then show you all the cache files, including Downloaded Program Files and Temporary Internet Files.
- Select the files by ticking the box beside them and click "Ok" at the bottom to remove them.
Clear the Temp folder and flush DNS cache
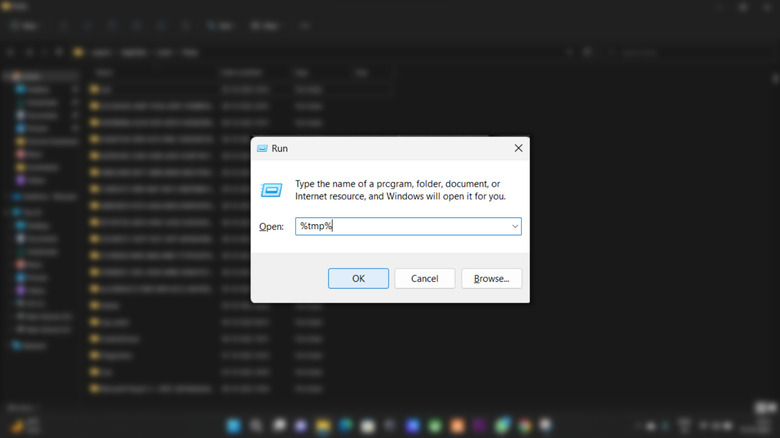
All the apps on your Windows 11 PC store their cached files in the Temp folder. While the apps are supposed to clean these files when they don't require it anymore, sometimes these files end up in your storage.
- To get rid of them, press Win + R to open the Run window, type %tmp%, and press enter.
- This will open the Temp folder, where you'll see files with random names.
- Press Ctrl + A to select everything in the Temp folder and delete it.
- It is worth noting that you might not be able to delete all the temporary files as they could be in use by some or the other app. For the most part, you should be able to clear up almost all the temp files on your computer.
Now that you know how to clear the app cache, let's learn how to remove the DNS cache. DNS refers to Domain Name System, and as per Amazon, it helps a computer translate human-readable domain names to machine IP addresses. While doing so, DNS creates a temporary database as a cache. However, when the DNS cache piles up, you might face network issues on your PC.
- To clear the DNS cache, open the Start Menu, type Command Prompt in the search bar, right-click on it and select Run as administrator.
- In the Command Prompt, type ipconfig /flushdns and press enter to clear the DNS cache).
Enable Storage Sense and clear Microsoft Store cache
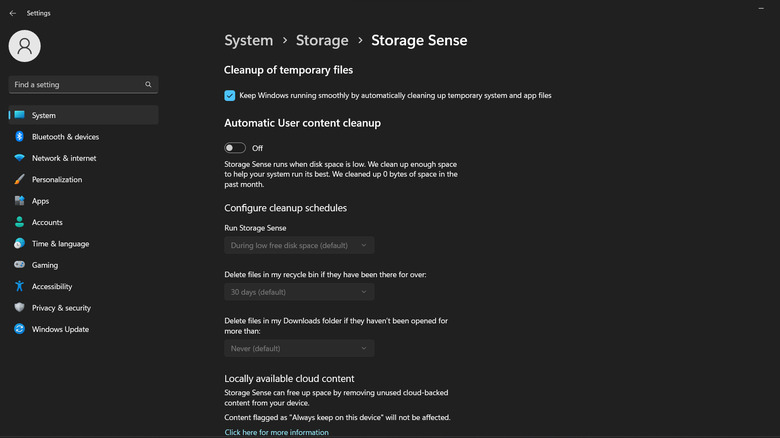
It could be daunting to clear the cache from different locations manually. Hence, we want to introduce you to Storage Sense, a tool that can "automatically free up drive space for you by getting rid of items that you don't need," including temporary files.
- Head to Start > Settings > System > Storage and enable Storage Sense.
- Depending on what you need, you can even customize the cleanup schedule and choose from options like every day, every week, or once a month.
- The tool lets you clear your Recycle Bin at fixed intervals (via Microsoft).
The app library on your Windows 11 PC, Microsoft Store, also stores some temporary files to quicken the search process. However, with time, you might start facing certain issues with the Microsoft Store due to the accumulation of cache files.
- To clear Microsoft Store's cache, press Win + R to open the Run prompt and type wsreset.
- That removes all the cache files created and stored by Microsoft Store.
As long as we are talking about clearing the cache, the web browsers on your computer also create temporary files. All browsers store some information on your disk. Hence, whenever you are going about deleting all the cache files from your Windows 11 PC, you can also clear the cache in Google Chrome, clear the cache in Firefox, and clear cache in Microsoft Edge as well.