OnePlus 3 Teardown Part I: Battery Replacement
Today we're aiming to give you a glimpse inside the OnePlus 3 in the first of a couple of teardown articles for the device. In the past we've done teardowns of odd devices such as the first version of the Samsung Gear VR. Now, with so many of our readers asking for a simple look at the insides of the OnePlus 3, it's time we did it again! As such, we asked our good friend Anonymous Contributor to work with us on some teardown action.Fair Warning: We do not recommend you do any of the following unless you're excited about never getting tech support from OnePlus or whatever place you purchased your device from again. The following images have been provided to us by a skilled, experienced gear fiddler. Do not attempt this with your own OnePlus 3 unless you KNOW what you are doing.
If you'd like to turn back now and instead have a peek at our OnePlus 3 Review Series, feel free to do so.

The OnePlus 3 is held together by a number of plastic clips, pressure around the rim of the device, and a couple of very, very tiny screws. You're going to need a Torx T2-sized bit – that's super teeny, and it does not come in your standard screwdriver bit collection.
On the bright side, they aren't Pentalobes.
Next you need to take out your SIM card tray. Do not forget to do this. Bad things will happen if you forget to do this next.

From there you're going to be doing some jabbing and prying. You'll want to separate the back panel from the rest of this device using plastic tools wherever necessary, because the plastic and the metal around the edge of this device is very thin, and prone to bending – easily.

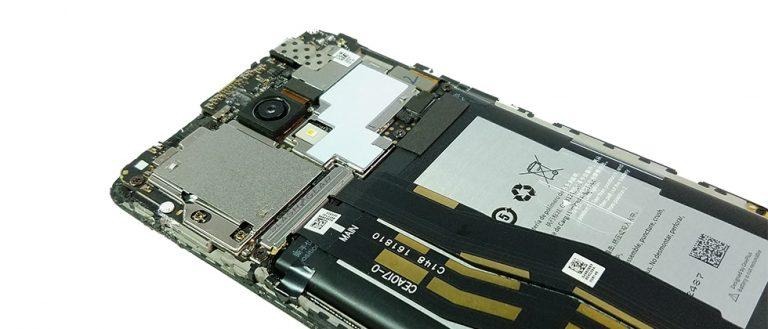
Once you've popped off the back of the OnePlus 3, you've got a few very simple steps left before removing the battery.

At this point you'll want to look at two seemingly contradictory messages on this device. One suggests that the battery is not removable, while the other says that it is.

Basically what OnePlus seems to be saying here is "you can do this, but you're going to be on your own if you do."
Your next step is to disconnect the two longer connectors that span the back of the battery.

To do this, you'll need to remove one metal piece held down by a single philips screw, then you'll lift up both connectors with your fingernail.
Once you've done that, you're going to want to make sure the battery's connector is unplugged – that's another fingernail lift-up job.
Easy as pie.

You'll be lifting up and pushing back several pieces of electrical tape here, two layers of it in two of the corners.
This is what they call "Position 1" on the battery. Pull em all up, but don't rip them out! You'll want to use them again when you put your new battery back in.

You'll then pull the battery up by the transparent strip you saw earlier, and bang! It's out.
This battery will need a fairly strong set of tugs to pull out because it is held down by a bit of glue, but nothing you wont be able to muscle out by pulling that transparent strip.

Pull!
Mind the glue!

We're not going to make any recommendations on where to buy a replacement battery right this minute because they pretty much don't exist at the point at which this article is being published.
OnePlus manufactures their own batteries, and until we find a suitable replacement, you're on your own! Let us know if you find one first!
Next we'll be continuing to pull apart the OnePlus 3 to analyze which parts it actually contains.

Look like a part you recognize? Stay tuned!