Eufymake E1 Review: A Truly Affordable Creative Tool With Immense Potential
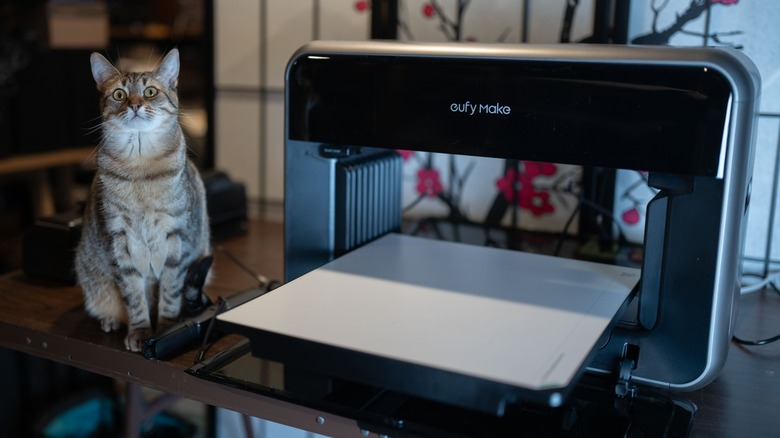
UV printing is a really compelling concept, with a lot of potential versatility for creators to manufacture all sorts of unique artworks. The Eufymake E1 is the first UV printer to bring UV printing to a relatively affordable and approachable point (for the average consumer). The possibilities it offers are exciting indeed, particularly to hobbyists and artists looking to create high quality products in their own homes.
Think of UV printing as existing halfway between traditional flatbed printing and 3D printing. The print head lays down the Ultra Violet sensitive ink, which is then fixed by a high intensity UV light. Essentially, this allows for a UV printer to print onto almost any surface, and to build up multiple layers like a 3D printer (though to a less dramatic extent). Up till now, such printers cost tens of thousands of dollars, but the Eufymake E1 clocks in at a base price of around $2,500 which places it in a tantalizingly affordable position.
There are a lot of factors to consider, because while on the face of it, this printer is potentially revolutionary, much depends on how easy it is to use, and how much it costs to operate. Eufymake provided the E1 for the purposes of this review.
Beautiful print quality overall, with some caveats
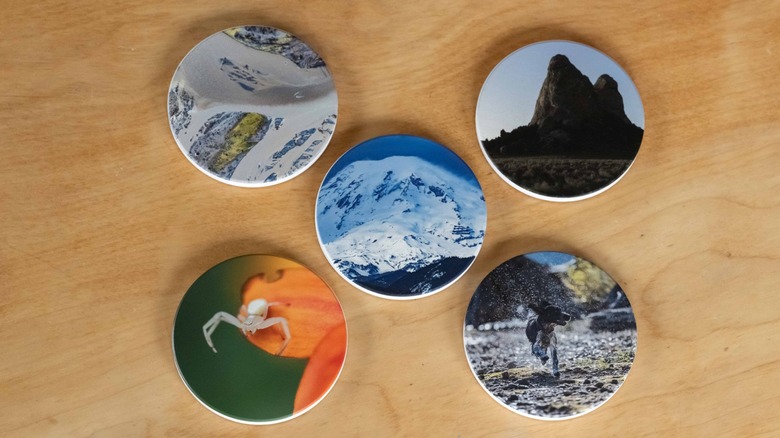
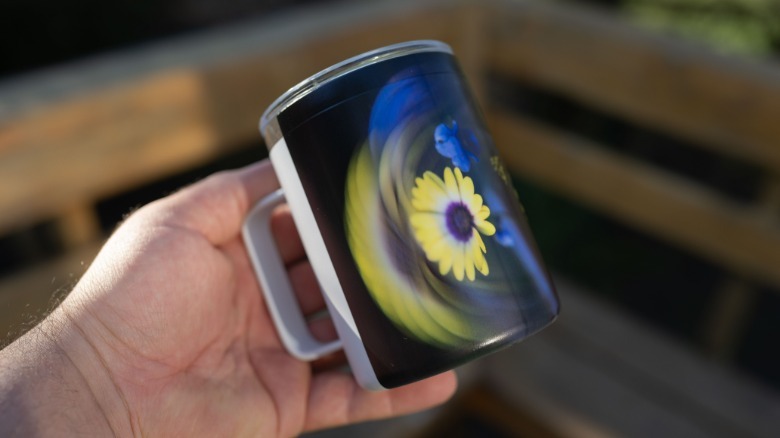
Prints up to about 8 X 10 size look great printed with the Eufymake E1. I really enjoyed printing on cups and small objects such as magnets, and the results are great. The printer is capable of delivering really gorgeous colors and sharp details. Colors are accurate and vibrant, and for smaller scale work the E1 is fairly quick.
Some of my larger prints also turned out very well, but you want to make sure to run a cleaning cycle first, as doing so helps to reduce the chance for print errors to occur. The larger the print, the greater the odds an error will occur, and on large media the stakes are much higher. For example, the colors and detail of a large print on a metal canvas were amazing, but the printer experienced a few errors which resulted in a few yellow and red stripes across the canvas. Also, despite this being a flat print, the printer elevated several elements of the image with an unwanted 3D effect. Additionally, when viewed at an angle, there was a noticeable grid pattern in the print. None of my smaller prints exhibited such issues.
The E1 excelled at rendering bright scenes, but dark scenes tended to be a bit muddy in the details and color rendition. With that said, I did a large canvas print of a photo I captured while flying over the wild Olympic coast, which while some detail was lost in the moody tones, the result turned out spectacularly beautiful, much like an oil painting.
The Eufymake E1 takes some practice to get to grips with in terms of how to get the best results out of it. Once you've got a feel for what works, it delivers reliably excellent prints.
Finding what works for you
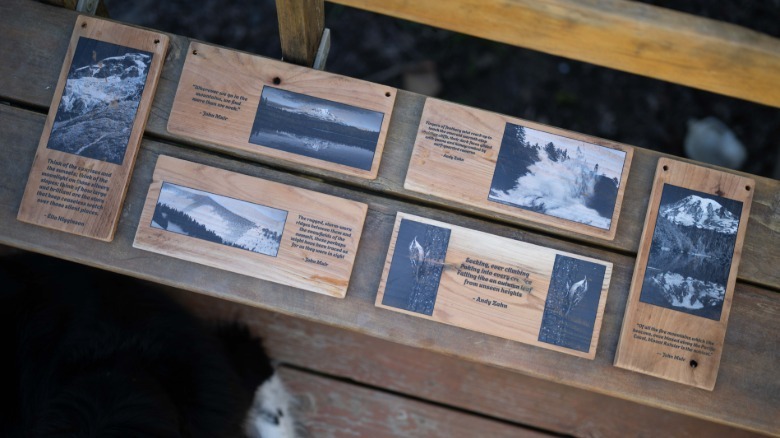
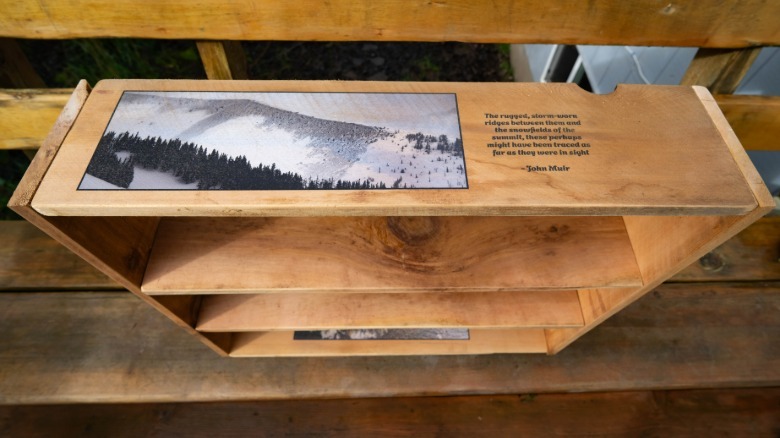
I used the Eufymake E1 for a considerable length of time, and it was only towards the end of my time testing the E1 for this review that I discovered what really worked for me creatively with this device. I personally love the look of black and white prints on rough wood boards, using the software to tweak each image so that the grain of the wood enhances the image itself. I found that I could create some really beautiful works of art from what would normally be considered unusable junk lumber.
My point here is that the Eufymake E1 can print onto just about any surface, and its design is highly conducive to experimentation. That is where this device truly shines; as a tool to unleash creative originality, enabling the creation of novel concepts that would otherwise be either impossible or severely inaccessible to the average person.
 Andy Zahn/SlashGear
 Andy Zahn/SlashGear
 Andy Zahn/SlashGear
I should mention here that there are generative AI features available in the desktop and mobile app. I personally have deep moral and creative reasons to dislike generative AI images, so I didn't print any of these. There's also generative AI integration for creating 3D texture maps of 2D images. However, these require you to use credits to generate, and I didn't like the results of these texture maps. The non-generative 3D texture mapping works OK with very clean designs, but struggles beyond that.
This is all to say that after some experimentation, I found I was most happy using the E1 for 2D printing, and could happily ignore the generative AI and 3D textures. However, your mileage will likely vary, and it's certainly possible to create incredible things using the 3D texture printing capability of the E1.
Results of experimentation

It was a lot of fun trying out different materials, and I want to share a little more of what did and didn't work. First of all, unless you're using the rotary print bed, be sure the surface is reasonably flat.
Secondly, if printing on cardboard, you really want to have a specific type of ink. I didn't have that ink on hand, but I was still able to get OK-looking prints on regular cardboard, though the results were inconsistent. Whether the cardboard was warped or not strongly affected print quality, and that goes for any material. When using a flat print bed, you want to be printing onto flat materials.
 Andy Zahn/SlashGear
I tried printing onto stones, but the volcanic rock in the region where I live is rough, porous, and dark, so I couldn't achieve an acceptable print using it. Prints look great on ceramics, and I expect that smooth, pale stone would also be excellent. Magnets and coasters turned out great, and I am exceedingly pleased with a print I did of a duck on one of Eufymake's wooden canvases.
Stickers and rotary printing
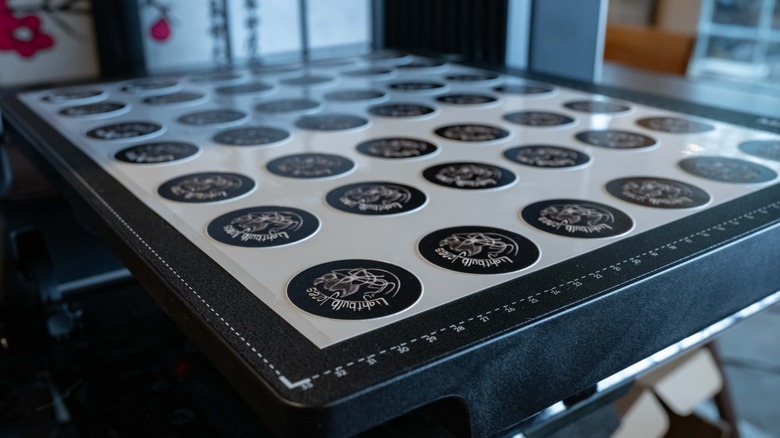
With regard to stickers, I struggled to get good results. I believe this was the result of a combination of my inexperience with sticker printing, the materials provided, and my lack of a computerized cutting device. An automated, programmable cutting tool would allow for accurate cutting of stickers, which would be preferable to scissors or a cutting board.
The big problem with the paper-based sticker material provided is that it's very difficult to remove this from the print bed (which is itself adhesive) without the layers separating and ruining the sticker. Eufymake sells a roll-to-film attachment for the E1, which would likely be a better option for printing stickers, or if using the flatbed, you might want to seek out sticker material with a stronger adhesive layer.
 Andy Zahn/SlashGear
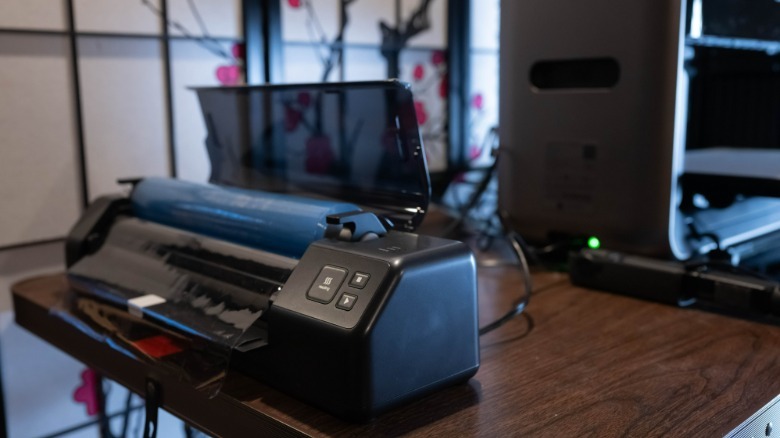
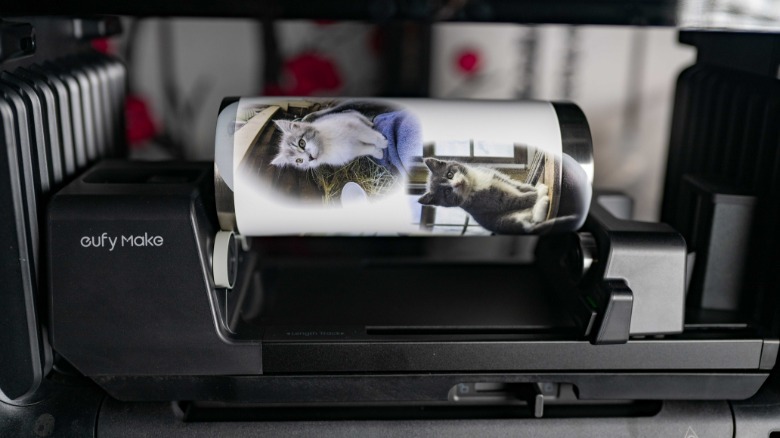
The roll-to-roll film attachment also allows you to do large-format printing, so it has far more use beyond just stickers. I should also note that I had the opportunity to test Eufymake's laminator, which is a great system for laminating your prints, though I ended up mostly printing on objects too bulky to laminate.
 Andy Zahn/SlashGear
Printing on mugs and cups using the rotary print bed is a lot of fun, and produces really excellent results which would otherwise be almost impossible for the average person to pull off at home. It's easy to swap out the different print beds using the simple locking-socket mechanism; it's as close to hassle-free as it gets. Through its various attachments, the E1 can be many different things to different people and their wildly varying creating pursuits.
Software is approachable and powerful, but needs some work
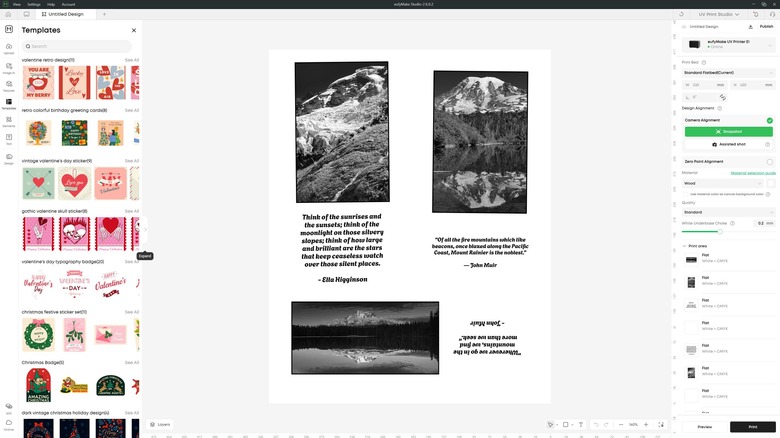
Overall, I find Eufymake's software to be something of a diamond in the rough. It's fairly approachable, and does a good job of guiding the user through its functions. My personal workflow for a typical print starts with injecting ink, then taking a snapshot before manually aligning my design with the printing medium.
This can be a little time consuming, and some of the tools are clunky. I particularly wish that I could mask a particular area of the print bed so that the printer would not print anywhere else. Ideally, this would also include a tool to automatically recognize the print surface and only print on that surface. As it is, if you want to completely cover an object, you will be looking at some over-spray. I started out trying to put down disposable material around the objects I wanted to print, but eventually I gave up and simply learned to live with the overspray. However, Eufymake apparently has an update in the works to address this, which should be rolled out soon.
Placing text boxes is also fiddly work, and there's just generally a feeling that the software here is still a work in progress. I encountered one error that essentially prevented me from printing for a day, but the issue resolved itself the next (I believe it may have been server related). Overall, Eufymake still needs to work some kinks out of its software, but issues aside, there's a good base here on which to build.
Slick design has some weak points
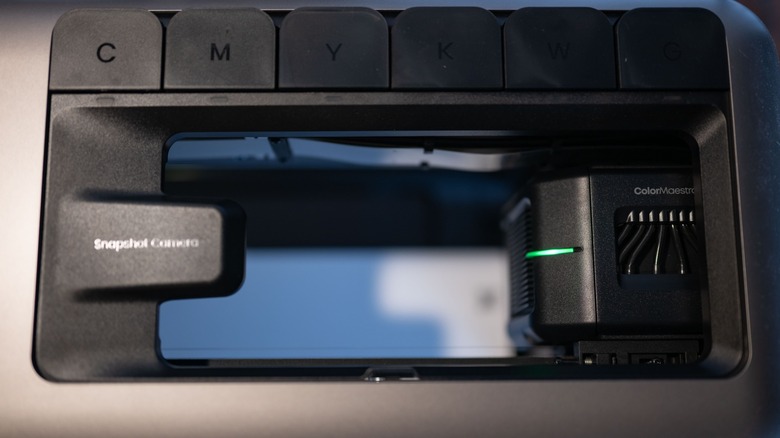
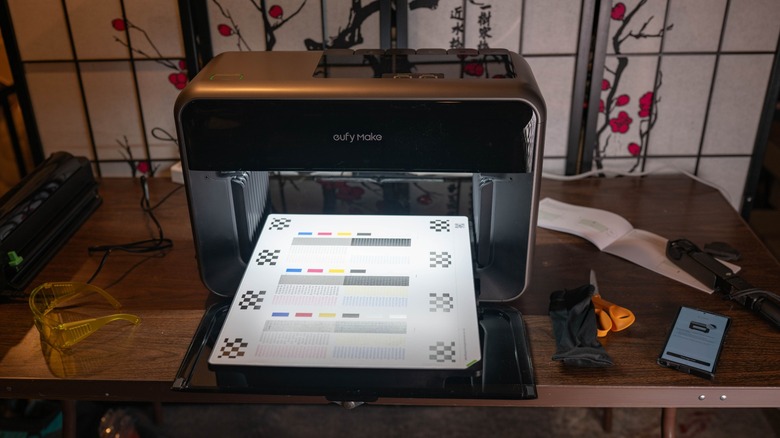
The Eufymake E1 is built like a big rectangular donut, with a large space in its middle where the print surface is placed. This design is clever, as it enables the printer to handle large, bulky, and/or oddly shaped items. Two large doors enclose this opening, the power/print button sits on top of the printer, and ink cartridges are accessed through an opening adjacent to that button, while the cleaner cartridge is located on the side of the device.
The E1 also features its own air filter system, though even with these I found it necessary to run a large 3rd-party air filter machine next to it while printing to reduce the fumes emanating from the printer. It isn't healthy stuff to breathe, and it is highly advisable to operate the Eufymake E1 in a well ventilated room. This isn't the sort of device you want to operate in a small, enclosed office or the crafting corner of a kitchen. It's best suited to a garage or shop with significant ventilation.
Unfortunately, the translucent panels on the sides and top of the Eufymake E1 do not live up to the overall excellent build quality of the rest of the device. For a start, these panels are dust magnets, and the material is such that this dust is very obvious. Similarly, it accumulates fingerprints and smears very easily, and be very careful when cleaning these panels, because the material scratches very easily. Even very soft cloth can leave permanent micro scratches in the exterior, so I would recommend leaving dust and finger prints where they land. Additionally, the weak point mechanically for this printer is definitely the mechanisms which open the translucent panels, as they are clearly more fragile than the rest of the E1.
Ink consumption and cost is a serious consideration
The proprietary ink cartridges for the E1 don't come cheap. A full set of cartridges will set you back $299 (including the cleaning cartridge), or $42.99 each. A full set of 100ML 6 ink cartridges works out to a total of 600ML of ink per cartridge set. A large flat print uses up around 15ML of ink, while a sheet of (mildly) 3D textured stickers uses about the same. That means you get about 40 large print jobs per cartridge set, or roughly $7.50 per large print (not including the printing material itself).
The good news is that for smaller, flat print jobs, you can expect to use as little as milliliter of ink per print, or even less. A large water bottle should only take 1 or 2 ML to print, if you cover the entire bottle with the print. If you're only using the rotary printer or the small print bed, then your ink should last for quite a few print jobs. It's only when you move on to larger prints or 3D/texture jobs that you really start burning through ink. It's also worth noting that I found that white ink (yes, this machine prints in white, unlike many traditional printers) goes the fastest, followed by grey and black. This will of course depend partly on what sort of images you're printing, but white depletes at a rate of roughly 3X as fast as other colors. Black and grey also depleted relatively quickly, though not as fast as white.
Eufymake's own blank materials are generally fairly decent (though I wasn't too impressed with their sheets of sticker paper). The large canvasses they sell are very nice, as are the mugs and water bottles.
Relatively low upfront cost makes UV printing more accessible
As of this writing, the Eufymake E1 is going for $2299 with a coupon code on their own web store for the basic bundle. Costs run up to $3419 for the Deluxe Plus bundle. Compared to the Epson SureColor V1070 (Epson's current hero UV printer) which sells for around $8500 (which itself is a fraction of the price of most other UV printers), the Eufymake E1 is an amazing bargain.
This all means that even considering the exorbitant price of the ink, and the high rate of ink consumption, it will be a very long time before your ink costs begin to approach what you would have spent on a different UV printer. It should also be noted that the much more expensive Epson SureColor V1070 has slightly more expensive first party ink.
Currently, there are no third-party ink cartridges available for the E1, though there are accounts online of users modifying cartridges to refill them with less expensive ink. However, this is a dicey operation from the sounds of it, and not one which I would personally attempt or recommend. I would like to suggest to Eufymake that they consider selling refillable cartridges and bulk quantities of ink at a reduced rate.
Conclusion
Evaluating the Eufymake E1 was challenging, at times frustrating, but simultaneously an incredibly rewarding experience. I put in an enormous quantity of time over the past month getting to grips with the printer. I've probably spent more time testing the E1 for review than any of the many and varied products I've ever covered. So, should you buy one? Maybe.
This is one of those products which is both a bargain and at the same time still pricey enough that a lot of people who're interested in it may still hesitate. Beyond the upfront cost, the cost of ink is quite high, though I eventually concluded that it's not as significant a downside as I first had feared. This is certainly a viable and powerful tool for small businesses and professional independent creators, and it's an absolutely amazing hobbyist tool. I would far rather use the E1 to print my own custom items at home than go through one of the many online print ordering services.
My concerns about the design, and issues with the software aside, at its core the Eufymake E1 is an incredible machine that has greatly inspired me creatively. If you can put up with its eccentricities, then I can definitely recommend it.
The Eufymake E1 is available starting at $2299 from Eufymake's web store, and new orders are expected to begin shipping in April through mid-May 2026.
UPDATE: In-stock retail availability will start May 6, 2026 with a basic bundle price of $2,299. Sign-ups for this printer through the Eufymake website between April 8 and May 5 include potential promotional offers like complimentary ink, vouchers, and shipping protection.