How To Remove The Dull Finish From Your Bumper So Your Car Doesn't Look Outdated

Buying and owning a new car is a great experience. Everything just works — most of the time — and everything on the car looks shiny and fresh just as it's supposed to do. However, with the average price of a new car sitting scarily close to $50,000 in recent years, more and more of us are finding the used car market looking so much more appealing, and frankly, just a touch more sensible.
However, not only do used cars pose some reliability risks, especially if they are higher mileage, or getting on a bit in terms of age, but they tend to look a bit worn in comparison to a brand-new car. There is only so much you can do about that, unless you're an expert detailer who's savvy when it comes to paint corrections and interior valets, but for the rest of us, we largely learn to just put up with our car's wear and tear.
It doesn't need to be that way, though. A car's age can be masked with a little tender love and care, and while addressing the entire car might take ages, keeping on top of key areas like the front bumper can be easily managed. Be it a dull gray bumper that needs a little extra shine, or a dull painted bumper which has lost its luster, there are answers out there for you.
Those faded gray bumpers are fairly easy to rectify with an assortment of gels and solutions, and we'll get to those shortly, but first we'll address painted bumpers, as those are more common on modern cars. Methods such as sanding out fine scratches and touching in deeper marks can help your old beater to shine once again.
Here's how to revive dull paint on your front bumper
Flat paint is something that just happens over the course of a car's life. Filth from the road, dirty rain, and continuous exposure to sunlight will soon see that glossy new-car shine become a thing of the past. Fortunately, it's not lost forever, and it's not hard to coax it back into life either.
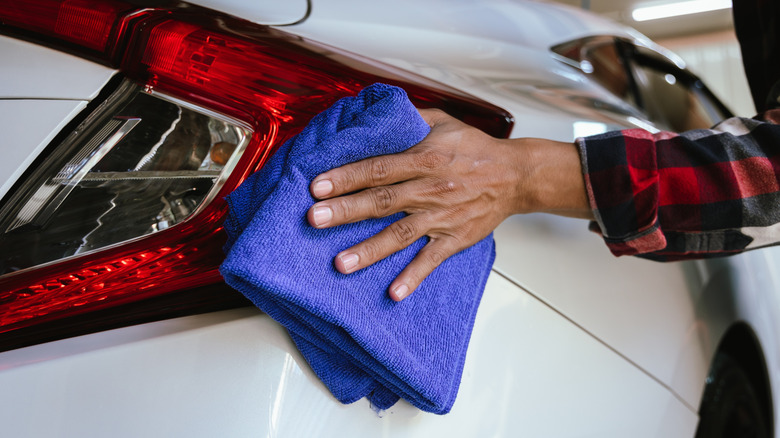
If the bumper is simply dull, but not heavily scratched and chipped, then a simple clean and polish will see it sparkling again. There are dozens of products you can use here, but to keep things simple and cheap for first-timers, here's a quick and easy approach. Simply wash the bumper down with warm water and car shampoo. Before rinsing the soapy mixture off, massage it with a soft bristled brush to help remove more stubborn contaminants. Once done, hose the bumper down, and then dry it with a clean towel or microfiber cloth.
Now, to add the shine, simply use a buffing pad and some generic car polish — there's no need to fork out for expensive waxes if all you're seeking out is a little extra shimmer. Apply the polish in a circular motion, fold the cloth to reveal a clean area, and then buff the polish off the same way.
Reviving a dull gray bumper is done in a very similar way, but instead of polish, you'll use a specialist solution which revives that dark gray plastic color instead. Simply clean the area as before, apply the solution as instructed on the bottle, and stand back to admire the results.
Here's how to tackle even tattier bumpers

If your bumper is dull because it's covered in scratches and stone chips, then you'll need to get a bit more involved. First, you'll address the scratches. The initial step is the same as before, the surface area needs to be clean and free of any road grime, so give it a thorough wash before attempting to remove the scratches.
Once that's done, it's important to assess how deep the scratches are. If you can't feel them by running your nail across them, they are fine and can be removed. If they are deep and you can feel them, or see the base material beneath, it's best to consider filling them with touch-in paint instead, as you could the stone chips. To remove fine scratches, lightly sand over them various different grits. A popular method for DIY removal of scratches is to begin with 1200-grit paper, then move up in increments of 200-400 until the final pass with a very fine-grit piece. Once done, use a polishing compound to brighten the area up (use the same circular, on-off method as per previously mentioned) and you should be left with no or at least reduced scratches.
As for deeper scratches and chips, seek out a color-matched touch-in paint pot, and then use a fine brush to fill in the damaged area. It's difficult to get a perfect finish, so take your time here, and have a clean cloth to quickly wipe up any spills. The finished result won't be showroom-fresh, but it should be smarter than a bumper covered in chips and scratches.