How To Scan From A Printer To A Computer (The Easiest Way)

Sometimes, you may need to turn a physical document into a digital file, either to keep a copy on your computer or send it to someone via email. If you have an all-in-one or multi-function printer, you can use its built-in scanner for this. You simply need to place the document on the scanner bed or feed it through the automatic feeder, then start the scan using the printer.
Many printer brands also offer their own software that lets you scan from your computer. For instance, if you have an HP printer, you can use the HP Smart app to scan documents. Similarly, those who have a Brother printer can use its iPrint&Scan app. However, these apps often pack in a lot of features, so they can feel a bit tricky to navigate. And if you have more than one printer, you might have to install a separate app for each one.
The good news is, you don't necessarily have to stick to manufacturer-specific apps to get the job done. Both Windows and macOS offer tools that let you easily scan documents from your printer. So, if you want to avoid downloading extra software, it's best to use these built-in tools on your PC or Mac.
How to scan documents from a printer to a PC
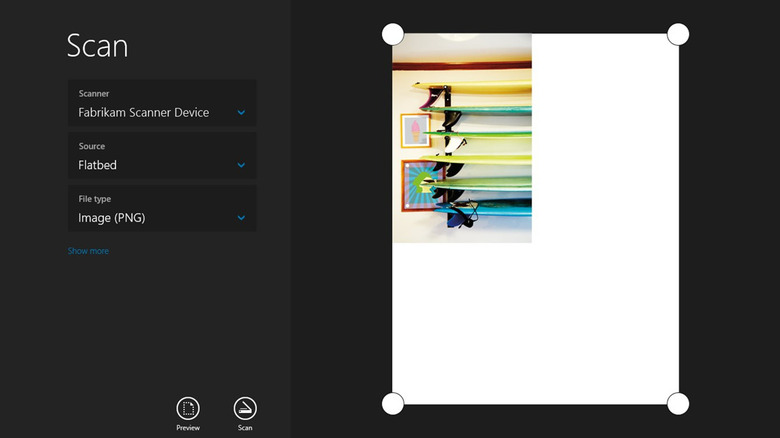
Microsoft offers the Windows Scan app that you can use to capture documents and save them to your PC. To use it, you first need to add your printer to the PC if you haven't already. You can do this by plugging the printer in with a cable or connecting it to the same Wi-Fi network as your PC. Then, head to Settings > Bluetooth & devices > Printers & scanners and click Add device to set it up. Once the printer is added, here's how you can use it to scan documents:
- Download and install the Windows Scan app from the Microsoft Store.
- Open the Windows Scan app and select your printer using the drop-down menu.
- Place the document you want to scan in the feeder or on the scanner bed.
- In the Scan app on your PC, select your preferred file format, such as JPEG, PNG, or PDF.
- Optionally, you can click the "Show more" option to adjust the resolution and change the location where the document will be saved.
- Click the Scan button.
- Wait for the scan to complete and click the View button to open the file.
By default, Windows saves scanned documents in This PC > Documents > Scanned Documents or in C: > Users > [your username] > Pictures > Scans. From there, you can share them via email or through other methods.
How to scan documents from a printer to a Mac
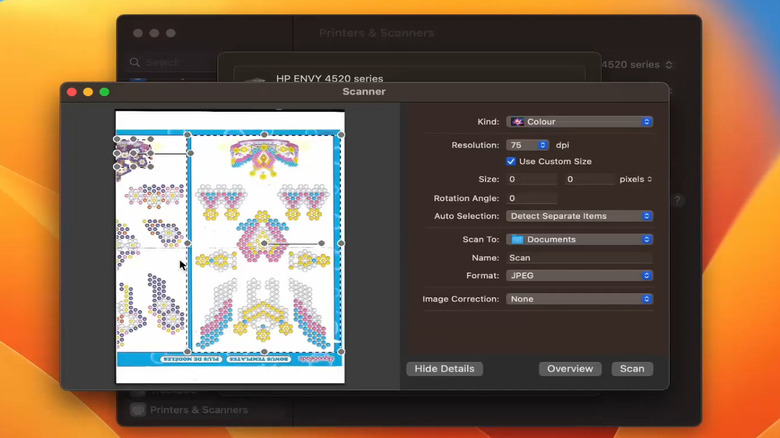
Scanning documents from a printer to a Mac isn't too difficult either. If you haven't added your printer yet, connect it to your Mac with a USB cable. If it's a wireless printer, simply connect it to the same Wi-Fi network as your Mac. Next, head to System Preferences > Printers & Scanners and click the plus (+) button at the bottom to add your printer. Once the printer is added, you can start scanning documents to your Mac. Here's how:
- Turn on your printer and place the document on the scanner bed or into the feeder.
- On your Mac, click the Apple menu in the top left corner and select System Preferences.
- Click Printers & Scanners.
- Select your printer from the list of devices and then switch to the Scan tab.
- Click the Open Scanner button.
- Use the drop-down menus at the bottom to specify the save location and document size.
- Click the Show Details option to change the document name, format, resolution, and more.
- Click Scan to confirm, and your document will be saved to the folder you chose.
If your printer doesn't have a scanner, you can use your computer's webcam to capture the document instead. Another option is to scan the document using your Android or iPhone, then transfer it to your computer.