How To Use Your iPhone As A Raspberry Pi Monitor
Imagine this — you're packing for a week-long trip to the mountains and realize that while there, you need to finish up some work you can only do on a desktop. Unfortunately, you can no longer squeeze a laptop in your bag, and you're also not too keen on bringing an expensive device in the rugged outdoors. In that case, the best alternative is to pack a Raspberry Pi instead.
It's compact but powerful and can pretty much handle most tasks normally done on a Windows or Mac computer. You just need to connect some Raspberry Pi accessories like a monitor, keyboard, and mouse to your board, and you're all set. However, you can't just lug around a standard desktop monitor to use with your Pi. You can go for other portable options like the official seven-inch touch display, but if you really want to pack as light as possible, there's an even smaller monitor you can use: your iPhone. Software-wise, this setup only requires three apps: the Raspberry Pi Imager, Termius, and RealVNC Viewer. We'll walk you through the step-by-step of how to use your iPhone as a monitor for your Raspberry Pi.
Step 1: Configure the Raspberry Pi for wireless connection
You'll be connecting the Raspberry Pi and your iPhone wirelessly, so it's important that your board is already set up for such a connection. Here's what you need to do:
- Install the Raspberry Pi Imager on your desktop.
- Flash the Raspberry Pi OS to your microSD card using the Raspberry Pi Imager.
- Insert the microSD card into your computer.
- Launch the app.
- Choose your Raspberry Pi Device and Operating System.
- Select your microSD card as the Storage.
- Press Next.
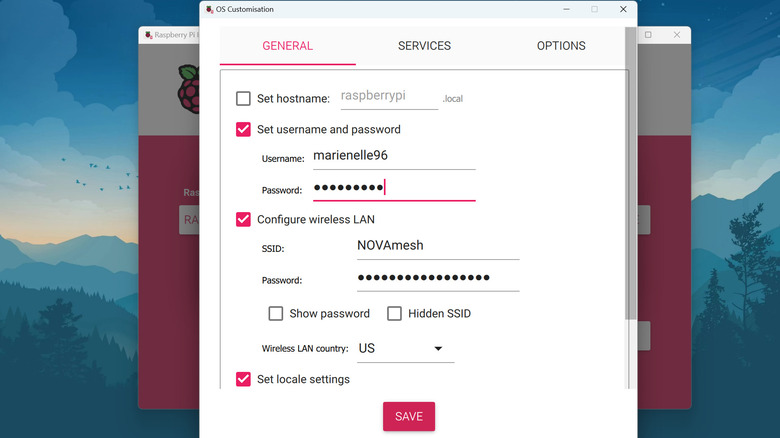
- In the Use OS customization dialog box, click Edit settings.
- Enable "Set username and password" using your preferred username and password.
- Turn on "Configure wireless LAN" with your Wi-Fi's name as the SSID, your Wi-Fi's password as the Password, and your country code as the Wireless LAN country.
- Enable "Set locale settings" with the correct Time zone.
- Go to the Services tab.
- Check the box to Enable SSH.
- Select Use password authentication.
- Click Save to exit the OS Customization window.
- Press Yes to apply your customized settings.
- Click Yes again to proceed with the flashing process.
- Once that's done, eject your microSD card.
- Insert it into your Pi.
- Power up the board.
- Connect your accessories like keyboard and mouse to make the Pi fully functional as a computer.
Step 2: Set up your iPhone
With the Raspberry Pi ready, it's time to configure your iPhone and subsequently connect it to the board. Follow these steps to do so:
- On your iPhone, install Termius to run terminal commands and RealVNC Viewer to display the Pi's screen on your mobile device and manage your Raspberry Pi board remotely.
- Launch Termius.
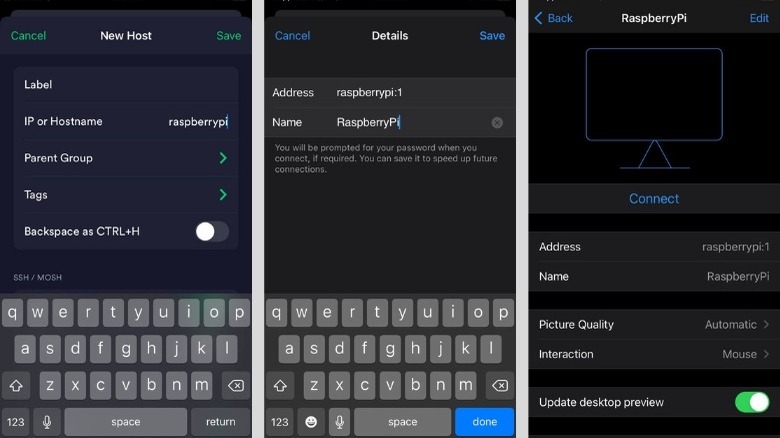
- Tap on New Host.
- Type raspberrypi in the Hostname field.
- Press Save in the top-right corner.
- On the Hosts page, select the raspberrypi host you just created.
- Log in with your username and password. You should now be able to access your Pi's command line interface.
- On the command line, type sudo apt-get install tightvncserver.
- Press Enter to install the tightvncserver software. You'll use this to connect to RealVNC Viewer on your phone.
- Set up the tightvncserver.
- Type in tightvncserver.
- Press Enter.
- Set your eight-character password.
- Type N to skip creating a view-only password.
- Take note of the new desktop value for your Pi (typically raspberrypi:1).
- Exit the Termius app.
- Launch RealVNC Viewer.
- Tap the plus icon in the top right.
- Type your new desktop value as the Address and your preferred name in the Name field.
- Hit Save.
- Tap Connect to connect with your Raspberry Pi.
- In the Encryption screen, press Connect.
- In the Authentication screen, enter your tightvncserver's password.
- (Optional) Enable Remember Password, so you won't have to type your password every time.
- Press Continue to proceed with the connection. Your Pi's desktop GUI should now be displayed on your iPhone screen.
- Use the Pi as usual.