5 Ways To Make Your Own Animated GIFs
You're messaging your friend, and they just told you the juiciest gossip you've ever heard. It's so utterly surprising that words simply won't cut it. So what do you do instead? You send a GIF of Chris Pratt's iconic surprised expression (from that one scene in "Parks and Recreation"), and it perfectly conveys your shock without typing a single word or needing to film a reaction video. That's the beauty of GIFs — they can easily get the message across without much of a hassle. Besides messaging, GIFs are also great for other use cases like giving flair to your otherwise static and boring presentation or serving as a fun social media post announcing your small business's new opening hours.
While the web is loaded with GIFs for nearly every mood or moment, sometimes you just won't find the exact expression for your situation. That's where making your own GIF can come in handy. We'll walk you through five ways to create a custom animated GIF using Photoshop and Photoshop alternatives like GIMP and Canva.
Using Photoshop
When it comes to editing photos, Photoshop is one of the top software of choice. However, you can also use it to turn your videos or photos into GIFs. To make an animated GIF in Photoshop, here's what you need to do:
- Create a new file in Photoshop.
- If using a video:
- Drag and drop your video file into Photoshop.
- (Optional) Change the size via Image > Image Size. Adjust the width and height to your preferred dimensions. Then, press OK. When prompted to transform the video layer to a smart object layer, select Convert.
- (Optional) Trim the video down by adjusting the start and endpoints of the video in the Timeline window.
- Press the play button on the Timeline window to preview the video.
- If using photos:
- Import your photos as separate layers via File > Scripts > Load Files into Stack. In the Load Layers dialog box, press Browse and choose the photos you need for your GIF. Hit OK to confirm.
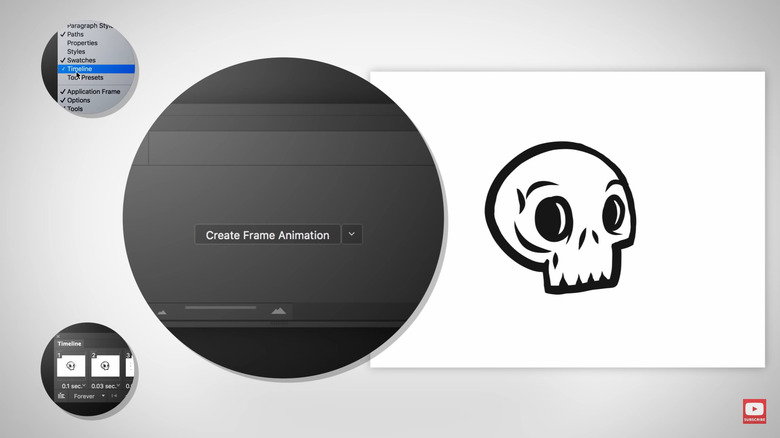
- Navigate to Window > Timeline.
- Press the Create Frame Animation button in the Timeline window that opens.
- Still in the Timeline window, select the hamburger menu at the top-right.
- Enable Make Frames From Layers.
- Change the time each frame is displayed by clicking on "0 sec." under each frame in the Timeline window and setting it to your desired duration.
- (Optional) Drag and drop the frames to rearrange them.
- To save your GIF, navigate to File > Export > Save for Web (Legacy). In the Save for Web dialog box, ensure that GIF is selected (found at the top) and Looping Options is set to Forever (located at the bottom) before hitting Save.
Using GIMP
GIMP is a standout choice for those in need of advanced photo-editing capabilities but without the hefty Photoshop price tag. And just like Photoshop, GIMP allows you to make a custom GIF. Follow these steps to do so:
- Open your photos in GIMP by going to File > Open as Layers and selecting all the images you'll be using.
- Drag the layers to rearrange your photos in the desired order, with the top layer appearing first in your GIF.
- If necessary, adjust subsequent layers to ensure a smooth transition from the first layer.
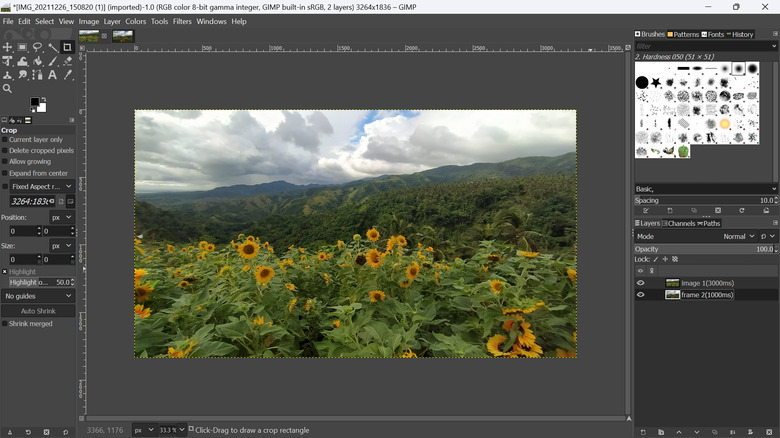
- Rename each layer in the Layers panel to include the frame duration you want in parentheses. That means the first layer can be "frame 1(500ms)" and the second layer "frame 2(300ms)."
- To check your animation, navigate to Filters > Animation > Playback, then click the play button.
- Reduce your image's file size by selecting Filters > Animation > Optimize (for GIF).
- Go to File > Export As.
- Press Select File Type.
- Choose GIF image from the options.
- Hit Export.
- In the Export Image as GIF dialog box, enable As animation and Loop forever.
- If you didn't set frame durations earlier, specify your desired delay in "Delay between frames where unspecified." Check "Use delay entered above for all frames" for uniform timing.
- For "Frame disposal where unspecified," select "One frame per layer (replace)" and ensure "Use disposal entered above for all frames" is enabled.
- Click Export to save your custom GIF.
Using Canva
One thing you probably didn't realize you can do in Canva is make animated GIFs. Here's how:
- Log into Canva if you haven't already.
- Click on Create a design at the top.
- Search for "animated social media" if you want a square GIF or "video" if you want a landscape rectangle GIF.
- To turn a video into a GIF:
- Upload your video to Canva. Alternatively, select one from Elements > Videos or Design > Templates.
- Drag and drop the video onto your empty page.
- Adjust the position as necessary.
- (Optional) Increase the playback speed by selecting Playback at the top and changing the Video speed.
- Shorten your video to the desired length by dragging the edges of the video. Free accounts can download up to one-minute GIFs and paid accounts up to two-minute GIFs, but generally, short five-second GIFs work best.
- (Optional) Add a text and animate it.
- To turn photos into a GIF:
- Upload the photos you want to use.
- Place each photo on a separate page.
- Adjust the position and size as needed.
- Click on the time indicator at the top.
- Set it to one second per page.
- Turn on Apply to all pages.
- To turn a design made of Canva elements into a GIF:
- Add any elements you like. Animated stickers are best, but you can also use static graphics.
- Adjust the GIF duration by clicking on the time at the top and entering your preferred time.
- To animate the entire page, select the Animate button and choose your style.
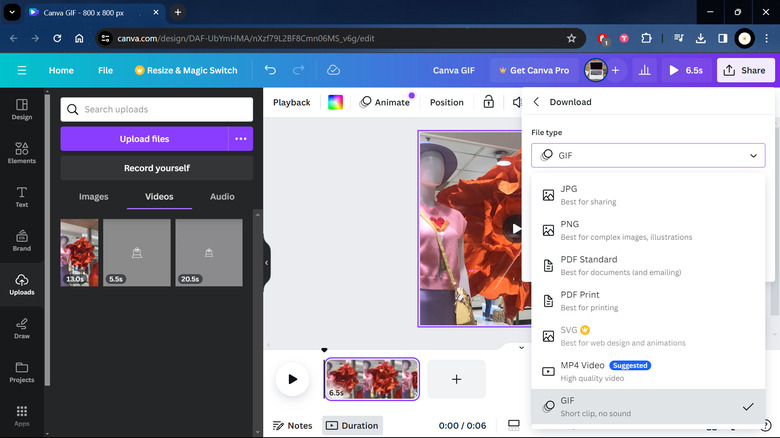
- Download your creation by selecting Share > Download, changing the File type to GIF, and pressing the Download button.
Using PowerPoint
Aside from helping you make presentations for your boss or school, PowerPoint is also a surprisingly great tool for creating GIFs. Here's a step-by-step guide to turning your PowerPoint slides into animated GIFs:
- Start with a blank presentation.
- Change the slide size by going to Design > Slide Size > Custom Slide Size. Adjust the width and height to your liking.
- Using a video:
- Go to the Insert tab.
- Select Media on the far right of the ribbon.
- Choose Video > This Device.
- Position the video on your slide.
- (Optional) Use the Video Format tab to adjust the video's size, border, shape, color, and brightness.
- (Optional) Trim the video or add a fade duration by selecting the video and clicking the Playback tab that appears at the top.
- To save your presentation as a GIF, navigate to File > Save as. Choose the destination and make sure to change the file type from PPTX to Animated GIF Format.
- Using photos:
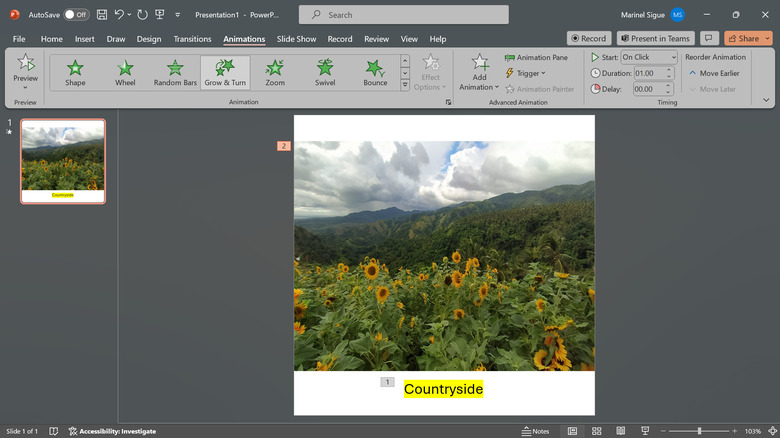
- Upload your photos to PowerPoint from Insert > Pictures > This Device.
- Place a different photo on each slide for a sequence or use just one and animate it. To animate your photo, head to the Animations tab and pick your effect. Adjust the Duration and Delay based on your preferences. Hit the Preview button to check out how your animation looks.
- (Optional) Add an animated text via Insert > Text Box. Type in your text and change the font, size, color, highlight, background, and alignment in the Home tab. Then, go to Animations and apply your effect of choice.
- To save as a GIF, go to File > Export > Create an Animated GIF. Choose the quality, set the time per slide, decide which slides to include, and if needed, make the background transparent. Hit Create GIF.
Using GIPHY
GIPHY is most people's go-to database for ready-to-use GIFs, but it also comes complete with a nifty GIF maker should you want to create your own. Follow these steps to use it:
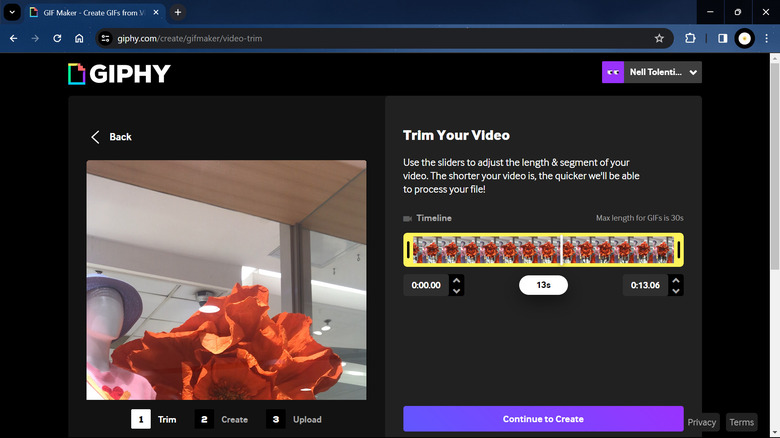
- Head over to the GIPHY Create page.
- Sign up for a free account if you don't have one already.
- In the GIF section, click on Choose File. You can use JPG, PNG, GIF, MP4, MOV, or WebM formats.
- For videos:
- Trim your video by dragging the edges or entering the start and end timestamps. Do note that you can make GIFs for up to 30 seconds only.
- Hit the "Continue to Create" button.
- (Optional) Decorate your GIF with a text, sticker, or filter.
- (Optional) Switch the Loop Type to Reverse to reverse the video.
- Adjust the GIF's size as necessary.
- For photos:
- Transform your static photo into a GIF by adding an animated sticker. Select Sticker (folded circle icon), search for the sticker you want to use, and click on it to place it on your photo.
- (Optional) Add a text by clicking on the Aa icon. Type in your caption and change the font style, color, outline, and alignment.
- (Optional) Apply a filter for extra visual appeal.
- Change the aspect ratio of the photo as needed.
- Once you're happy with the custom GIF, press Download at the bottom to save it to your device.