How To Make A GIF In Photoshop
Scrolling through the internet, whether that's on a social media app or your favorite website, isn't complete without encountering at least a couple of GIFs now and then. This image file type has indeed conquered the web because, unlike JPGs or PNGs, they're dynamic and fun to view. This makes them the perfect format not only for creating funny memes but also for conveying ideas and messages for advertisements.
If you're thinking of using a GIF on your social media platform or blog, there's a host of websites where you can download them, including Giphy, Pixabay, and Tenor. However, if you want to generate a GIF using your personal photos, you can turn to Adobe Photoshop instead. Photoshop comes complete with tools to help you convert a series of static images to a looping animated GIF, and don't fret — the process is actually pretty easy. We'll walk you through exactly how to make a custom GIF with Photoshop.
Making a GIF using Photoshop
Before creating a GIF in Photoshop, you first need to have your files ready. These can either be a short video or a series of images (preferably photos shot in a sequence and with the use of camera accessories like a tripod). Afterward, follow these next steps:
- Launch Photoshop.
- Import your file.
- For short videos:
- Click on the File tab at the top menu bar.
- In the drop-down menu, navigate to Import > Video Frames to Layers.
- Import your video file.
- In the Import window, hit OK to convert your video to individual layers. If the clip is too long for Photoshop, click on Selected Range Only in the Import window to shorten it.
- For photos:
- Select the File tab.
- Go to Scripts > Load Files into Stack.
- In the Load Layers window, hit Browse and select all the images you wish to add to your GIF.
- Click on OK to finish. You can now see your photos as new layers.
- For short videos:
- Open the Timeline panel by clicking on the Window tab and selecting Timeline from the drop-down menu.
- In the Timeline panel, hit the arrow-down button.
- Select Create Frame Animation from the menu.
- Hit the Create Frame Animation button next to the arrow to load the first layer in your GIF.
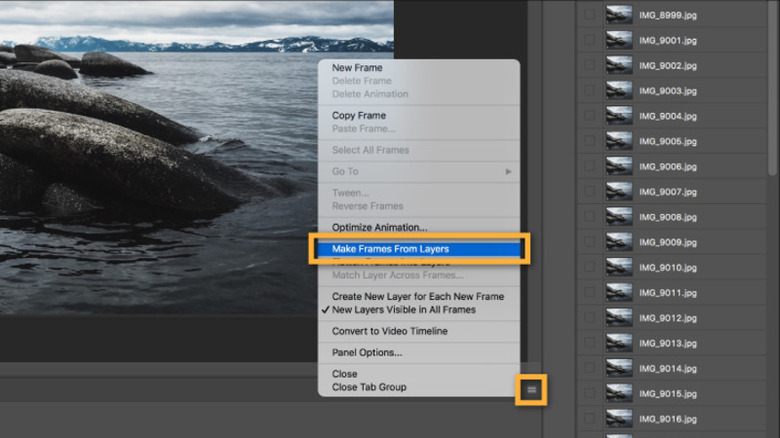
- Load the rest of your layers by opening the Timeline menu (hamburger menu icon in the top right of the Timeline panel) and choosing Make Frames From Layers from the options.
- Preview the GIF by pressing on your spacebar to play it. If it's playing in reverse, open the Timeline menu again and select Reverse Frames.
- In the bottom left of the panel, select Once and change it to Forever to loop your animation.
- Preview what the animation looks like by pressing the Play button.
- Once you're happy with the animated GIF, export your file. Select File from the top menu bar and go to Export > Save for Web (Legacy). In the new window, set the Preset as GIF 128 Dithered, Colors as 256, and Looping Options as Forever. Optionally, you can change the width and height under Image Size to reduce the GIF's file size. Hit Save.