How To Restore An iPhone From A Windows Backup Without iTunes

If you own an iPhone, one of the easiest ways to secure your data is by backing it up to iCloud. You will most likely need to pay for additional iCloud real estate to accommodate your iPhone's full storage capacity, but if you take the plunge and splurge on iCloud+ — which costs between $0.99 to $59.99, depending on how much storage space you need — you can easily save a copy of your essential iPhone information online and restore it to a new (or newly erased) iPhone.
Alternatively, you can also opt to back up your iPhone to a computer. Of course, if you have a Mac, the process of doing so should be seamless as both devices are part of the Apple slate of products. Creating an iPhone backup on a Windows PC — and restoring it to an iPhone — is also doable, but the process is often met with difficulty, according to several online forums.
Why PC users are having issues creating and restoring an iPhone backup

Simply put, part of the problem is iTunes. As of this writing, most of the guides and support pages online that outline steps on creating and restoring a backup of an iPhone using a Windows computer still suggest using the mostly obsolete Apple app, which hasn't received an update since 2020. On Apple's official iTunes page, where you can see the system requirements needed to run the app on a PC, it still says Windows 10. Incidentally, most of the online forums we've visited, on which users relayed problems completing the process, all have Windows 11 on their machines. This is a telling sign that iTunes as an app may no longer be receiving full technical support, perhaps due to the emergence of newer services like Apple Music and Apple TV.
Of course, there's a myriad of third-party programs that you can try installing on your computer to copy your iPhone's contents and transfer them to a newer (or newly erased) device. However, the effectiveness of these services and their ability to completely extract all the necessary information can be hard to verify until much later, when it could be too late. They may also not be free to use and may have limited features.
Thankfully, all hope is not lost for Windows computer users — there is a largely unknown alternative to using iTunes to back up and restore your iPhone to a PC.
Use this new Apple app instead
When you visit the iTunes home and click around long enough, you'll eventually land on a new support page discussing three new apps that are designed to replace different iTunes features. One of them is Apple Devices, a dedicated app that'll help you manually back up and restore your iPhone or iPad on a Windows computer, among other things.
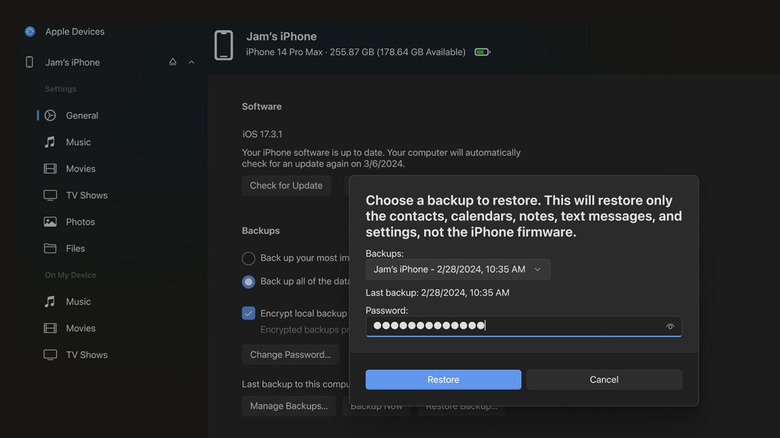
We learned about Apple Devices and how to use the app to back up an iPhone to a computer on Windows. Once you download it to create a backup, similar steps can be employed to restore an iPhone with it:
- Launch Apple Devices on the Windows computer you created the backup on.
- Connect the iPhone you want to restore the backup to using a compatible USB cable.
- If it pops up on your iPhone, hit Trust on the "Trust This Computer" box. Enter your iPhone passcode if required. However, if you've used Apple Devices before to do the back up process, the same iPhone should automatically show up on your computer screen.
- Select your iPhone from the Apple Devices left-side panel.
- Select General from the left-side panel.
- Hit Restore Backup.
- Select your most recent backup from the dropdown list.
- If your backup is encrypted, enter the password you assigned to it.
- Hit Restore.
Note that before you can use a backup to restore an iPhone, Find My must be disabled temporarily on your mobile device. In addition, only your iPhone's contacts, calendars, notes, text messages, and settings will be restored through the Windows backup. Much like the backup process, expect this task to take a while, so make sure you temporarily disable your iPhone lock screen and keep an eye on both your iPhone and computer for progress updates.