Every Way To Take A Screenshot On Mac

Whether you and your friend are cramming for an exam and need to share lecture slides with each other or you'd like to share snippets of a presentation with a colleague, you've probably needed to take a screenshot on your Mac at some point in time. While using the volume buttons to capture a screenshot on an iPhone feels like second nature to most people, it's usually not the same way when it comes to Macs.
Fortunately, on Macs, the options are limitless. For instance, unlike iPhones, Macs have a sniping tool that allows you to capture only a portion of the screen, and you can save it to your Files or copy it to a clipboard. You're also not limited to using macOS's built-in features – you can use third-party tools as well! So, whether you're wondering how to take a screenshot of an entire webpage or simply want to figure out which Mac keyboard shortcuts to use, we've got you covered.
Take a screenshot of your entire screen

If you're deep into the Apple ecosystem and have been using a Mac for a while now, you've probably noticed that Apple seems to prioritize ease of use. The quickest and most straightforward way to take a screenshot on a Mac is by using keyboard shortcuts. Most Mac keyboard shortcuts out there are quite similar to the ones you'll find on a good old PC, with the only difference usually being the use of the Command key instead of the Control key. However, unlike PCs, there's no Print Screen button present on a Mac's keyboard, which you can use to take a screenshot.
Instead, you need to press the Command, Shift, and the number 3 keys on your keyboard simultaneously to take a screenshot of your entire screen. Given that your Mac's volume isn't turned all the way down, you'll see a preview of your screenshot at the bottom-right corner of your screen and hear a sound indicating that the photo has been captured. The screenshot will now be saved to your Mac's desktop. If you'd like to copy it to your clipboard instead, all you need to do is press and hold the Control keys along with the others. So, the keyboard shortcut to take a screenshot of your entire screen and copy it to your clipboard is Command, Shift, Control, and 3.
You can also take a screenshot of only the window or menu you're currently using by long-pressing Shift, Command, 4, and the Space bar. Your cursor will turn into a camera icon automatically. If you're using Split View and would like to capture only one window, simply move the cursor to that window and click it once it's highlighted.
Take a screenshot of part of your screen

Say you want to take a screenshot of a specific part of your screen, perhaps a certain paragraph from an essay. One option is to take a screenshot of the entire screen and then crop it. A simpler way to do the same thing is to long-press the Shift, Command, and 4 keys simultaneously. Upon doing so, your Mac's cursor will be turned into a crosshair automatically.
All you need to do is drag the crosshair across the part of your screen that you'd like to screenshot. You can also press and hold the Option key to resize your selected portion. Similarly, if you'd like to move your selection, you can do so by pressing and holding the Space key. If you'd like to copy your screenshot to your clipboard instead of it appearing on your desktop, simply press the Control key as well. So, your new shortcut would become Command, Shift, Control, and 4.
Use your Mac's built-in snipping tool
One of the most underrated Mac features is the built-in snipping tool. Mac's snipping tool is similar to the app you'll find on Windows computers. To use the snipping tool to capture a screenshot on your Mac, you'll need to launch the Screenshots app. You can find it by clicking the Launchpad icon on your Mac's Dock and finding the Screenshots app. Unless you've customized your Mac's layout, you should find it in the "Other" folder by default. Alternatively, you can also launch Screenshots by pressing the Command, Shift, and 5 keys simultaneously.
A toolbar will now appear at the bottom of your screen. You should now see the following three buttons – Capture Entire Screen, Capture Selected Window, and Capture Selected button. The Screenshots app also features two additional buttons since you can use the snipping tool to record your Mac's screen as well. However, since you'd like to capture a screenshot, all you need to do now is pick from the three buttons we've mentioned above. One of the primary reasons why we recommend using the snipping tool to capture your Mac's screen is that you can use it to take timed screenshots.
Once the toolbar appears, click Options and choose 5 seconds or 10 seconds from the menu that appears. So, if you'd like to have more control when capturing screenshots, it's a good idea to use the snipping tool instead of relying on keyboard shortcuts solely.
How to take a scrolling screenshot on a Mac
Unfortunately, macOS has yet to launch a built-in feature that lets you capture scrolling screenshots with a click of a few buttons. While there are many third-party applications out there that you can use to take a scrolling screenshot, most are often paid, or their free versions have limited functionality.
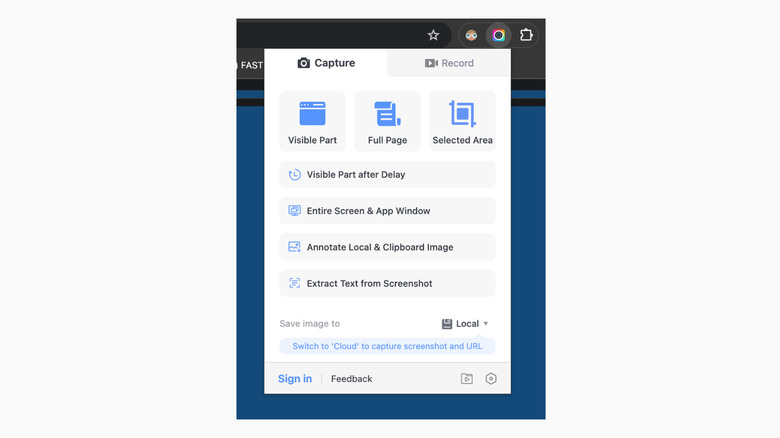
There are tons of extensions you can use to take scrolling screenshots instead. One great example is the Awesome Screen Recorder & Screenshot extension, which you can use on Chrome, Safari, Microsoft Edge, and Mozilla Firefox. Once you download the extension, you'll see two different tabs upon launching it — Capture and Record.
Simply click on the Capture tab. Now, you'll see three different buttons: Visible Part, Full Page, and Selected Area. Since you'd like to capture a screenshot of the entire webpage, choose Full Page. All you need to do now is wait for your entire page to be captured. Make sure to not move your cursor or attempt to scroll through the webpage while the screenshot is being taken. You'll then be taken to a new tab, where you can preview and edit your screenshot. Once you're satisfied, click the Done button at the top-right corner of the screen. Finally, click Download.
How to find your Mac screenshots and change their format
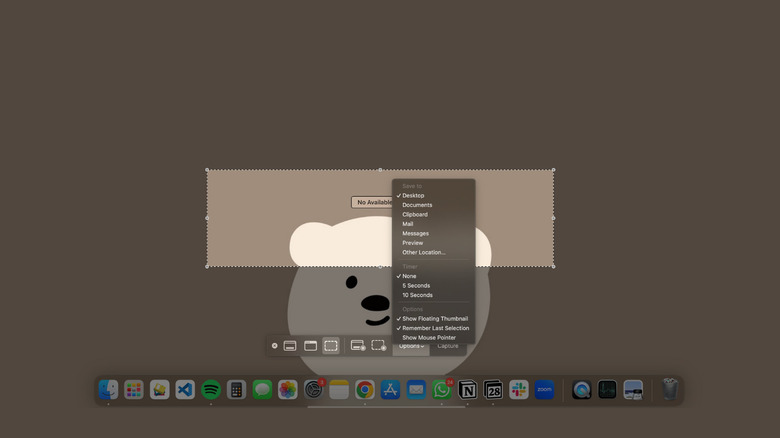
By default, all screenshots you capture are saved to your Mac's desktop. If you'd like to change the location where your screenshots save, there's fortunately a way to do so. Press and hold the Command, Shift, and 5 keys simultaneously. Once the snipping tool appears, click Options. Now, you can check where Mac screenshots are saved. If you haven't messed around with this setting before, Desktop will be checked by default. You can choose to save the screenshots to Documents, Clipboard, Mail, Messages, Preview, or another location of your choice. Once you've chosen a location, any screenshots you take moving forward will be saved there.
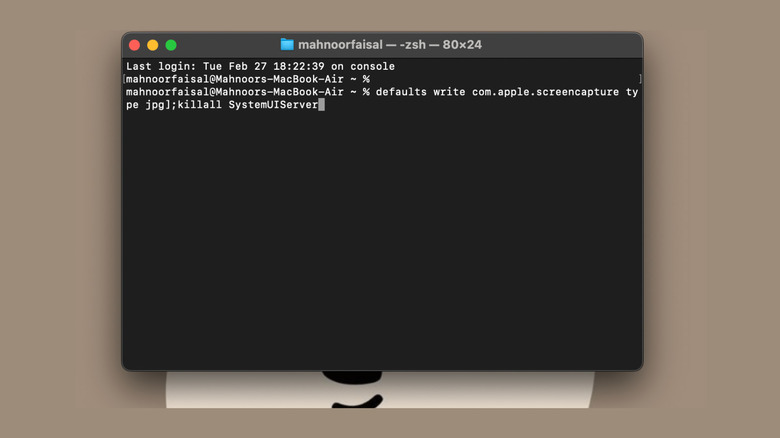
All your screenshots are saved as PNG files by default. While you can manually convert the file type of your images if you need to by heading to Apple's Preview app, you can permanently change the Mac screenshot format by using a simple Terminal command. To do so, launch Terminal by heading to Applications > Utilities. Now, type the following terminal command "defaults write com.apple.screencapture type [file type];killall SystemUIServer" into the Terminal window. Make sure to type the file type, for example, JPG, HEIC, PDF, GIF, or TIFF, in all lowercase in the [file type] placeholder. Press the Return key and all your screenshots will now be saved in your chosen format.