Here's How To Screen Record On Your MacBook With Sound

If you are an Apple user and you are interested in creating video content, you can do so quite easily with a MacBook. One of the key things you'll need to know — especially if you're putting together a step-by-step instructional video or presentation — is how to record your screen. Experienced Apple users may already know the appropriate keystrokes and shortcuts to do this, but those who are brand-new to the machine and its accompanying operating system may not know exactly how to get started.
The good news is there's no need to install or pay for third-party applications to create screen recordings on a MacBook. In fact, Apple has a nifty built-in feature that lets you make video recordings of your entire screen — or just a section of it — complete with sound. Additionally, you can capture static images using these tools, allowing you to quickly snap and share screenshots with others.
How to screen record on a Mac with sound through the Screenshot toolbar

To begin capturing footage of your MacBook's screen using keyboard shortcuts, you'll first need to trigger Apple's Screenshot toolbar and follow these steps (via Apple).
1. Press the Shift + Command + 5 keys together. This should pull up the screen record controls onscreen.
2. Click "Options" and pick where you want your screen recordings to be saved (Desktop is selected by default).
3. Pick any option under "Timer" and keep "Show Mouse Clicks" checked if needed. If you'd like to speak while recording your screen and have it included in the finished product, make sure you select "Built-in Microphone" under "Microphone."
 Jam Kotenko/SlashGear
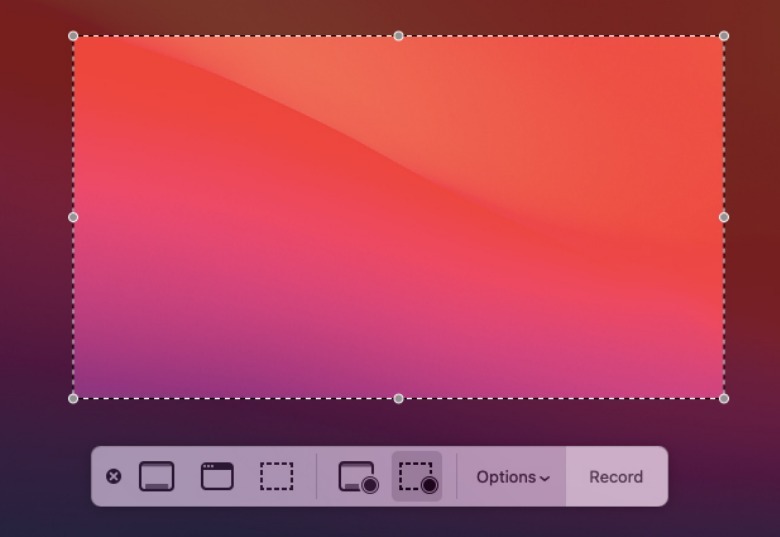
4. Pick a screen record mode to use. There are various options, including buttons to take still-image screenshots of your screen or a selected section. However, for the purposes of screen recording with audio, choose either "Record Entire Screen" or "Record Selected Portion."
5. To record your entire MacBook screen with sound, click the fourth icon (window with record button). This will turn the cursor will turn into a camera.
6. Click anywhere on the screen or hit "Record" on the toolbar to initiate the recording process.
7. To record a section of your MacBook screen with sound, click the fifth icon (marquee box with record button). Drag the marquee box around the screen portion you'd like to capture then hit "Record" on the toolbar to begin.
 Jam Kotenko/SlashGear
8. To stop screen recording, hit the stop icon on the toolbar above or press the Command + Control + Esc keys together. The video recording file should appear in the location you selected previously under "Options."
How to screen record on a Mac with audio via Quicktime Player

Another method to record your MacBook screen with audio is through QuickTime Player, which comes installed on every Apple computer.
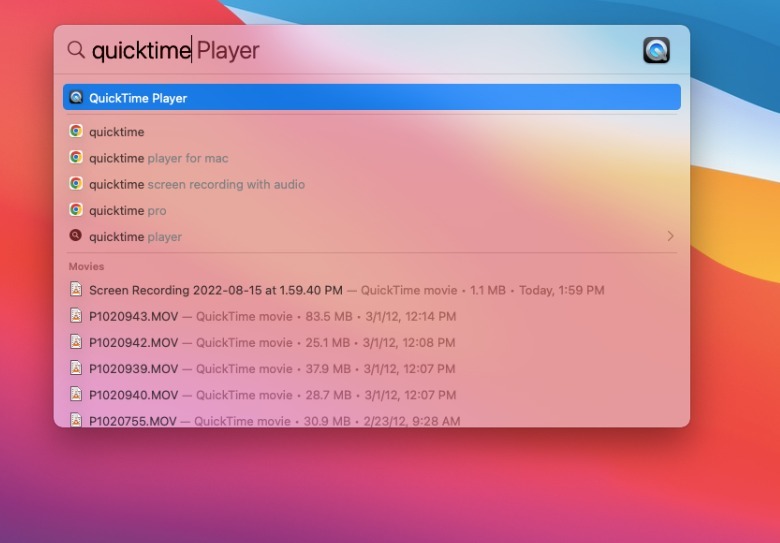
1. Launch QuickTime Player from the applications folder or look it up using Spotlight Search.
 Jam Kotenko/SlashGear
2. From the menu bar, choose "File" then "New Screen Recording." This should either pull up the Screenshot toolbar previously described in this guide or a new Screen Recording window.
3. If you get the Screenshot toolbar, follow the same screen record process stated in the previous section.
4. If the Screen Recording window shows up, click on the dropdown arrow next to the Record button to modify the recording settings. Choose a microphone option to record yourself speaking in the video capture.
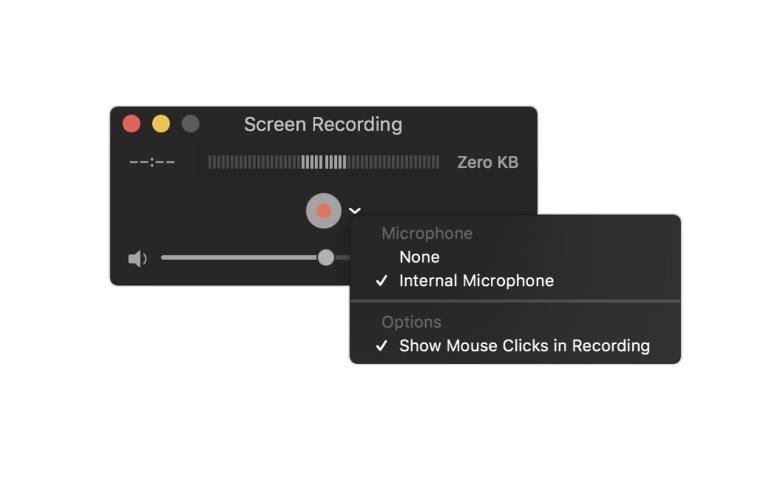
5. To monitor your audio levels while recording, adjust the volume slider. In case of sound feedback, adjust the volume to a lower level or use headphones with a built-in microphone.
6. Leave "Show Mouse Clicks in Recording" checked under "Options" to give mouse clicks a visual indicator in your recording. This will show as a black circle around the cursor, making it easier to spot.
7. Start screen recording with sound by clicking the red record button and then clicking anywhere on the screen to record the entire space. If you only want to record a small section of the screen, drag the cursor around the desired area to be recorded, then click "Start Recording" within that area.
8. Stop recording by clicking the stop button in the menu bar, or pressing Command + Control + Esc together.
Other things to note about the MacBook's screen-recording feature

Capturing screen recordings with sound on a MacBook can be incredibly useful when you are creating how-to tutorial videos. It's also an effective tool for showing different processes or tasks that you run on your device, as part of a presentation or simply an exchange of information. In any case, screen recording with audio provides a necessary visual to any instructions being passed on to others.
Apple's Screenshot toolbar is a feature included in macOS Mojave and later iterations, so you may need to ensure that your MacBook has the most up-to-date version of the operating system installed before you attempt to make a recording. Also note that some apps might not allow you to record their windows, so they probably won't appear properly onscreen if they are included in the video capture.
If you need to cancel making a screen recording for whatever reason — maybe you need to tweak a setting, change the selected recording area, or you simply changed your mind about recording entirely — you can do so by simply pressing the Esc key before clicking to record.
Your saved screen recording files will use Apple's naming convention — "Screen Recording [date] at [time]" — in the .mov format. MacBook users will be able to access and modify these video clips through Apple's built-in player apps — such as QuickTime Player and iMovie — as well as other third-party programs designed to preview and stitch together captured footage.