5 Tips And Tricks To Organize Your Google Calendar

If you're someone balancing your professional responsibilities, social engagements, and personal tasks, your Google Calendar is probably bursting at the seams with all sorts of commitments. There's that client presentation on Monday at noon, a friend's engagement dinner that evening, and then a trip to the grocery store the following day.
Such a packed schedule can easily translate to your calendar being a jumbled mess, spelling chaos for your ability to manage time. For starters, you're at a higher risk of being tardy or, worse, completely missing an important appointment, which doesn't make for a good impression. Then there's the mental toll — simply looking at a disheveled calendar can leave you feeling bogged down, which goes against the very purpose of Google Calendar as a productivity tool on your phone or desktop.
To keep your schedule tidy and efficient, here are five organization tips you can apply to your Google Calendar.
Create a new calendar to separate personal and work tasks and events
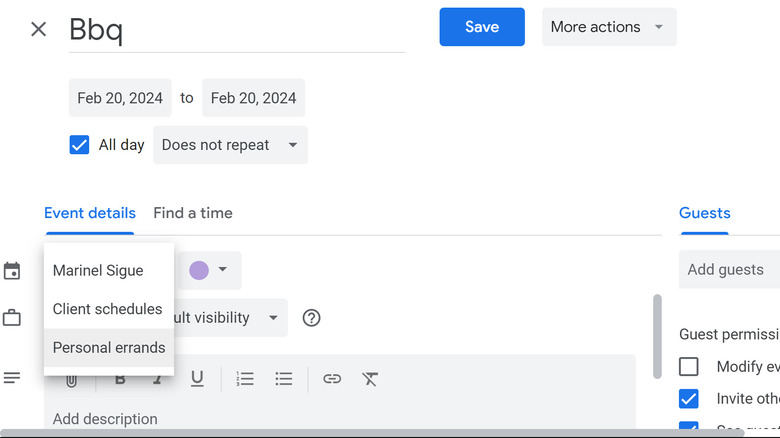
Chances are, you don't use your Google Calendar for just one aspect of your life. For instance, if you're a corporate employee, you're juggling one calendar filled with meetings and seminars and another dotted with personal errands. Or if you're a mom running a cake business, you have a calendar for your cake pickup times and a separate one for your kid's soccer practice schedule. It's chaotic to have all your tasks and events jumbled on one calendar. It's best to segregate them into their own distinct view. This way, your entire calendar is organized and you can easily change your calendar views based on what group of events (like work meetings or personal to-dos) you want to focus on at any given moment.
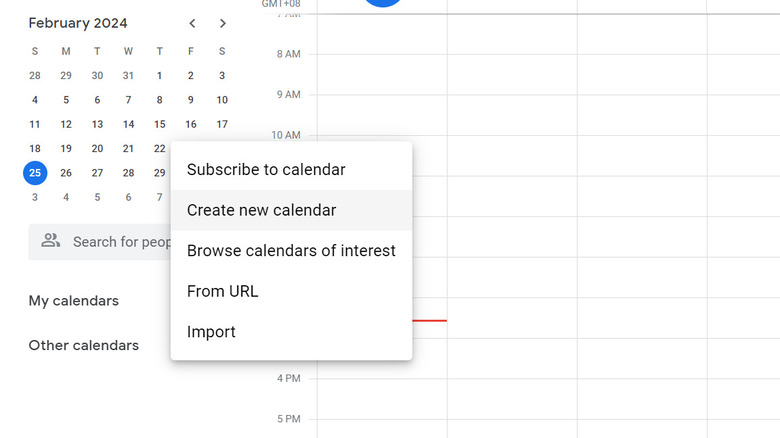
A simple way to go about this is to make a new calendar within your existing Google account. It's a Google Calendar feature you might not know about, but it can come in handy when organizing your schedule. Here's the step-by-step on how to set up a new calendar:
- Sign in to Google Calendar on your desktop.
- Go to the "Other calendars" section on the left-side panel.
- Click the plus sign next to it.
- Select "Create new calendar" from the menu.
- Name your calendar.
- (Optional) Type in a description for a bit more clarity.
- (Optional) Adjust the time zone if needed.
- Hit the "Create calendar" button.
Your brand-new calendar will now show up under "My calendars" on the left-side panel. To display only that calendar, you can either deselect all your other calendars or hover over the calendar, click the menu, and select Display this only.
Color code tasks, individual events, and calendars
With your jam-packed schedule and tight deadlines, the last thing you want is to confuse one entry for another because they all have the same color on your calendar. A handy Google Calendar tip to help you visually differentiate between various types of events, tasks, and other entries is through color-coding them. Follow these steps:
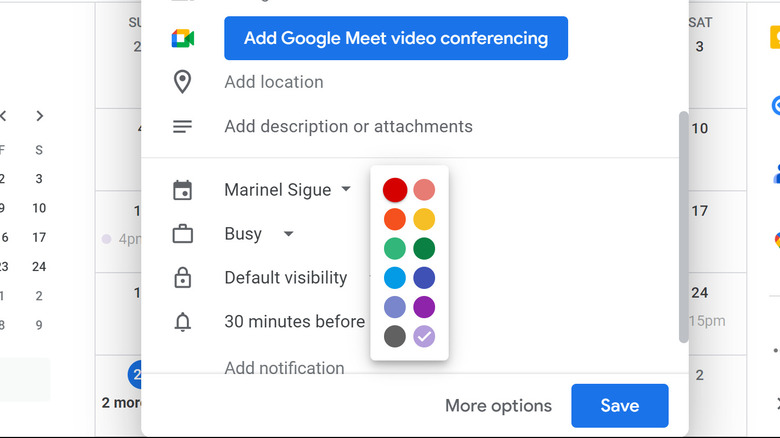
To change the colors of individual events:
- Open Google Calendar.
- Add a new event by clicking Create > Event.
- Fill in your event details.
- At the bottom of the event dialog box, select the solid color circle next to your name.
- Click this circle again to show the drop-down menu of all available colors.
- Choose from the 12 options.
- Press Save to save your event.
To change the colors of tasks:
While Google Calendar doesn't allow for individual task color changes, you can still change the default color for all your tasks.
- Go to your Calendar's homepage on your desktop.
- Hover over the Tasks option under My calendars.
- Select the three dots that appear.
- Pick a color from the given options. Alternatively, click on the plus sign to select a custom color or type in your color's hex code, then press Save.
To change the colors of your calendars:
If you added new calendars to your account or subscribed to other's calendars, you can also customize how those calendars' events and tasks appear on your main calendar.
- On the left-side panel, expand the My calendars and Other calendars sections.
- Hover over the calendar you want to change the color of.
- Click the three dots.
- Choose your color from the preset list or select the plus sign and input a custom color.
Change what and how events and tasks are displayed
It can be overwhelming to see your calendar full of events and tasks, some of which may have already passed and others you have no interest in attending. If you want to keep your calendar looking clean and minimal, you can change which events are seen and how they are shown. Here's how to go about that:
- On your desktop, visit the Google Calendar page. Sign in if you haven't already.
- Open Settings by clicking on the gear icon in the upper right corner and selecting Settings from the drop-down menu.
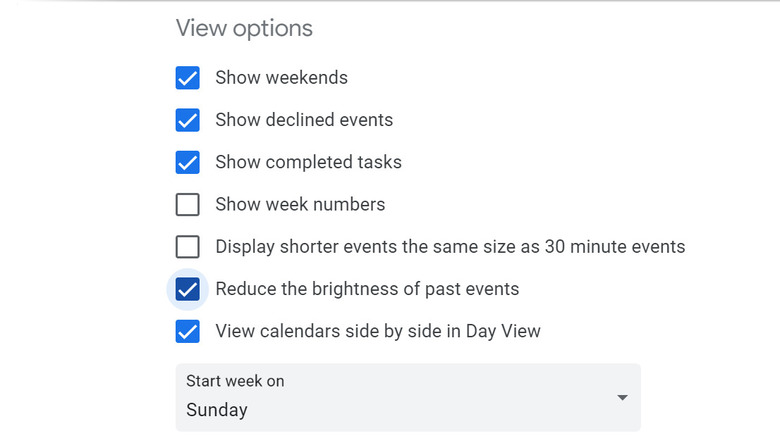
- Under the General option, click on View options.
- Do one or all of the following:
- Turn off "Show declined events" to hide events you've decided not to attend.
- Uncheck "Show completed tasks" to remove tasks you've accomplished.
- Enable "Reduce the brightness of past events" to fade the color of events that already happened.
- To hide or remove birthdays and local holidays from your view:
- In the Settings window, go to Birthdays under "Settings for my calendars" or Holidays in [country] under "Settings for other calendars."
- To hide the birthday/holiday calendar, hover over the name and select the eye icon.
- To delete the birthday/holiday calendar completely, expand the Birthdays/Holidays in [country] option and click on Remove calendar. Then, press the Unsubscribe button.
- To add other holidays or game schedules to your view:
- In Settings, go to Add calendar > Browse calendars of interest.
- Explore the available calendars under Regional holidays, Global religious holidays, Sports, and Others.
- Enable a chosen calendar by checking its box.
Customize your view
Changing how your Google Calendar is displayed can boost your productivity by aligning it more closely with your personal or work schedule preferences. Here are some settings you can tweak to make your scheduling experience on Google Calendar more efficient:
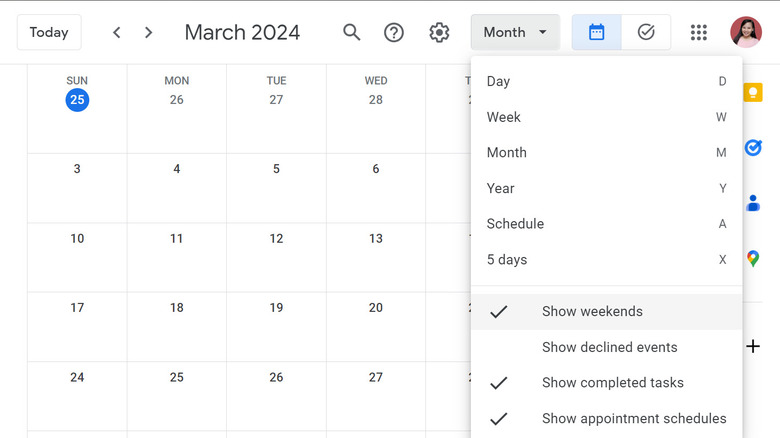
- Change to a different view:
- On your Calendar homepage, open the drop-down menu next to the gear icon (by default, this is set to Day).
- Select your preferred view (Day, Week, Month, Year, Schedule, 4 days). The "4 days" option is a custom view that you can adjust in the settings (instructions below).
- To change to a view other than these options, use the small month calendar on the left. Press and hold your chosen start date and drag it to your preferred end date. Do note that you're free to choose any span from one to seven days. But if you go beyond seven days, the calendar rounds up your selection to the closest full week. So, choosing between eight to 13 days means you will get a two-week view, somewhere between 15 to 20 will display a three-week view, and so on.
- Remove weekends:
- Change to the Week and Month views. You can't remove weekends in the Year, Schedule, and 4 days views.
- Click on the drop-down menu for the views again.
- At the bottom of the view options, unmark "Show weekends."
- Change what day your week starts:
- Open the Settings page.
- Navigate to General > View options.
- Expand the "Start week on" menu.
- Change it to Saturday, Sunday, or Monday.
- Edit the custom view (which is 4 days by default):
- Go to Settings > General > View options.
- In the "Set custom view" option, pick your duration of choice.
Move events between calendars
Juggling events across multiple calendars within your Google account can sometimes lead to accidentally slotting a personal errand into your work calendar or vice versa. It's a common mishap, and you'll normally resort to deleting and recreating the event. Thankfully, Google Calendar has a more convenient solution. Here's a quick rundown on how to move events where they actually belong, or even copy them if you need the events listed in more than one place:
- To move the event to a calendar in your account:
- Log into Google Calendar on your desktop.
- Find and open the event you need to move.
- Click on the pen icon to edit the event.
- Expand the drop-down menu next to the calendar icon.
- Choose your new calendar from the options.
- Hit Save to confirm the transfer.
- To retain the event in the original calendar and copy it to another calendar:
- Open the event on Google Calendar.
- Select the options icon (three vertical dots).
- Click on Copy to [calendar name].
- In the new window that opens, press Save.
- To move the event to a new owner (instead of sharing your Google Calendar):
- Again, in the event options (three vertical dots), press Change owner.
- In the New owner field, type the email address of the person you want to transfer the event to.
- Type in a custom message for the new owner or keep the pre-written message.
- Select Change owner to proceed.
- The new owner will then receive an email notification about the transfer. They simply need to click on the link within 60 days to accept it.