How To Fix A Disappearing Mouse Pointer On Your Computer

The mouse is one of the most essential hardware components of a computer. Without it, navigating most standard visual interfaces can be quite a hassle. Like any computer hardware, however, a mouse can act up. One particularly frustrating problem Windows users sometimes encounter is the disappearance of the mouse cursor. This can be especially irritating when you don't have a touchscreen.
A disappearing mouse cursor can be caused by a variety of factors, including outdated or corrupted mouse drivers, conflicts with third-party software, display driver issues, system settings, and even hardware malfunctions such as a faulty mouse or loose connection. As with almost any computer problem, the first step is to reboot. Press Ctrl + Alt + Del, navigate to the Power option using the arrow keys, and press Enter to reboot, clearing the registry of any temporary bugs. If your cursor is still AWOL, try the function keys one at a time, F1 to F9.
If those initial fixes don't bring back the missing pointer, it's time to explore more advanced solutions.
Rule out hardware issues

Before you move on to system fixes, it's crucial to rule out any potential hardware issues. No software change will fix a problem with your physical machine.
First, check the physical connections of your mouse. A loose or faulty connection can cause intermittent cursor disappearance. Ensure that the mouse is securely plugged into the appropriate port. If you're using a wireless mouse, make sure the batteries aren't low and the mouse is properly connected to the computer via Bluetooth.
Next, try using a different mouse or connecting your current mouse to another computer. This simple test can help determine if the issue lies with the mouse itself or with the computer. If the mouse works fine on another computer, then the problem likely lies within your system.
We also recommend dealing with any physical issues that might be impeding mouse function by giving your mouse a deep clean. Use a soft, lint-free cloth with a bit of rubbing alcohol to clean the mouse sensor and the surface you're moving it on, wiping gently. Allow the mouse to dry completely before reconnecting it to your computer and using it again.
If the problem persists, it's time to move on to software fixes.
Use the hardware troubleshooter
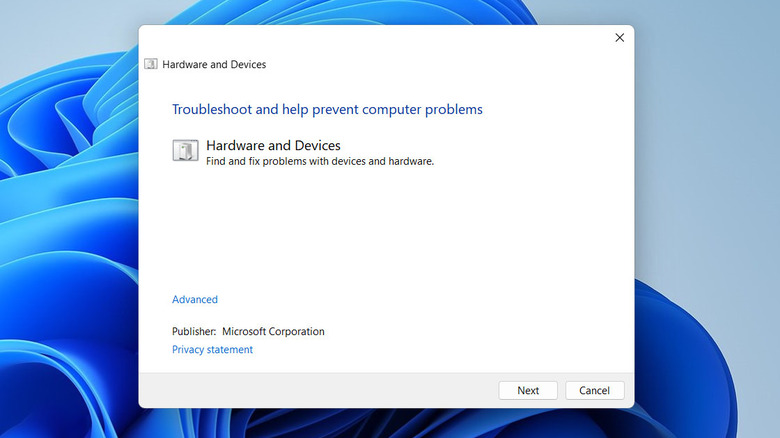
Windows comes with a hardware troubleshooter designed to detect and fix common issues. It works by scanning your system for potential conflicts, driver issues, or hardware malfunctions related to the mouse or other pointing devices. If an issue is identified, it will provide relevant solutions.
To run the troubleshooter:
- Press Windows + R to open the Run dialog box.
- Type "msdt.exe -id DeviceDiagnostic" and press Enter to launch the troubleshooter.
- Click Next using the Tab key and wait for the troubleshooter to scan your hardware and devices for issues.
- If the troubleshooter finds any problems, it will show you the details and suggest possible solutions. Follow the on-screen instructions to apply the fixes.
- If the troubleshooter does not find any problems, it will show a message reading "No changes or updates were necessary." In that case, highlight Close and press Enter to exit the troubleshooter.
While you are at it, make sure your system is up-to-date. Windows updates often include patches, bug fixes, and driver updates that address various system issues. You can do this by going to Settings > Windows Update > Check for updates. If the system identifies any available updates, install.
Update your mouse driver
One of the most common reasons for components to act up is outdated drivers. Drivers are the links between hardware components and the operating system, making sure the two play nicely with one another. Outdated or incorrect drivers can lead to performance degradation, compatibility issues, and malfunctions.
To update your mouse driver using the Device Manager:
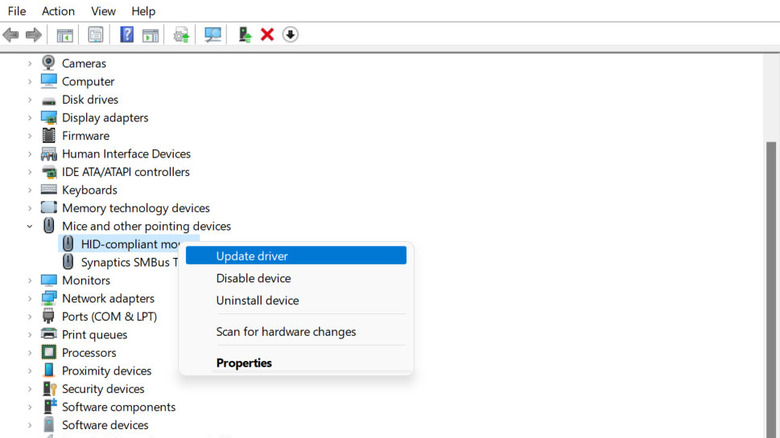
- Press Win + X and choose Device Manager from the context menu.
- Once in the Device Manager, press Tab to start navigating the list of drivers.
- Locate the "Mice and other pointing devices" category and press Enter.
- Choose your mouse driver using the arrow keys.
- Press Shift + F10 to right-click on it and choose "Update driver" from the context menu.
- Choose "Search automatically for drivers." This will prompt Windows to search for the latest driver software for your mouse on your device. Follow the onscreen instructions.
If Windows doesn't find an updated driver, try visiting the manufacturer's website to manually download the latest driver for your mouse model. Once the driver is downloaded, open Device Manager again, use Shift + F10 to right-click on the targeted driver, and choose Update driver > Browse my computer for drivers. Select the driver you just downloaded and follow the onscreen instructions to complete the installation.
Adjust the pointer settings of your computer
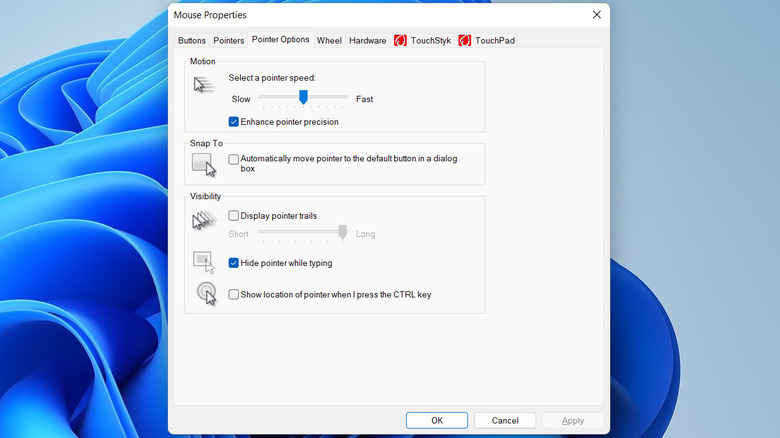
If your cursor only disappears while you're typing, the problem may be a particular pointer setting. This can be fixed with the following steps.
- Press Win + R to open a Run dialog.
- Type "control mouse" in Run and click Enter.
- Head over to the Pointer Options tab by using the Tab key on your keyboard.
- Press Tab to move to the "Hide pointer while typing" option and press Enter to uncheck it.
- Press Tab to select Apply and press Enter to press the button. Press OK the same way.
In case the problem persists and you are using a touchpad, ensure the touchpad isn't disabled in the same settings prompt:
- In the Mouse Properties prompt, head over to the ELAN tab using the Tab key.
- Use the Tab key again to select the Enable Device button.
- Press it using Enter.
- Select Apply using Tab and press Enter to press the button.
- Press OK the same way.
You can now close the Mouse Properties dialog and check if the issue is resolved.
Disable the Tablet Mode
Tablet Mode is designed to optimize the user interface for touch-based interactions, but it can interfere with mouse and keyboard input. Disabling Tablet Mode can bring back a disappearing cursor.
If you are a Windows 10 user:
- Press Win + I to open the Settings app.
- Use the arrow keys to navigate to the System option and press Enter.
- Choose Tablet from the left pane using the arrow keys.
- Open the "When I sign in" in the drop-down menu using Tab and change the setting to "Never use Tablet Mode."
- Open the "When I use this device as a tablet" drop-down menu using Tab again and change the setting to "Don't switch to tablet mode."
For Windows 11, follow the steps below. It is best to back up your PC and Registry data before you proceed, just to be safe.
- Press Win + R to open a Run dialog box.
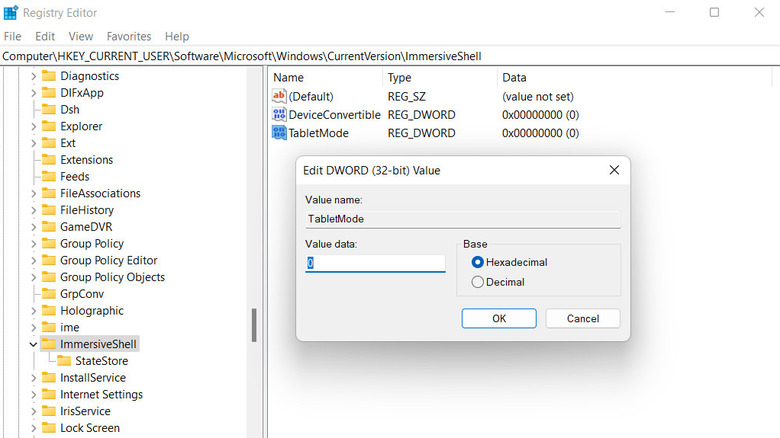
- Type "regedit" and press Enter.
- Navigate to HKEY_CURRENT_USERSOFTWAREMicrosoftWindowsCurrentVersionImmersiveShell.
- Press the Tab key to navigate through the contents of the left pane.
- Select the TabletMode key and press Enter.
- Set the Value data to 0.
- Use the Tab key to select the OK button and press Enter.
Once done, close the Registry Editor and restart your computer for the changes to take effect. Upon restart, check if the issue is resolved. To enable the TabletMode in Windows 11 in the future, change the Value data to 1 in the Registry Editor.
Repair system files
If none of the above fixes have worked, it's possible that some essential system files have become corrupted or damaged.
An easy way to repair these files is the System File Checker (SFC), a built-in troubleshooting tool in Windows. It works by scanning your system for corrupted or missing system files and attempting to repair them automatically. To use SFC:
- Press Win + R to open Run.
- Type "regedit" in Run and press Ctrl + Shift + Enter keys together. This will launch Command Prompt as an administrator.
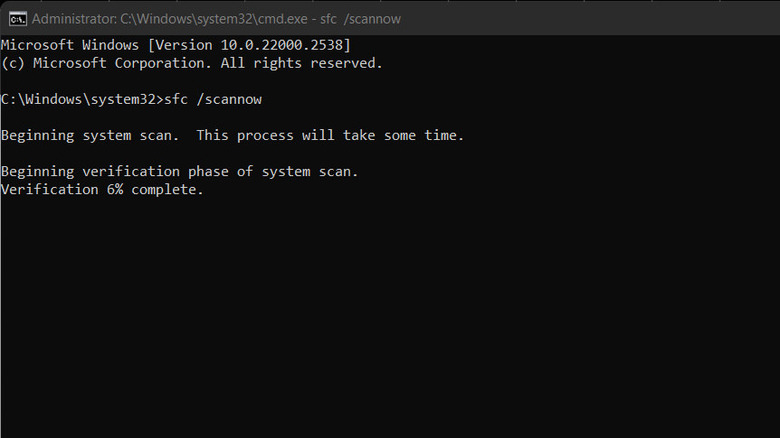
- Once the Command Prompt is open, type "sfc /scannow" and press Enter. This command will initiate the System File Checker scan, which may take some time. Don't exit the Command Prompt or shut down your computer while the SFC scan is working.
- During the scan, SFC will examine all system files and repair any that are corrupted or missing. If it encounters issues it can't fix automatically, it will prompt you to take further action, such as running additional commands or performing a system repair.
After the scan is complete, restart your computer to apply repairs. Once your system has restarted, check to see if the issue with the disappearing mouse cursor has been resolved.