How To Manage Boarding Passes And Tickets With Your Apple Watch
While airline travel has made our lives easier by allowing us to get from point A to point B in a fraction of the time compared to other transportation methods, it also comes with its own set of challenges. From juggling boarding passes to managing travel documents, there are a lot of moving parts to deal with before any flight, short or long. So, it's not surprising that many of us are always on the lookout for things that can make our lives easier as we prepare for our next flight.
That's where the Apple Watch comes in: giving users an easy way to keep up with the boarding passes and tickets they'll need to get through airport security and onto their flight without a hitch. All you have to do is install Apple Wallet on your Apple Watch to download your digital boarding pass and tickets. Once you've done that, you can say goodbye to the days of searching your bags for these documents at the airport, making it one of those essential Apple Watch travel tips you don't know you're missing until you use it.
How to add boarding passes and tickets to your Apple Watch
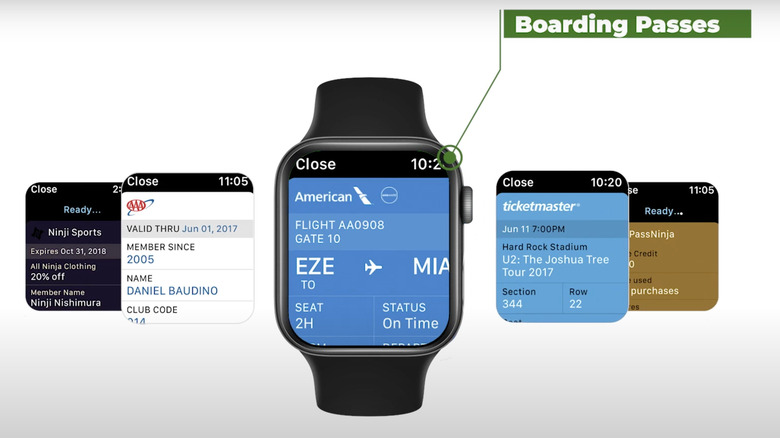
Adding your boarding passes and tickets to your Apple Watch makes managing and retrieving these documents easy, eliminating the need for physical copies and making them available on the go. Since this information is stored securely on your device, you won't have to worry about misplacing important travel documents. If you receive a message or email with a pass, you can quickly add it directly to your Apple Watch.
Follow these steps to add a pass directly on your Apple Watch:
- On your Apple Watch, open the email or message that contains the pass.
- Tap the pass within the message or email, then tap Add to Wallet.
Follow these steps to use an iPhone to add a pass:
- Ensure your Apple Watch is paired with your iPhone.
- Open the airline's app, message, or email containing your boarding pass and tap Add to Wallet.
- Open the Wallet app on your Apple Watch. You should see the passes you've added.
Once you've added the pass to your Apple Watch, it'll be ready to use the next time you fly. To use a barcode pass, double-tap your Apple Watch's side button, scroll to your pass, and then show the barcode for scanning. Or, you can open the Wallet app on your watch, select the pass, and scan it. While you'll be able to scan your passes and tickets from your wrist most of the time, the design of some scanners may make this impossible, so you should be prepared to remove your watch to scan the pass if necessary.
Sharing Passes and Tickets

If you're traveling with someone who has an Apple Watch or iPhone, you can share certain boarding passes and tickets with them.
Follow these steps to share boarding passes and tickets with others:
- Open the Wallet app on your Apple Watch, where your passes and tickets are stored.
- Scroll through your saved items and choose the boarding pass or ticket you wish to share.
- Tap on the selected pass or ticket to view its details. Then, scroll down to find the Share Pass option.
- Choose a sharing method such as Messages or Mail. This will allow you to send the pass or ticket directly from your Apple Watch to another person's iPhone or Apple Watch.
- Complete the process by sending the pass or ticket to the intended recipient. They will receive it on their device, where they can add it to their own Wallet app.
This feature comes in handy when traveling with a group or attending events with others, making it easy to distribute passes and ensure everyone has what they need.