5 Microsoft Outlook Hidden Features You Should Know About By Now
In this day and age, it's rare for most people to go through an entire day without opening or creating at least one email. In fact, a report by Statista highlights how emails have become a central part of daily life — users in the United States spend 149 minutes on work-related emails and 172 minutes on personal ones per day. With such extensive use of emails, you're likely already familiar with your email platform's basic features, from text formatting to keyboard shortcuts that increase productivity.
However, if you're on Microsoft Outlook, there are a host of nifty features that you might still be unaware of but should definitely know by now. These features, designed to elevate your email experience, are tucked away in the many options and buttons of the app, hidden in plain sight. Let's go over five of these hidden yet valuable features and explore how to use them to your advantage.
Custom shortcuts for your favorite emojis
You likely don't think of using emojis when messaging your supervisor or client, but there are other types of emails where they are quite fitting. For instance, when you're having a casual conversation with a work bestie or sending a company-wide email about the upcoming year-end party, emojis bring a touch of fun and personality to the otherwise boring messages. Adding emojis to your Outlook emails is as quick and easy as pressing the keyboard shortcut Win + . (period) for Windows and Command + Control + Space for Mac and clicking on your emoji of choice from the panel.
However, an even more convenient way is to just set a custom shortcut for the emojis you use daily. Here's how you can do so from Outlook on your desktop:
- Create a new message by clicking on the New Email button.
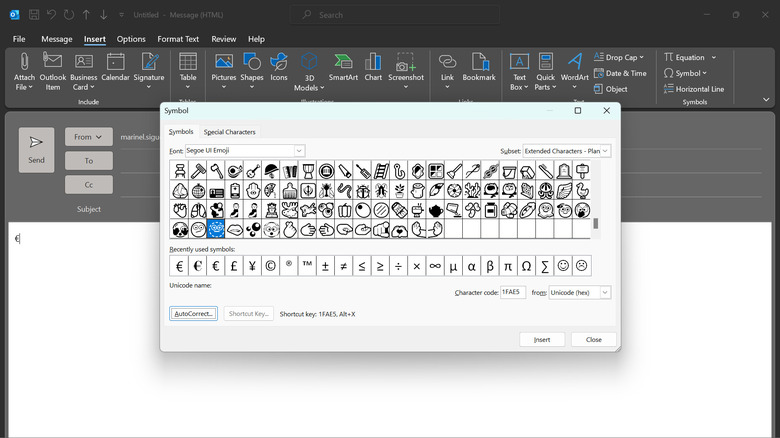
- Go to the Insert tab.
- Select Symbol > More Symbols.
- Set the Font options to Segoe UI Emoji.
- Scroll down until you reach the "Extended Characters – Plain 1" subset.
- Pick your emoji from the selection.
- Click on the AutoCorrect button.
- Under the Replace column, enter the shortcut you prefer. It can be a combination of punctuations like :} or -.- or random letters that don't correspond to a known word like XX or yy.
- Hit Add.
- Select OK.
- Type your shortcut in the email body to test it out. Do note that your shortcut will only work on the desktop app and not on the web app.
Reusable phrases and sentences
If your work involves sending countless emails throughout the day, you'll inevitably find yourself typing the same responses over and over again. Perhaps you regularly share a list of training materials with new hires, or your Outlook out-of-office replies are the same. To streamline this process and avoid the tedious task of typing the same message repeatedly, just use Outlook's Quick Parts. Quick Parts serves as a repository for frequently used messages that you can easily insert into your email body whenever you need to. Here's a step-by-step guide on how to use Quick Parts in Outlook:
- To create a custom Quick Part:
- In your Outlook desktop app, compose a new email.
- Type out the message you want to save to Quick Parts.
- Highlight the text.
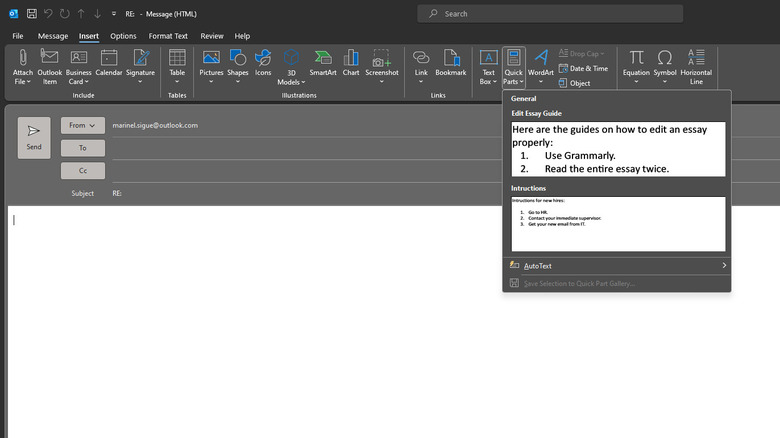
- Go to the Insert tab at the top.
- In the Text section, click on Quick Parts.
- Select Save Selection to Quick Part Gallery.
- Add a name for your Quick Part.
- (Optional) Add a description.
- Hit OK.
- To insert a Quick Part in your emails:
- Create a new email or reply to one. If you're replying to an existing email, make sure to click on the Pop-Out button to open the reply in a new window.
- Navigate to the Insert tab.
- Select Quick Parts.
- Choose your message from the gallery. It should automatically be inserted wherever your cursor is.
Color-coded emails

With the hundreds of emails you receive every day, it's easy to get overwhelmed and miss important messages. An easy solution is to color-code your emails using Outlook's conditional formatting. This feature lets you assign different colors to emails from specific senders or those with specific content, effectively organizing your inbox and distinguishing critical messages from the rest. Follow these steps to apply conditional formatting to your existing and incoming emails:
- In your Outlook desktop app, go to the View tab.
- Click on View Settings located in the Current View section.
- Select Conditional Formatting.
- Hit the Add button to create a new rule.
- Enter a name for your rule.
- Click on Font.
- Under Effects, change the color to your preferred hue.
- (Optional) Set the Font, Front style, and Size to suit your tastes.
- Once done, click on OK.
- Hit the Condition button.
- Do one or both of the following:
- If you want to color-code your emails based on sender, type the email address in the From field.
- If you want to color-code your emails based on the email content, type your keywords in the "Search for the word(s)" field and set "In" to "subject field and message body."
- Click OK in the dialog boxes to exit.
Existing and incoming emails that fit the criteria in your rule will now show up with a different color in your inbox. However, this color-coded scheme will only appear in your desktop app and not the web app.
@Mentions
If you're part of a big organization, chances are you usually mention specific colleagues in your emails. Perhaps you're endorsing a client to your manager or mentioning the presenter in a meeting invite you're sending. In such cases, you'll typically style your text with underlining or highlights to make the mentioned names more noticeable. To make messages with mentioned names stand out without much hassle, you can use Outlook's @mentions feature instead.
@Mentions work just like how you would tag friends in a social media post. When you mention someone in your email, their name gets highlighted, and clicking on it will pull up that person's contact details. On top of that, using @mentions also automatically adds the person to the recipient list. Another nifty advantage of this feature is that such emails are marked with a special symbol in your inbox, so you can quickly identify the messages that directly involve you. Here's how to use @mentions:
- To mention someone in an email:
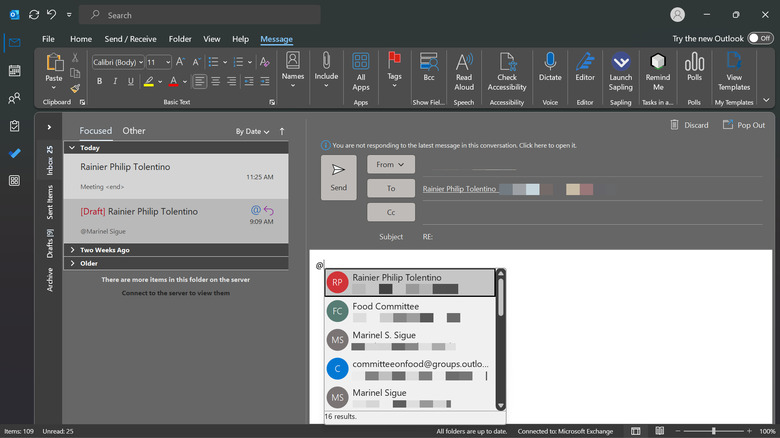
- Create a new email or reply to one in your inbox.
- In the email body, type @ followed by the name of the person you want to mention.
- Select their name from the available options.
- (Optional) Delete part of the mentioned name to leave only the first name or last name in the email body.
- To show only mentioned emails in your inbox:
- At the top of your email list, click on "By Date" for the desktop app or the Filter icon (three horizontal lines) for the web app.
- Choose Mentioned emails or Mentions me.
Image attachment resizer
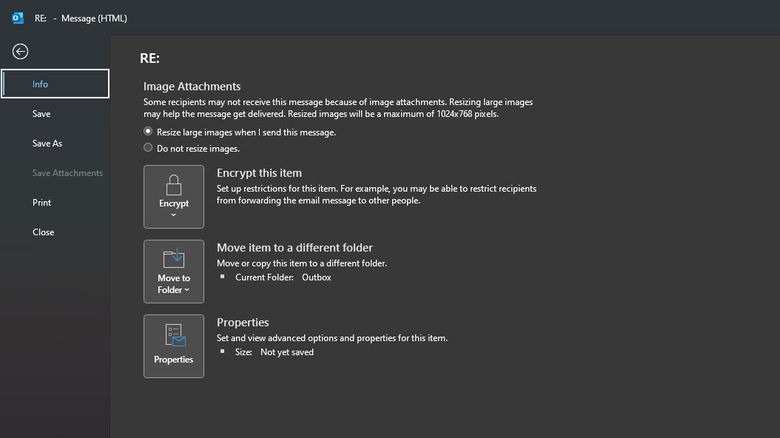
Isn't it annoying when you attach a photo to your email, but it's too large to be sent successfully? When this happens, you have to hop on an image resizer site, upload your photo, set it to a size you think is small enough, download it to your desktop, and reattach it to your message. But the most frustrating part is doing all these only to find out the image still exceeds the allowable file limit for the email.
Fortunately, Outlook has a built-in image resizer feature that can do the resizing for you without much hassle. This feature resizes your image attachments to a maximum of 1024 x 768 pixels, ensuring your messages get delivered without issues. To use the image attachment resizer, here's what you need to do:
- In your email, attach your photo of choice by clicking Insert > Attach File > Browse This PC.
- Select the File tab.
- Under Image Attachments in the Info section, select Resize large images when I send this message.
- Go back to your email body and type out your message as usual.
- Once done, hit Send. The message should be successfully delivered, and your recipient will receive a resized version of the image.