5 Essential Tips And Tricks For First Time iPhone Users

As a first-time user, you're probably most excited about exploring the hidden features on your iPhone, and who wouldn't be? The most recent models alone come with an array of nifty capabilities designed to enhance the overall user experience. There's a charging limit option to preserve your battery health, external display support to improve the viewing experience, and various zoom options to cater to a variety of photography styles.
However, while it's tempting to dive straight into these hidden and advanced features, it's equally important for you as a new user to familiarize yourself with the essential functionalities of the iPhone first. Understanding these basics will not only help you use your device efficiently but also get the most out of it. We'll walk you through five of the most essential tips and tricks you need to know to unlock the full potential of your iPhone and turn you from a newbie to a pro.
Turn on Find My iPhone
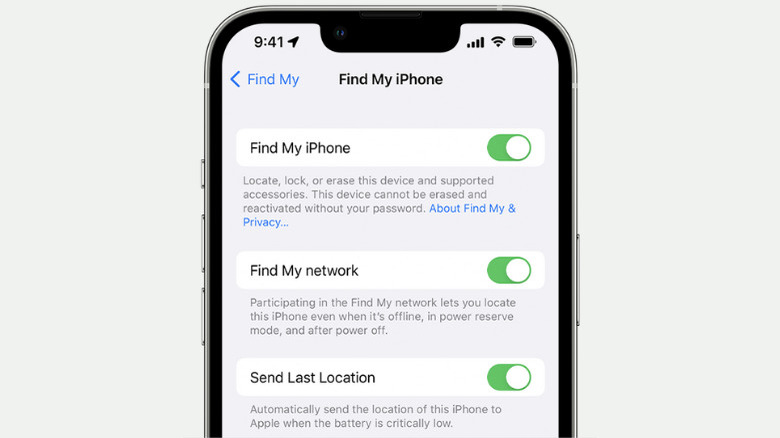
One of the most important things to set up as soon as you get your hands on your first iPhone is Find My. It's a utility tool you can use to locate your device if it goes missing. Here's how to enable it:
- Launch your Settings app.
- Tap on your name at the very top.
- Select Find My.
- If you haven't already logged in with or created an Apple ID during the initial setup, do so now.
- Go to Find My iPhone.
- Enable Find My iPhone.
- (Optional) Enable Find My network to allow Find My to locate your device even when it's in power reserve mode, turned off or disconnected from Wi-Fi or cellular service.
- (Optional) Enable Send Last Location to allow your device to automatically send its location to Apple once the battery level becomes critically low.
To use Find My iPhone if your phone is misplaced:
- Visit iCloud.com/find.
- Sign in using your Apple ID.
- Under All Devices, click on your missing iPhone.
- If your device can be located, you'll see a map pointing to its location.
- If your device can't be located, it will be marked as "Offline," and a map of its last location will be available for up to 24 hours.
- (Optional) Tap on Play Sound to play a chime on your missing phone to make it easier to find if it's nearby.
- (Optional) Tap on Directions to see how to get to it.
Customize Control Center
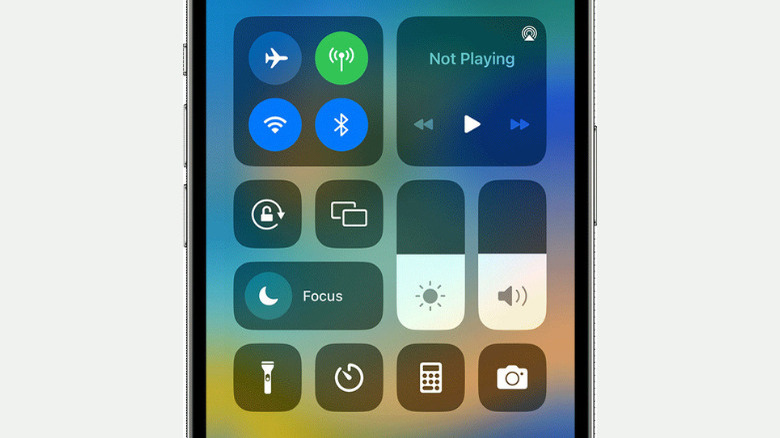
The Control Center is one of the hidden places where you can find useful iPhone settings. It provides easy access to the functionalities, tasks, or apps you frequently use. By default, there are only four controls: flashlight, timer, calculator, and camera. You can, however, personalize it by adding or removing controls that better fit your needs. Here's how to do so:
- Open the Settings app.
- Go to the Control Center.
- To add new controls, scroll down to More Controls. Tap the green plus sign icon next to the control you wish to add to the Control Center.
- To remove existing controls, go to Included Controls. Tap the red minus icon next to the control you want to delete from the Control Center.
- To rearrange how the controls look on the Control Center, press and hold on the three-line hamburger icon to the right of the control and drag it to your preferred position.
If you're overwhelmed with the options and are unsure what controls to add, here are some suggestions:
- Dark Mode: Enable dark mode across your system, including apps.
- Low Power Mode: Activate low power mode to conserve battery life.
- Screen Recording: Record what's happening on your screen.
- Flashlight: Use your device's backlight as a torch.
- Silent Mode: Switch your iPhone to silent mode.
- Notes: Open the Notes app instantly to capture your thoughts when they come.
- Camera: Access your camera.
- Alarm: Set alarms with ease.
- Apple TV Remote: Control your connected Apple TV directly from your iPhone.
Get familiar with gestures
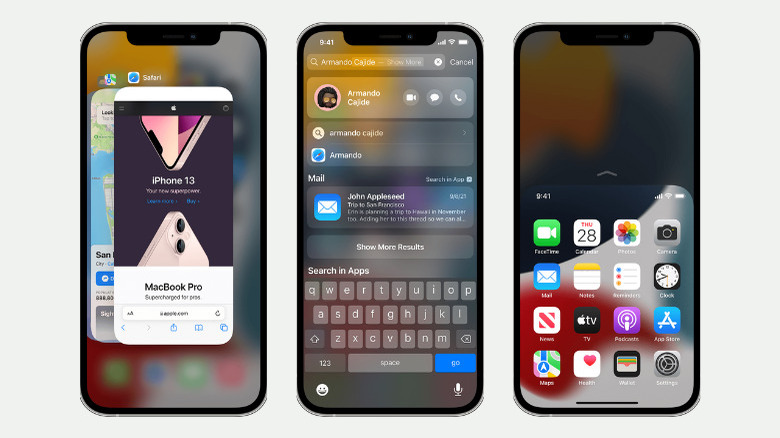
If there's one essential thing you need to learn about your iPhone, it's gestures. Gestures help you navigate and interact with your device more efficiently so you can do what you want to do and get where you want to go in a jiffy. Here are the key gestures you need to know if you're using any of the iPhone variants with Face ID:
- Swipe up from the bottom: Return to the Home Screen wherever you are. If your phone is locked, swiping up and glancing at the screen for face ID verification unlocks your device. If you're in an app, swiping up from the bottom exits the app and brings you back to the Home Screen.
- Swipe up from the bottom to the middle: Open the App Switcher, where you can go to another opened app by swiping right to find it on the stack and selecting it.
- Swipe left or right on the bottom edge: Switch between opened apps quickly.
- Swipe down from the upper right corner: Open the Control Center, which contains quick settings and functions.
- Swipe down from the top (left/middle): Access the Notification Center, where all your recent notifications are logged.
- Swipe down from the Home/Lock Screen: Pull up Spotlight Search. You can use this to look for apps and content (e.g., text messages, contacts, notes), open specific websites, and search the web, among other things.
- Swipe right from the Home Screen: This takes you to the widgets page.
Use AirDrop
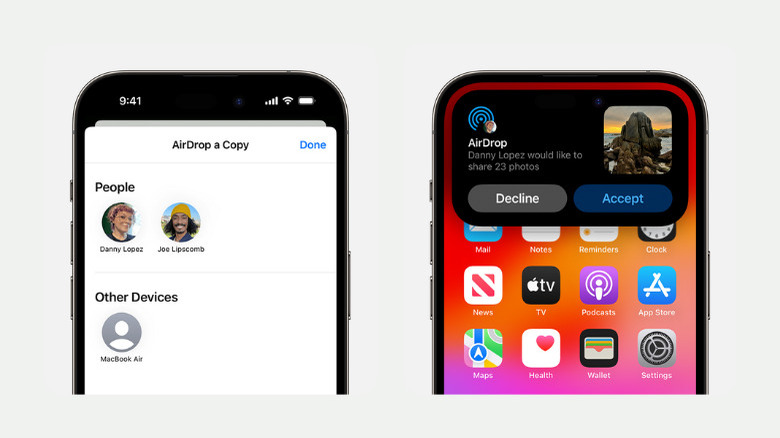
Using AirDrop on your iPhone allows you to wirelessly send files such as photos, videos, and documents to other devices within the Apple ecosystem (like another iPhone, iPad, or Mac computer). It's a convenient alternative to using instant messaging apps, third-party wireless transfer services, or physical cables. Here's a guide on how to use AirDrop on your iPhone:
- To send an item from your iPhone to another Apple device:
- Turn on Wi-Fi and Bluetooth on your iPhone.
- Place the other device close to your phone.
- Turn on Wi-Fi, Bluetooth, and AirDrop on the other device. If your Apple ID email address or mobile number isn't in their contacts, set their AirDrop receiving option to Everyone for 10 Minutes (or simply Everyone). If you're in their contacts, choose Contacts Only instead.
- Open the content you wish to share.
- Tap on the Share button, typically found at the bottom of the screen.
- Select AirDrop.
- Pick the contact or device you want to send the content to.
- On the receiving device, tap on Accept to proceed with the transfer. If the receiving device is also yours and logged in with the same Apple ID as your iPhone, the transfer happens automatically without needing to accept the file.
- To allow other devices to send you items:
- Go to the Control Center.
- Long press the upper left group of controls (that includes Wi-Fi and Bluetooth) to expand the options.
- Tap on AirDrop to switch it on.
- Select who you want to receive content from (Contacts Only or Everyone for 10 Minutes).
Turn a paper document into a PDF with Notes
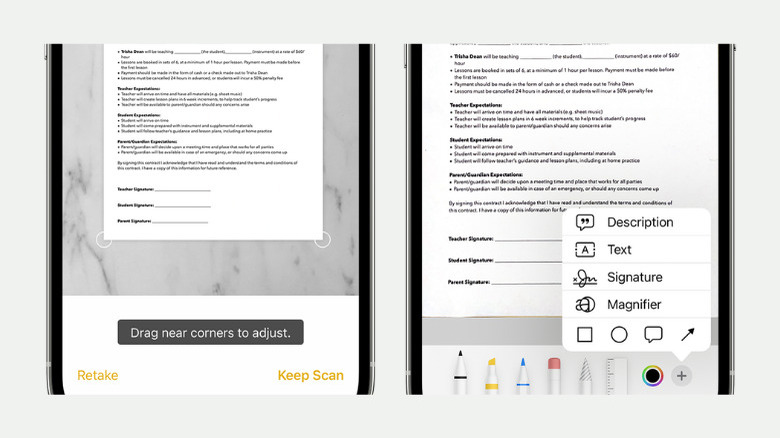
The Notes app on your iPhone is great for obvious reasons. It's a convenient way to jot down your thoughts and organize them in various formats (tables, lists, plain paragraphs). It also supports photos and handwritten notes/drawings if you want to add more context to your notes. However, another nifty, lesser-known feature of the Notes app is that it can convert your physical documents into digital files, eliminating the need to install document scanner apps on your phone. Follow these steps to use Notes to scan your paper documents:
- Launch the Notes app.
- Create a new note by tapping the write icon at the bottom-right corner of the screen.
- Select the camera button.
- Tap on Scan Documents.
- (Optional) To change the color scheme of the document, tap on the three circles at the top and pick between Color, Grayscale, Black & White, or Photo.
- (Optional) Enable or disable the flash as needed.
- Position your document within the camera view. By default, the app will automatically detect the edges of the document, snap a picture, and automatically crop it.
- (Optional) Edit the scanned image as needed. You can rotate, crop, or change the color scheme.
- Tap on Done.
- Select Save to add the scanned document to your note.
- In your note, tap on the scanned document.
- Select Share.
- Select Save to Files to convert it into a PDF.
- Choose where you want to save the file (iCloud Drive or local storage).
- Hit Save.