Hidden iPhone Features That Are Complete Game Changers
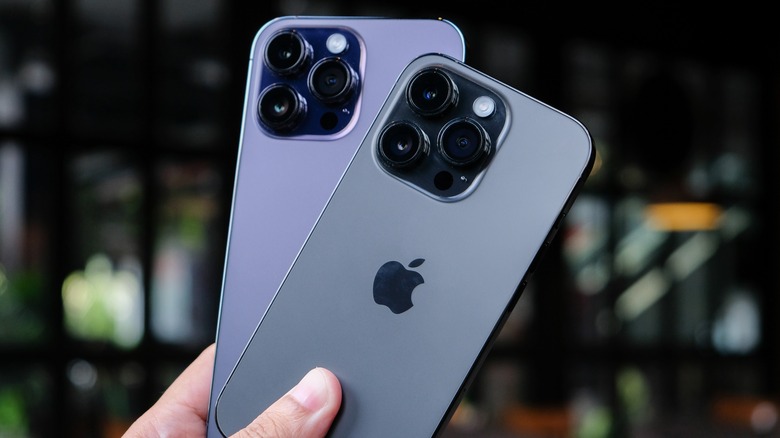
If you own an iPhone, you know it is a powerful device that can do much more than just make calls and send messages. But did you know about the many hidden features and settings that can improve your iPhone experience? Whether you're a new iPhone user or have been using the device for years, there are likely many features you haven't discovered yet. The operating system used on the iPhone, iOS, has gone through major upgrades, revisions, and variations over the 15 years since its first release in 2007. The software's power has been aided by Apple's self-designed bionic chips, with recent models having dedicated AI cores and other on-device machine-learning tasks. The company put a camera into the pocket of over 1.5 billion people, which is no small feat.
We've rounded up some of our favorite lesser-known features that make the iPhone experience even better. Some of these have been around since the early days of the iPhone, while some were recently added to the latest version of iOS.
Back-tap to open the camera
The worst thing after not having your iPhone camera around to record special moments is if you can't open the camera app in time to record them. Apple has multiple ways to open the camera app, but they're all imperfect. There are two ways to get from the lock screen, swiping left or holding the camera icon at the bottom, both of which are tricky to pull off if you're not looking at the screen or if it is in your pocket. If your iPhone is already unlocked, you can get the camera open with a tap, but unlocking it takes time. There's a hidden button on your iPhone that isn't enabled by default that makes opening the camera, or almost anything else, a matter of a few quick taps.
It's called Back Tap, and it's part of the iPhone's Accessibility technologies. It was designed as a quick way to get things like VoiceOver active, but we can use it for opening the camera. Open Settings, tap on Accessibility, and look for the Physical and Motor section. Tap on Touch, then select Back Tap at the bottom of the next screen. Decide if you want two taps or three, and then select Camera from the list. Once active, take your finger and tap the area around the Apple logo on the back of your iPhone to open up the Camera app.
Monochrome mode for focus

The iPhone is a technological marvel, as is any smartphone, shrinking a computer down to pocket sized with a vast assortment of software and games to use on it. Its greatest strength — versatility — is its greatest weakness, as the more apps you install, the more distractions vying for attention. Family, friends, and work blend together in that little glass rectangle clad in exotic metals. We can tap into another Accessibility feature to quiet the noise somewhat, and turn the iPhone into a monochrome monolith to cover up the red notification icons.
To do this, open the Settings menu, head to Accessibility, Display & Text Size, and scroll down to Color Filters. Set it to on, and your iPhone will go monochrome. You can also set a shortcut to easily toggle it on and off from the Accessibility Shortcut section in the main Accessibility menu. Select Color Filters to get a checkmark next to it, and it's set up. Now when you triple-click the side button, it will toggle Color Filters on and off, making the iPhone into a colorless, low-distraction UI.
Disable Face ID

Face ID is a quick and secure method of locking an iPhone in most situations. There are some times that having Face ID active could be a drawback, so it's good to know that you can toggle it off with a few quick clicks. If you think you're in an unsafe situation, you can disable Face ID so that any would-be attacker can't get into your iPhone easily. That way, nobody, not an assailant, mugger, or the police, can force you to open your iPhone using Face ID. There are a few ways to disable Face ID temporarily, or at least until the iPhone's passcode is entered. If you can see the screen, try pressing and holding the side button and one of the two volume buttons. After a few seconds, the Emergency power off screen will show up. Once that shows, Face ID is disabled until the passcode is entered.
Another way takes a bit of setup but is quicker to do after that. Open Settings, tap on Emergency SOS, the toggle the Call with Side Button switch. On newer versions of iOS, this is already enabled and won't show in the options. At any time after that, pressing the side button five times will open the Emergency SOS calling screen, which locks Face ID. If you have enough time, you can turn your iPhone off by holding the side and volume buttons long enough to trigger a reboot.
Add a second person to Face ID
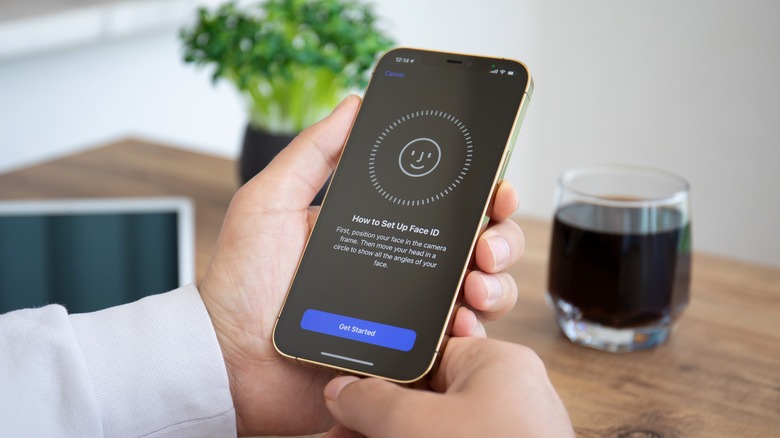
Face ID is intended to be used by one person, the owner of the iPhone. Sometimes you want a second person to be able to use the iPhone without knowing the passcode, which makes things a little complicated. It's not like you can register multiple fingerprints into Touch ID, as you can on the iPhone SE or some iPads. Well, iOS has a way to register a second face for use with Face ID. It was intended for users who have some types of glasses or wear head coverings for various reasons, but it can be used to add a partner or family member as Face ID.
It's called Face ID Alternative Appearance, and it gets set up like the main Face ID scan. Open Settings, go to Face ID & Passcode, enter your passcode, and tap on Set Up an Alternative Appearance. Hand the phone to the trusted person, and have them scan their face as directed to set up their Face ID scans. Then both you and that person can use Face ID to sign in.
Spotlight search
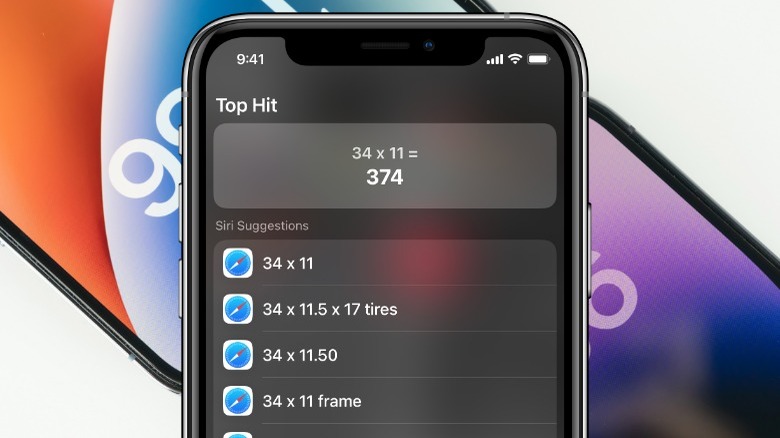
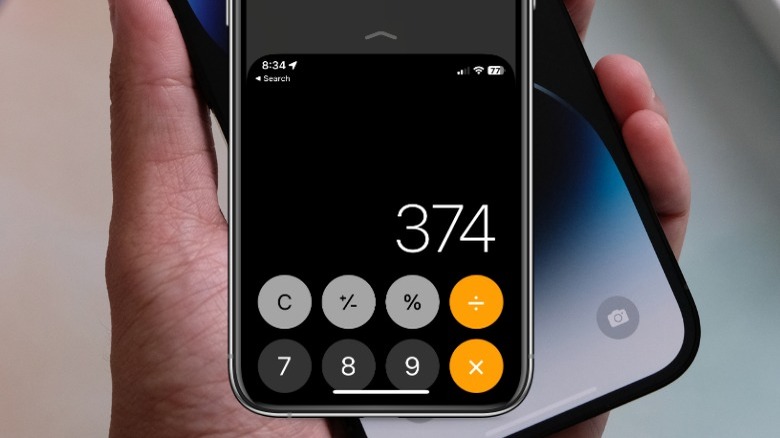
Spotlight search sits on the iPhone's Home screen, hiding there until swiped into existence by a quick top-to-bottom motion. This can be used to search for apps, documents, or anything on your iPhone or the internet. The search bar is on the bottom of the screen in recent versions of iOS, and can be typed in or the mic button can be tapped for voice search. The screen also has a recent searches section, which shows your search history. The Siri Suggestions section shows apps you often use, like Podcasts if you like listening to those while you drive, or games to unwind after a long day.
Spotlight search can also be used for all kinds of other inquiries. It's internet connected, so it will find search results on your device but also in the App Store, websites, and Settings. It indexes Messages and Mail, so it will show results for those too, and it can search in apps that are installed on your iPhone. You can also use Spotlight search for other queries, like simple math equations. Simply type them into the search bar, and you will get an answer. Use it to convert currencies, or track flights. It's a supercharged search that might become the first stop, and the last.
Reachability for one-hand mode
The iPhone screen has progressively gotten longer, a problem for shorter fingers. Nobody is buying the smaller iPhones, making Apple remove them from the lineup, but what are users supposed to do when they want to only use one hand, and one finger, to navigate around their devices? Apple has a built-in feature to shrink the UI of iOS down to fit in the bottom half of the screen, when in portrait orientation. It's great for tapping top navigation buttons while one-handed browsing, and it's called Reachability.
Head into Settings, then to Accessibility and Touch. Turn on Reachability. Now iOS has a way to shrink the screen to the bottom half, making it easier to reach any part of the UI. On an iPhone with Face ID, swipe down anywhere on the bottom half of the screen. For Touch ID-enabled iPhones, lightly double-tap the Home button to do the same. Now every part of the UI and app will be pulled down to the bottom half of the iPhone's screen. To expand it back to the whole screen, swipe up from the middle of the screen where the up arrow is.
Hold on spacebar to move cursor
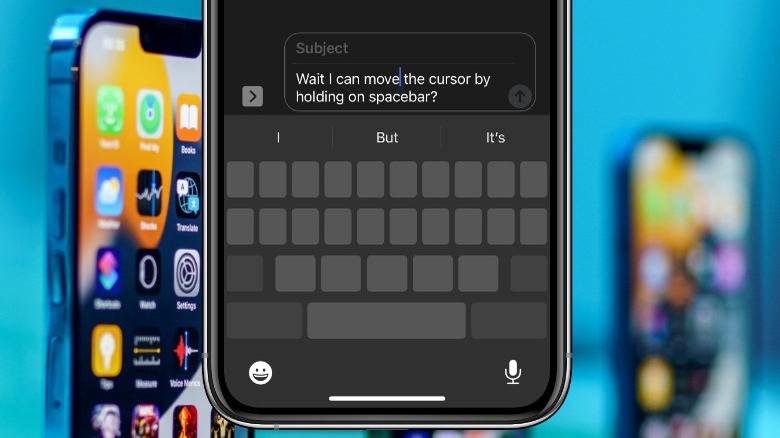
The keyboard on the iPhone is fairly usable for typing, making longer messages and emails feasible when on the go. Where it breaks down is when you have to make an edit to an existing chunk of text, as trying to tap the cursor to the place you want is tricky, especially the larger your fingertips are. There is an inbuilt trick on the keyboard to turn you into a mobile editing whiz, and it's simply to hold down your finger on the spacebar.
You'll know the feature has activated because all of the letter and modifier keys will go blank. When the keyboard is like this, you can swipe your finger around as a touchpad, so the cursor will go exactly where you want it to. While moving the cursor around, tap with another finger to turn the cursor into select mode, enabling the selection of sections of text for removal or other edits. You can also long-press on the cursor to bring up the bubble magnifying glass again, and drag the cursor to where you want it to go. That takes more movement than using the spacebar trick, but it's another option.
Undo typing quickly
Typing on a small touchscreen keyboard isn't the most accurate for spelling, even with inbuilt spell checking like on an iPhone. You can use the hold-to-use cursor trick, but the iPhone has a few other tricks for quickly undoing (and redoing) typing mistakes. The first is Shake to Undo, which has been around since iOS 3 and is a shortcut I've never seen anyone use. It is enabled by default, and to undo the last typed piece of text, incorrectly moved photo, or archived or deleted email, just shake your iPhone like you are trying to get a drop of water off it. Confirm Undo with the popup, and it'll be removed or reverted. Shaking again brings a popup for Redo Typing, and confirm this as before. If you don't want this enabled, open Settings and access the Accessibility menu. Tap on Touch, then tap the toggle next to Shake to Undo so it turns it off.
Apple added some new ways to undo typing in iOS 13. Swiping to the left with three fingers will undo the last typed section and works in all first-party and third-party apps. Swiping to the right with three fingers will redo the removed text. Tapping twice with three fingers will open the edit popup, and tapping the left or right arrows will undo or redo, respectively.
Tap and hold for scrollbar

Scrolling on an iPhone is usually a smooth experience, with Apple limiting the scrolling speed somewhat so that you can browse casually. That slow scroll speed gets annoying when scrolling a long website, social media apps, or a Pages document. Some apps, like Photos, have a quick shortcut to scroll to the bottom by tapping on the corresponding tab on the bottom navigation. That's great if you want to go all the way to the bottom, or if you are using one of the few apps with this function. You can get back to the top similarly by tapping the top of the screen to zoom right back up to the beginning.
There is also one more improvement, which Apple introduced in iOS 13. Start scrolling so that the usually-hidden scroll bar on the right of the screen shows up. Then, tap and hold the scroll bar placeholder and drag it down. That scrolls faster than if you were dragging the screen normally, while enabling you to navigate the middle of the website, document, or app without skipping to the bottom. The scroller has momentum, so the harder you flick it, the faster, and further, it will go.
Find songs in Apple Music
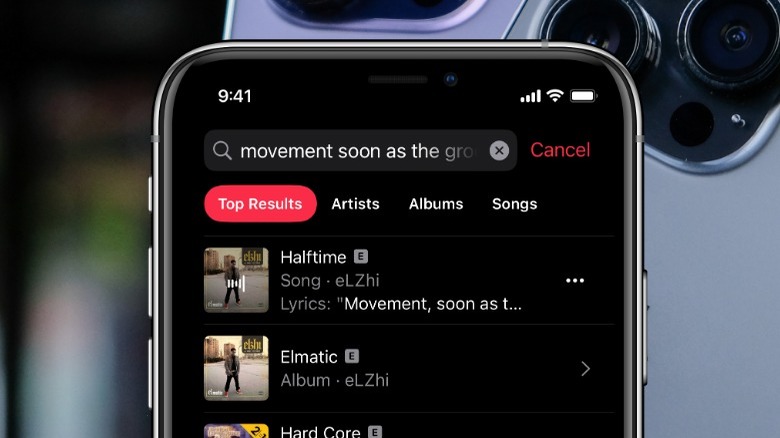
Apple Music has millions of tracks, which makes it a fair bet the music you want to listen to is there, somewhere. The thing is, you have to be able to search for it. Maybe you know your favorite tracks, or artists, or the band they toured with once. That's easy for the search engine to ferret out your tunes. When it normally gets tricky is if you can only remember a few scattered song lyrics, or if you heard a track in the mall and only caught a few bars. Shazam can figure it out if you have that installed, or Siri can also do the same if you remember in time. There is another way, thanks to the deep cataloging inside Apple Music.
Add those lyrics to the search bar, and it will search inside the music. Most tracks on Apple Music have lyrics attached to them, so they can be used in Apple Music Sing, or just followed along to while listening. The search function looks through those, and will return all of the tracks it thinks are relevant. Each title will also have a short subtitle with lyrics, and the snippet of lyrics that you searched for.
Lock Notes
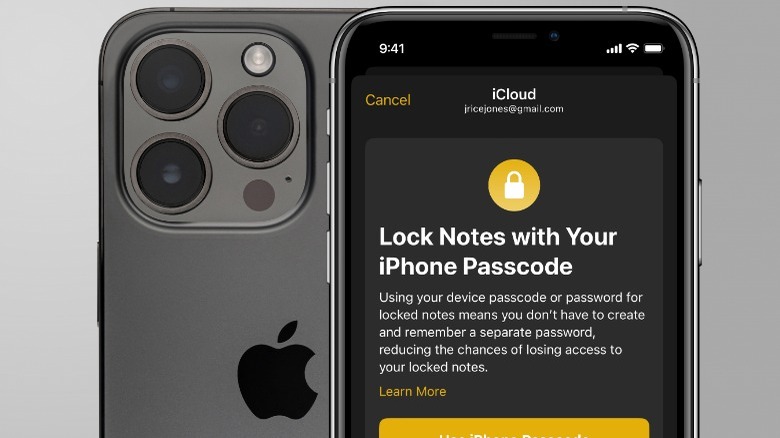
The Notes app on iPhones is an ever-present way to jot down thoughts, checklists, and other pieces of information that could be handy to keep in view. Some of that information could be personal, and you wouldn't want anyone else to be able to easily read it. The Notes app does have a way of locking away notes, so they need a password, Touch ID, or Face ID to unlock them for reading again. When unlocked, they stay like that for 15 minutes before reverting back to the locked state.
Locked notes are a useful tool for security, but they might not work as you thought. First, the master password locks and unlocks every locked note at once. It needs to be set up first, and newly created notes won't be locked unless you lock them. To start, open the Notes app, open a note, and tap the Share button. Select Lock Note from the options, enter a password, and verify the password you chose. This stage also has a toggle for enabling Face ID, which is selected by default. Once that is done, tap the lock icon at the top of the note, and it will lock. To read it again, tap on any hidden note and tap View Note to enter the password or unlock with Touch ID or Face ID. That unhides all the notes, so you will have to lock it again to hide all the other similarly locked notes again.
Find and remove duplicate photos
When Apple released iOS 16, it added a handy tool for reclaiming some of your iPhone's digital storage. The Photos app now has a duplicate file-finding tool, which can organize your iPhone storage and clean up some of your camera rolls. Think of how many downloaded images you might have, that are duplicated in files, downloads, messages, and photos. It's time to claim that back. You'll need an iPhone 8 or newer updated to iOS 16 to use it.
Open the Photos app to rid your iPhone of all its duplicate photos. Tap on Albums, then scroll all the way down until you see the Utilities section. If your iPhone has duplicated images, there will be an option called Duplicates. Tap on this; the app will show you all duplicate matches and give you some options. The safest way to remove duplicates is to tap on Merge, which will keep the largest version of every file and delete the smaller one. You can do them individually, or Select All and merge all the photos at once. That could add up to a significant storage saving.
Copy photo and video edits onto a different file
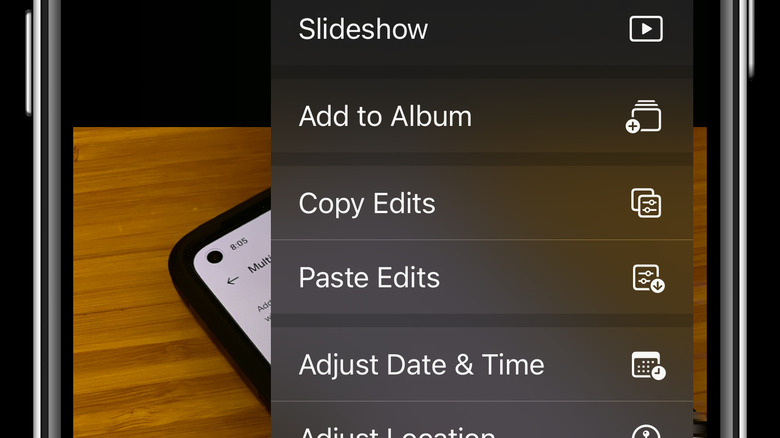
Editing photos and videos on iPhone is powerful with the inbuilt tools in the Photos app, but it is time consuming and tedious. It's also something that you don't have to manually do after you find one look that you like. The Photos app can copy the list of edits you made to any image or video and copy them to make the same edits on any other file. This simple tip can save you hours of frustration. It was added in the iOS 16 update, so you'll want to update your iPhone before continuing if you are on an older version.
Open the Photos app and find any photo or video that you want to edit, or an already-edited one. Tap the Edit button on the top right, and tweak the multiple adjustment layers to your liking. You can change auto, exposure, brilliance, highlights, shadows, contrast, brightness, black point, saturation, vibrance, warmth, tint, sharpness, definition, noise reduction, and vignette. Once done, tap the three horizontal dots at the top right. Tap Copy Edits from the pop-up menu, and then tap Done. Search for the image you want to be edited similarly, and open it. Tap the three dot menu again, then tap on Paste Edits. Stay on that image until the progress bar disappears, and it will be edited exactly as the first image was.
Supercharge Safari with gestures
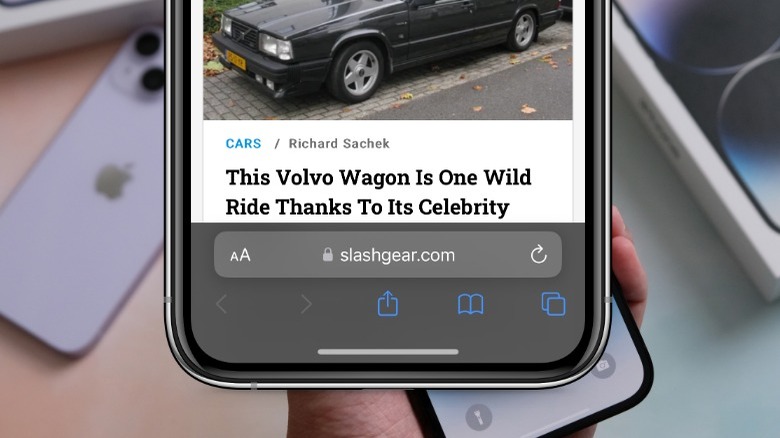
Apple brought a new redesign to its mobile browser, Safari, when iOS 15 was released. It wasn't immediately welcomed, as it moved the navigation bar down to the bottom of the screen from the previous top position. That change brought new ways to navigate the web and Safari, all within reach of your thumb. It also made more of the screen usable for content, as the navigation bar disappears away when scrolling starts.
The most significant navigation change is swiping from right to left on the tab bar will open a new tab, ready for whatever you want to view. This will only work when only one tab is open, or if you are at the end of the tab group. Otherwise, it will cycle to the next tab in the queue, or you can swipe left to right to go backward through the tabs. Swiping up on the address bar will open the tab window, with the clusters of tabs arranged for easy selection. Another handy navigation trick is to tap on links with two fingers. This will open it but in a background tab, so that it won't immediately switch focus. Handy if you want to open it for later use, but stay on the article you are reading.
Siri, what planes are above me?
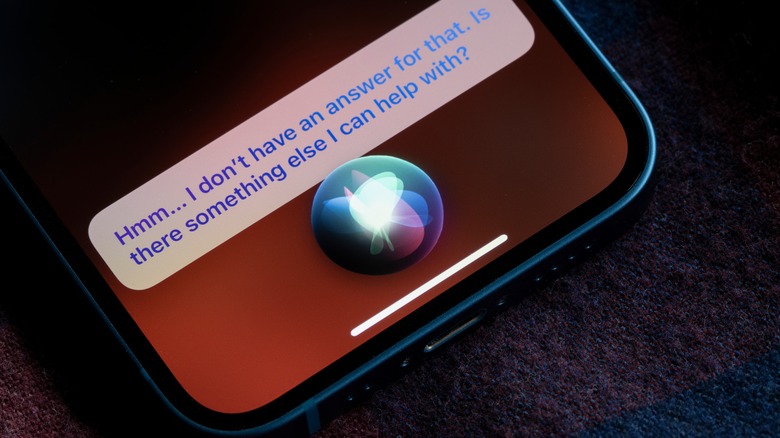
Siri, the voice assistant on iPhone and other Apple devices, has many hidden tricks thanks to its connection to services like Wolfram Alpha. One of the fun questions helps identify any planes, helicopters, jets, or other flying machines in the skies above your location. It's fun, aids planespotters and other hobbyists, and is a nice reminder that voice assistants don't always need to be giving immediately useful information as long as it is topical.
When a plane or helicopter is flying overhead, ask, "Siri, what flights are overhead?" You will get a returned answer from Wolfram Alpha. This list will show every flight viewable from the location your iPhone is at, with the angles and distances you need to look to spot them. The feature doesn't always work, which is slightly frustrating and is limited to the U.S. If you are using iCloud Private Relay or the other privacy features that limit IP tracking, your iPhone might not give the location it needs to Siri, stopping this quirky question from returning an answer. Siri will always provide links to Flightradar24 and FlightAware, two flight tracking websites that will have all of the information you were after.