How To Create And Share An Amazon Wishlist

We may receive a commission on purchases made from links.
In today's age when shopping online has become the norm, digital lists of items you want to get have too. These wish lists are especially useful for upcoming occasions like birthdays or holidays as well as the various shopping promotions and events that are centered around them. Whether it's for you to have a resource for things you eventually want to purchase for yourself, or if you want others to have insight about what they can get you on your birthday or some other important anniversary, having a wishlist makes shopping online easier and hassle-free.
One of the simplest ways to shop online is through Amazon. Apart from the fact that it's got one of the most expansive product catalogs known to man, the platform also has several features that make online shopping an absolute breeze — may it be through affordable prices or better payment and delivery options, to name a few. More importantly, any time you find something that piques your interest, you can easily add it to an Amazon wishlist, which you can later use as a personal shopping guide or share with friends and loved ones so they know what to get you.
How to create a wishlist on Amazon
Before you can start adding items to your shopping list on Amazon, you first must make one. Here's how you can do it through Amazon's desktop platform:
- Launch your computer's web browser, go to amazon.com, and log in.
- In the top-right corner of the Amazon home page, click on Account & Lists.
- Select Your Lists.
- Go to Create a List.
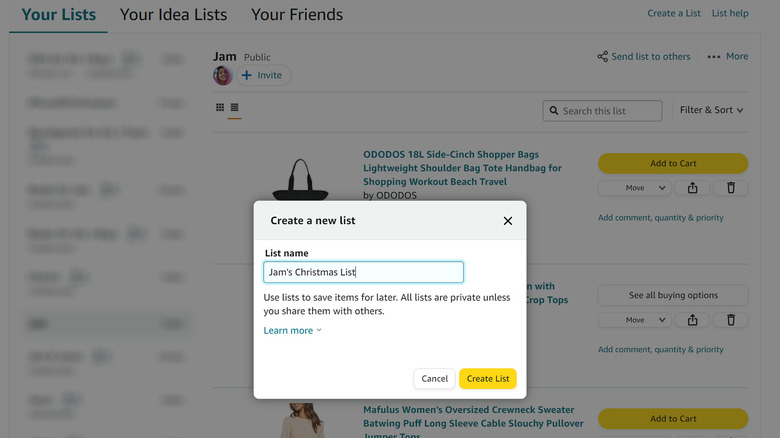
- On the Create a new list popup, enter your preferred list name.
- Hit the Create List button.
Then, there are the steps for creating a new wishlist through mobile as well:
- Launch the Amazon app. Log in if you haven't.
- Tap the account icon (it's next to the cart symbol) in the bottom navigation bar.
- Go to Your Lists.
- Hit Create a List near the top of the page. On the Android app, it may appear as a "+" symbol next to "Your lists and registries."
- Type your preferred wishlist name.
- Tap Create List.
Once the new Amazon wishlist has been created, an empty page for it should show up on the screen.
How to modify Amazon wishlist preferences (or delete the list)
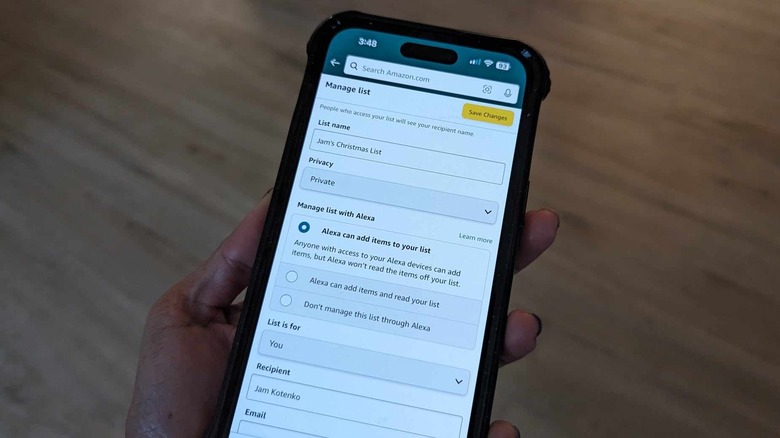
Every Amazon wishlist has its own settings. To check out all your options, open one of your wishlists, tap the three-dot icon in the top-right corner of the page, and select "Manage list." On this page, you can:
- Modify the wishlist name.
- Change the wishlist's privacy setting. By default, new wishlists are set to Private and only you can access it, but you can switch it to Public if you want anyone to have the ability to view it, or Shared so that specific people can have access to and add things to it.
- Manage your list with Alexa and allow your compatible device to read or add items to your list if you have one.
- Specify if the wishlist is for yourself or an organization.
- Add a recipient's name, email, and birthday.
- Provide a wishlist description.
- Assign a shipping address for items purchased from the wishlist.
- Share your shipping address with third-party sellers, an option we recommend you leave disabled for safety purposes.
- Let buyers ship additional items that you haven't included in your wishlist.
- Leave purchased items listed on your wishlist.
- Stop surprise purchases from being spoiled.
- Set the wishlist as your default list to add products to.
- Delete the wishlist permanently, which you should only do with absolute certainty.
Don't forget to hit "Save Changes" if you make any modifications to your list settings.
How to add products to your Amazon wishlist
After you've created a new wishlist on your Amazon account, you can begin filling it up with items you want from the platform. If you're not sure where to start, the Amazon app offers several fun ways to discover cool things to buy that are worth trying out. Once you see something you like, here's how to add it to your wishlist via the Amazon mobile app:
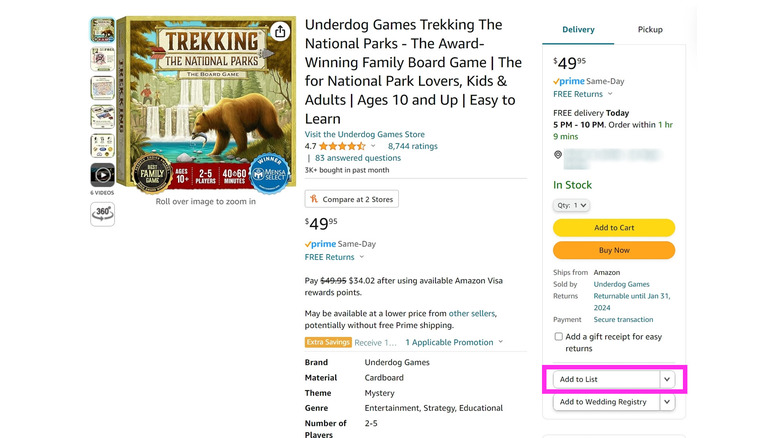
- Click or tap on the item to open its product page.
- A bit below the Add to Cart and Buy Now buttons should be a nondescript Add to List option. Hit it.
- If you already have more than one wishlist saved, you'll have the option to pick which one you'd like to add the item to.
The steps are similar on Amazon's desktop website. The only difference is the appearance of the Add to List option. If you have more than one list saved on your Amazon account, you'll need to click the downward arrow beside Add to List to pull up all your lists and choose which one to save to. Otherwise, you can click right on top of Add to List to automatically add the item to your default wishlist.
How to share your Amazon wishlist with others

Once you've populated your new Amazon wishlist with products available on the website, you can start sharing it with others. Here's how to do it via desktop:
- On the Amazon homepage, click on Account & Lists, select Your Lists, and pick the wishlist you want to share.
- Alternatively, you can hover over Accounts & Lists and choose which list you want to share in the Your Lists area. If the wishlist you want is not visible this way, you may need to click "See more" for a complete listing of all your wishlists.
- Click "Send list to others."
- In the popup, you can invite a person to:
- "View Only" – this is a good option to pick if you plan to send the link to someone without editing privileges
- "View and Edit" – Anyone you give this type of access to will be able to add or remove items from the wishlist, change quantities, and post comments, among other things.
Meanwhile, here are the steps for sharing a wishlist through mobile:
- Tap the account icon in the bottom navigation bar on the app's homepage.
- Go to Your Lists and tap the list you want to share.
- Hit the Invite button.
- Select either "View only" or "View and Edit."
- Pick one of the suggested share methods.
Again, new wishlists are set to private by default and only you can see it or make changes. Once you change this setting manually or share it with others and they accept your invite, your wishlist's privacy setting will be changed to "Shared." Anyone with a link to your wishlist wil then be able to view it and access other granted privileges.
Crucial caveats to consider regarding Amazon's wishlist feature
Now that you know most of the basics you can do with wishlists on Amazon, you should also be aware of factors that may affect the way you use wishlists.
- You can create an unlimited number of wishlists.
- When a wishlist is under the "Shared" setting — which, remember, has both the View Only and View and Edit share options — anyone with a link can view your list and more importantly, pass it along to others to do the same. While this should be fine for anyone with the View Only link — yay for more gifts! — it might be an issue for those with View and Edit access as it may prompt others to add unsanctioned items to your list. Only give wishlist-editing privileges to people you absolutely trust.
- Only wishlist owners have the ability to make changes to its preferences at any time, which includes privacy settings, the ability to share or delete the list, view or change shipping addresses, and more. If you don't see the "Manage list" option, you're likely not the owner of the list in question.
- Your wishlist will only show viewers your name, city, and state of your shipping address. Birthdays are only used for reminders, while email addresses will only be used to send invitation messages.
- Only list owners, along with invited people via the View and Edit option, can add items to a wishlist. To ensure that only approved people have this ability, go into a shared wishlist that you own, hit the three-dot icon, and select "Manage people" or "Manage access." Remove anyone who shouldn't be included.
- You can't add out-of-print books, out-of-stock products, cell phones with service plans, items without release dates, or items with quantity restrictions to your wishlist.