5 Things You Need To Do When Setting Up A New Android Tablet

Setting up a new Android tablet is pretty straightforward. The moment you power it on, the device starts walking you through the setup process, which includes selecting a preferred language, connecting a wireless network, copying apps and data from an older device, and so forth.
Signing in to the Google account is another thing you need to do while setting up your new tablet, as without it, you won't be able to access apps from the Google Play Store or other Google services like Gmail, Docs, Sheets, etc.
Then, you must decide which Google services you wish to use, from location to app scanning and sending diagnostic data. While the latter two are optional, and you won't really lose on any feature if you leave them off, enabling location, mainly to activate Find My Device on your tablet, is essential.
Apart from this, you would have to accept a couple of terms and conditions and then set up your biometric data to secure your device and protect it from unauthorized access. Now that you have an overview of the process, let's dive into the details. While the order of these steps might differ based on the device you have, they are more or less the same.
Connect to a Wi-Fi and sign into your Google account
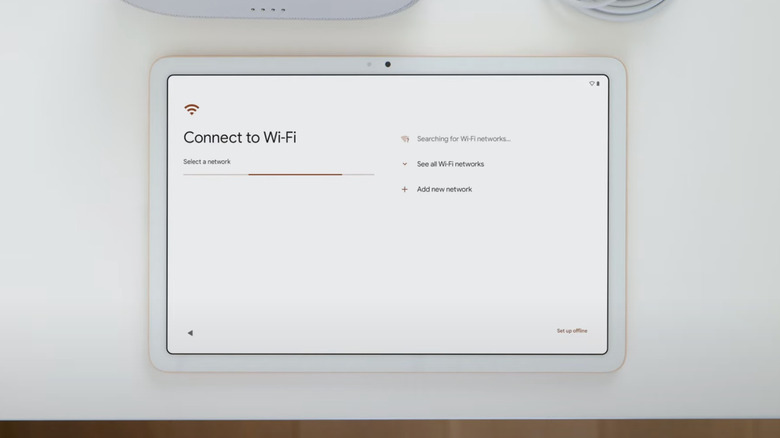
So, the first thing you need to do after powering on your new Android tablet is connect it to a wireless network. The device requires an internet connection during this process to look for available software updates and sign into your Google account later.
As soon as you select a language and tap on "Get Started," your tablet starts looking for available Wi-Fi networks. In a few seconds, it will show you a list of networks nearby. Tap on the one you wish to connect and then enter its password using the on-screen keyboard. Finally, tap "Connect" at the bottom right corner of the dialogue box, and you're good to go.
Next, you'll see the "Copy apps & data" screen. This allows you to set up a tablet by following the on-screen instructions when moving from an older Android device. However, you can hit "Don't copy" if this is your first Android tablet.
As the setup moves forward, the Android tablet will ask you to sign in to your Google account. You can do this by providing your preferred Google account's email or phone number in the text field and entering the password. If you've enabled two-factor authentication on your Google ID, you must also provide the OTP or security code.
Install optional updates and enable the required Google services
Afterward, the Android tablet may download and install any available software updates. However, the availability depends on several factors, including but not limited to the manufacturing and purchasing gap, whether early adopters reported some bugs or issues with the device, etc.
If there are any updates, your tablet will inform you and ask you to install them by following the on-screen instructions. If not, it will move on to the next step: turning on the optional Google services.
The first service is "Use location." This is the only option you should enable simply because it enables some of the most useful features, such as location-based weather alerts, live location tracking while navigating, and, most importantly, Find My Device, which helps you locate your Android tablet. Since the initial setup process doesn't allow users to activate Find My Device, we'll revisit this in a bit.
The other two services, "Allow scanning" and "Send usage and diagnostic data," are optional, and there's no specific feature that you'll lose if you turn them off. To give you a clear idea, though, the former allows apps and services to scan for Wi-Fi networks or nearby devices anytime, even when Wi-Fi or Bluetooth is off, and the latter sends back diagnostics data from your device to Google.
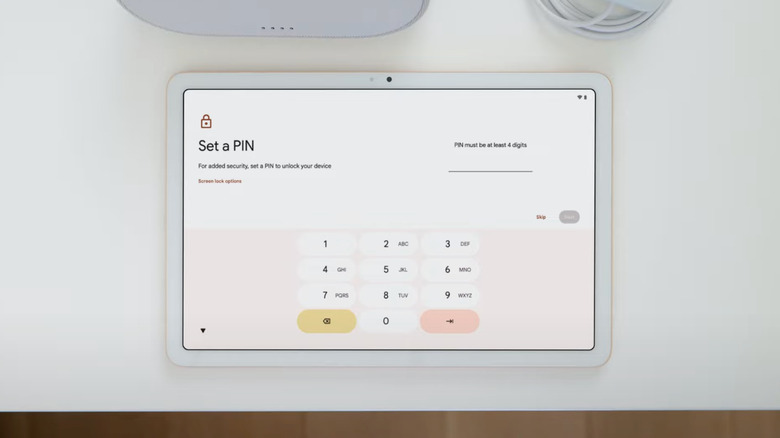
Set up a PIN and enable Find My Device
Once you've enabled the desired Google services, the tablet could ask you to accept the limited warranty and other usage terms.
The last step in setting up a new Android tablet is setting a PIN or fingerprint. Your tablet first asks to set a PIN, wherein you have to type the same PIN into the device twice. Now, if your tablet has a fingerprint scanner, depending on the make and model, it will ask to set up the fingerprint unlock.
All you've to do is press the fingerprint scanner (often embedded in the power button) a couple of times or, as instructed by the device. Finally, tap "Next," review any additional apps you might want to install on your new tablet, go through the gesture tutorial, and that's it.
Now it's time to set up Find My Device. Head to Settings > Security > Find My Device and enable the feature. If you can't locate "Security," look for "Security & location." Then, enable the "remote unlock" and "store recent location" options.
Remember that the location services must be on for the feature to work and help you find your lost device. You can find more details about finding a lost Android device in our guide for tracking a phone on Google Maps. The steps involved are similar, so you should get a fair idea.