5 Useful Google Chrome Extensions If You Use Notion
If you're looking for a multi-purpose productivity tool for your work or personal needs, you've probably already heard of Notion. This versatile workspace simplifies a wide range of tasks, from taking notes for class to overseeing a multi-month work project. It comes complete with an array of nifty features, including the table database used for various purposes like employee directories and expense tracking, an interactive to-do list for your daily assignments, and even embedded widgets like calendar, weather monitor, and Spotify.
However, beyond the myriad features integrated into the platform, there are additional ways to enhance your overall user experience. One such method is the use of Chrome extensions. These can add more functionality to Notion, so you can get the most out of it. As such, we've composed a list of five of the best Chrome extensions for Notion and will show you how to use them effectively.
Notion Web Clipper
There's always that one interesting article, news story, and blog post you'll come across but are unable to read at the moment. So you do the next best thing and bookmark it on your browser to get back to later. The problem, however, is that you frequently don't. Those web pages just sit in your bookmarks tab, forgotten. This is where Notion Web Clipper comes into the picture.
Developed by Notion itself, this Chrome extension helps you save any web page directly to your Notion page or database with only a few clicks. Once your web page is safely stored in Notion, you can then assign it as a task or set a reminder for it, ensuring that your web page doesn't fall into the digital abyss.
Here's how you can use Notion Web Clipper:
- Create an in-line database in your Notion workspace by creating a new page, typing /db, and selecting Database-Inline from the floating menu.
- Name your page and add an icon and cover photo if you please.
- Change the table database's default Tags column into a text type named Reminder.
- Install Notion Web Clipper.
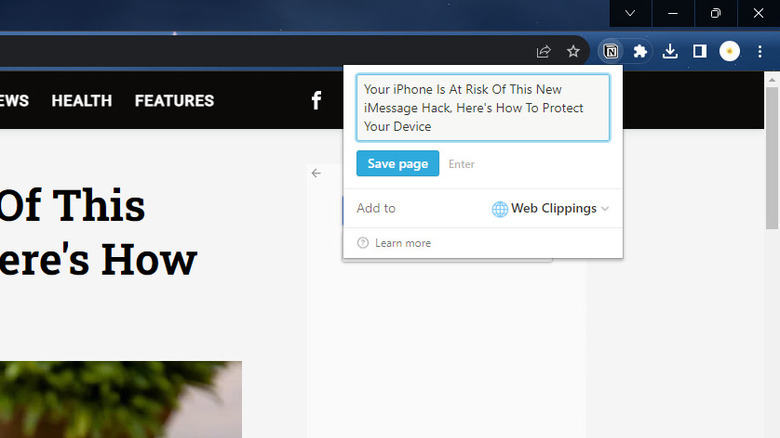
- Go to the web page you want to save to Notion.
- Click on Notion Web Clipper.
- Change the Add to section to the database you just created.
- Click on Save page.
- Select Open in Notion.
- In the Reminder property, type @remind Monday 9 pm or any other date. Notion will then send you a notification on your chosen date and time.
Notion Boost
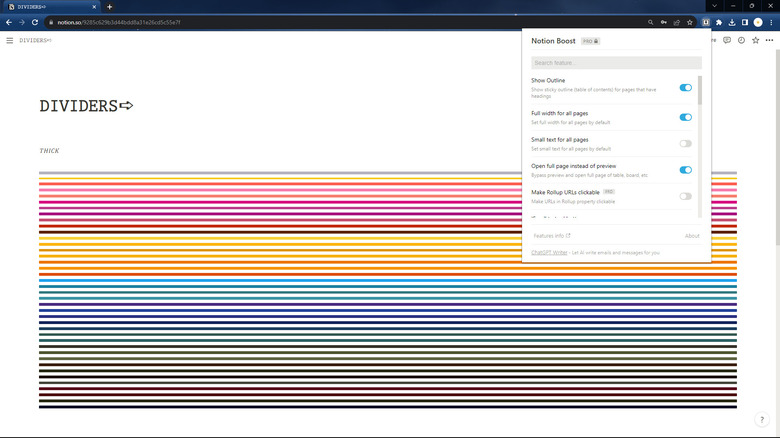
Notion already comes with fancy bells and whistles, but if you're looking to boost your productivity while using the platform, you'll want to check out Notion Boost. Notion Boost makes using Notion a lot easier and faster, adding more than 20 basic but handy extra features to your workspace. For one, there's the sticky outline which resembles Notion's built-in table of contents. But unlike the standard table of contents located at the top of the page, the sticky outline is made into a sidebar. This eliminates the need to scroll back and forth to the table of contents when you want to skip to a different section of the page. Another handy customization is the full-width and small text for all your Notion pages. By default, you would need to enable full-width and small text on every page as these settings don't automatically apply to your entire workspace. However, with Notion Boost, you only need to set it up once, and all your pages will be in full-width and small-text mode. Notion Boost also has a useful scroll-to-top button, slash command disabler, floating help button hider, spellcheck for code blocks, and narrow spacing between list items.
Using Notion Boost is pretty easy. Just install the extension from the Chrome web store and log into the Notion web app. Then, open any Notion page before clicking on the extension. From there, you simply need to enable the customizations you want to use.
Copy To Notion
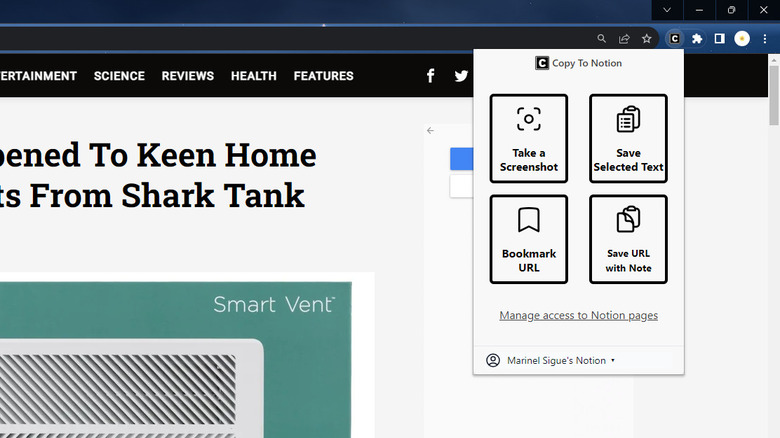
Notion Web Clipper is convenient when you want to save entire web pages to Notion, but what if you've already read the article and wanted to save only certain parts of it? Copy To Notion can help with exactly that. Instead of going through the hassle of copying the particular section, opening your Notion page, and pasting the content there, Copy To Notion simplifies the process as you won't need to switch between two tabs. You can save what you want to Notion without leaving the current web page.
Copy To Notion lets you save plain text content, a screenshot of parts of or the entire web page, and the web page's URL. You can choose where to add the content on the page (e.g., top, bottom, between existing headings) to keep things organized. Once Copy To Notion successfully saves the content, it will automatically appear on your Notion page, complete with a link to the original web page.
Here's how to use Copy To Notion:
- After installing the extension, click on it and log into Notion.
- Follow the on-screen instructions to set it up.
- Go to the web page you want to save to Notion.
- Click on the extension and choose what you want to save (text, screenshot, URL).
- In the "Clip's position on the page" section, select where you want the content to appear.
- In the "Save to" section, select "Add a Notion destination" and pick the Notion page you want to add the content to.
- Finally, click on Add to Notion.
ChatGPT to Notion
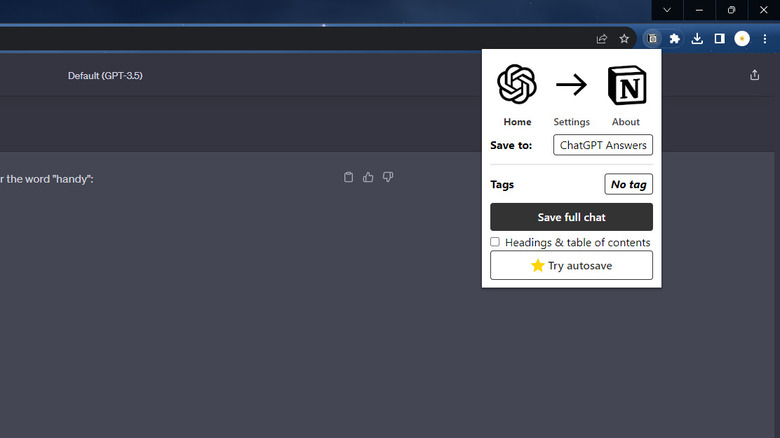
ChatGPT previously released a feature that lets you start sharing your conversation with others. This can be pretty handy when paired with Notion, especially if you want to compile links to your conversations in a centralized location. However, manually getting a ChatGPT shared link for every chat you have and pasting it to your Notion database can be quite cumbersome. To simplify the process, check out ChatGPT to Notion. This Chrome extension saves not only links to your entire ChatGPT conversation but also individual prompts and answers if you're only after particular answers from your thread.
Follow these steps to use ChatGPT to Notion:
- Install the extension.
- Click on the extension icon from the top of the browser.
- On the setup page, hit Select pages and pick the Notion pages you want the extension to access. Make sure that the page you share has a database with a URL property (column for URLs) and multi-select property named Tags. If you don't have such a page, create one first. Here's a ready-made database from the developer that's compatible with the extension.
- Select Allow access to finish the setup.
- Click on the extension again.
- Select the database from the list to link it to the extension.
- Go to the ChatGPT conversation you want to save to Notion.
- Do one of the following:
- To save specific answers, click on the pin icon next to the response.
- To save the entire conversation, click on the extension and select Save full chat.
Slashy
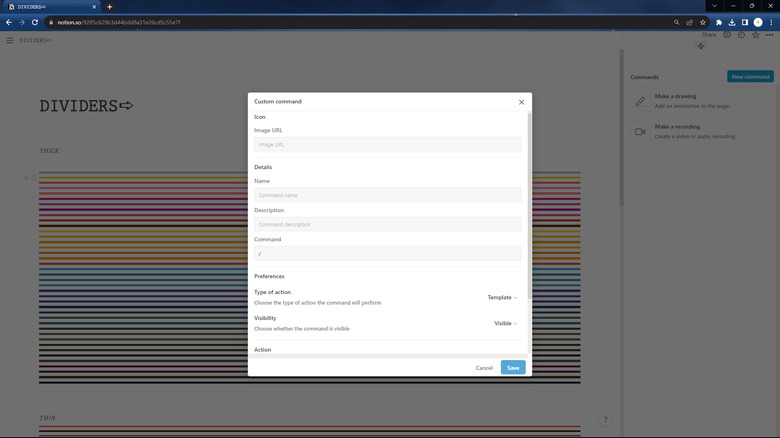
If you're not new to Notion, you already know how useful slash commands can be. They are essentially keyword shortcuts that trigger specific actions and enhance your experience with Notion. For further personalization, you might want to create your own command library. Slashy lets you do exactly that.
With this Chrome extension, you can make customized commands for content blocks you frequently use on your pages. Say, a command that adds a combination of a quote and a bulleted list with five items (default slash commands only create one bulleted item and one quote at a time). You can also set a command that inserts a particular image or runs a Javascript code on your Notion page. Slashy also includes two ready-made custom commands: Make a drawing (/draw) and Make a recording (/record).
To use Slashy, here's what you need to do:
- After installing the extension, go to any Notion page.
- Click on the zap icon in the top-right corner.
- Select New command.
- Paste a URL of an image under Image URL. This will serve as your command's icon.
- Input your command's name and description in the respective fields.
- Enter your command in the command field.
- Under Preferences, choose your type of action: Template for content blocks, Image for inserting images, and Script for running Javascript.
- Set the Visibility to Visible for the command to appear in Notion's floating menu.
- Type what the command will do in the Action field.
- Hit Save.