How To Connect A Camera To Your Raspberry Pi
One of the biggest (if not primary) selling points for the Raspberry Pi is its capacity for change. The modest computer platform can link up with a number of official and unofficial components to create everything from a pocket PC, to a handheld gaming system, to different kinds of security devices, and so on. This includes camera functionality as well, though there's a catch.
The caveat is that this usually requires a bit more work and knowhow than simply acquiring a particular add-on and hooking the pieces up. You'll need a Raspberry Pi computer (with a power supply), of course, in addition to a camera module. Additionally, if you want to cover up the Raspberry Pi's internal bits you'll probably want a case that can accommodate a camera module, such as the Raspberry Pi 3 Case or the Raspberry Pi Zero Case — though these aren't strictly necessary just to get the camera working.
You may also need to install and configure Raspberry Pi OS if you're buying your computer through unofficial sources, but if you purchase directly from Raspberry Pi you should be good to go out of the box.
Connecting a camera to your Raspberry Pi
With your Raspberry Pi computer and camera module ready, here's how to get them working together:
- The camera port should be turned on by default in all new Raspberry Pi computers, so you should be able to skip to step seven. But if it's not already on you'll need to manually set it up first.
- From the Raspberry Pi OS desktop, run the terminal and enter "sudo raspi-config" to open the configuration tool.
- Select Interface options, then choose Camera.
- Find the camera port from the menu (likely named something like "P1 Camera") and select it.
- When prompted about enabling the camera interface, choose Yes.
- Exit the config program and Accept to reboot your Raspberry Pi.
- With the camera port ready, make sure the Raspberry Pi is turned off and disconnected from all cables, including the power supply.
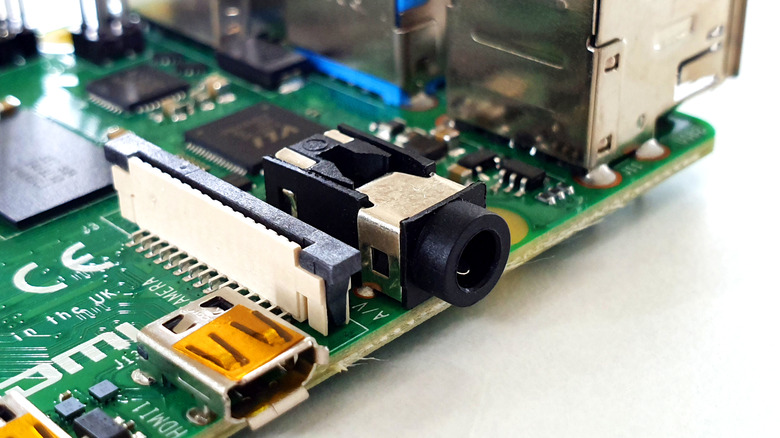
- Locate the Raspberry Pi camera port (usually between the ports for audio and HDMI), which should be labeled CAMERA.
- Align the connectors (blue side facing the USB port) and plug the camera module's cable into the CAMERA port. You may need to remove plastic film and pull back a black plastic piece, then push that black plastic back in once the cable is in place.
- Plug everything else back into the Raspberry Pi and turn it back on.
Your Raspberry Pi camera is now good to go, and with a little imagination (and some additional parts) you can use it for more than just taking photos.