4 Google Chrome Lifehacks That Will Make Your Browser Even Better

Google Chrome stands out as the Michael Jordan of web browsers, and despite the competition, it has maintained its unrivaled position as the most popular browser for many years. Built with a focus on speed and simplicity, Google's browser has consistently maintained these core values since its launch in September 2008 — not to mention that the company has also improved its capabilities by introducing new updates and features over the years, all aimed at enhancing your browsing experience.
Chrome's journey has evolved beyond its initial role as a mere search bar for internet access: it has today become a feature-packed experience, one that is also available on smartphones and tablets. Within these updates lie functions that make your browsing experience significantly smoother, including features that allow for browser customizations, keeping tabs on account security, efficient multitasking, and more, ultimately saving you time while surfing the net. With that said, here are four Google Chrome lifehacks that will make your browsing experience even better.
Group tabs together
So, picture this: you have so many tabs open in Chrome that your browser starts looking like a dumping ground, and finding the right tab becomes a treasure hunt — not cool for you or your computer. What if there was an easy way to organize and categorize these tabs for quick access based on your immediate needs?
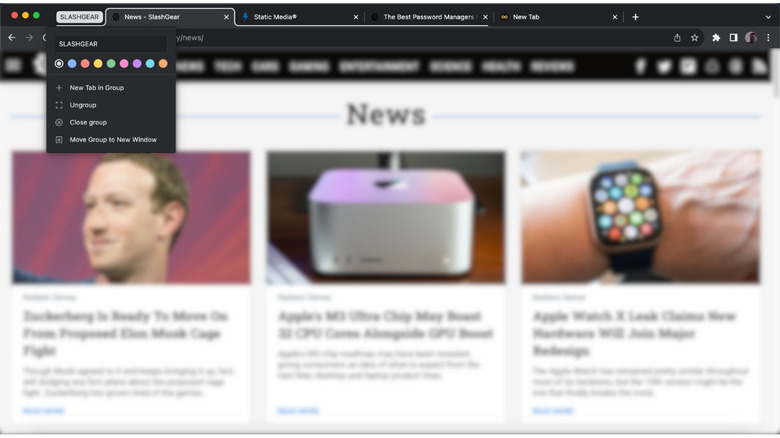
Luckily, achieving this level of organization is very simple. Start by right-clicking on any open tab, then select "Add tab to new group." Assign a name to the group to provide a clearer picture of the tabs within it — for example, you can label it Work if it's a tab for work. Next, drag new tabs into the same group, merging them.
Knowing that you can create different groups in your browser, relying on names alone might not be enough to quickly identify the tabs relevant to your current browsing session. To address this, Chrome offers a valuable feature: the ability to apply different colors to various groups. To do this, right-click on a group and you'll see a color palette. Here, you can choose whichever color you want to represent a group. Grouping tabs together within Chrome not only makes your browser look like a well-kept library bookshelf but also significantly saves time spent searching for tabs while browsing.
Send tabs from your computer to phone
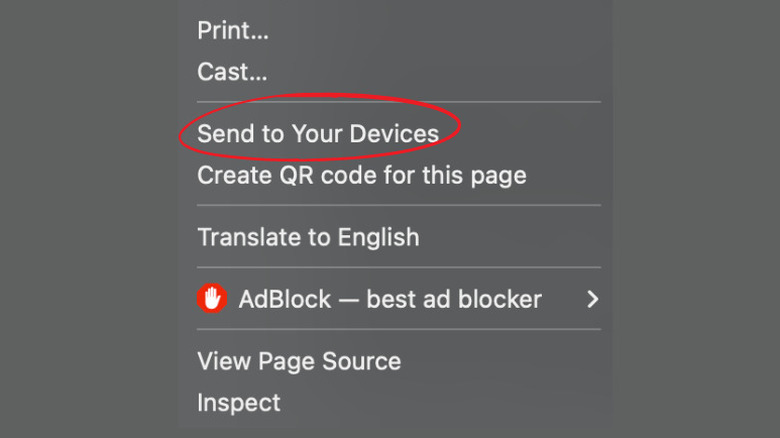
While you're browsing the internet, hopping from one web page to another, there are moments when you find something and want it on your smartphone, right? Now, you could take screenshots and transfer them over to your phone, email yourself the link, or use a bookmark syncing app, but all of those will take longer than directly sending the entire web page from your computer to your phone.
Here's the breakdown: navigate to the page you want to send to your phone. Right-click on the tab and select the "Send to your devices" option. Just make sure you're signed in with the same Google account in Chrome on both your computer and smartphone. Your phone will show up in a list — click on it and almost immediately, your phone will get a notification that a Chrome web page has been received from your computer. Tap that and the web page will pop open in the Chrome browser app right there on your phone.
Enable autofill
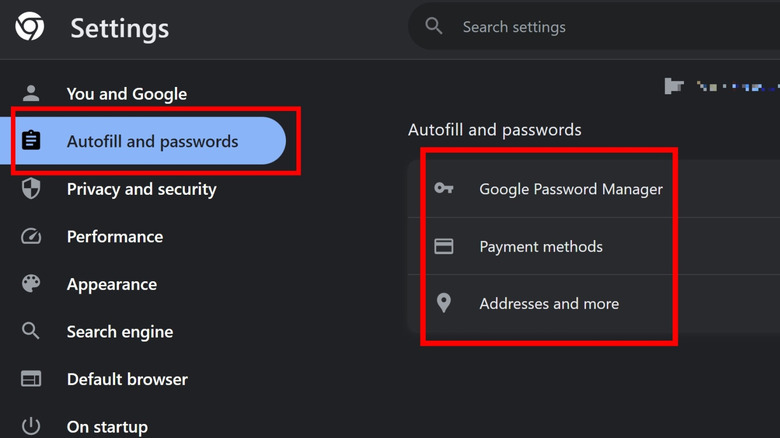
Autofill has to be one of the most useful features available in modern browsers. More times than you can count, you will need to fill in your email address, home address, credit card information, phone number, and more while shopping online or creating accounts. Autofill adds all of this info for you automatically. For you to use the Autofill function on Google Chrome, you need to first tap on the three-dots icon in the top-right corner of the browser.
In the menu that opens, select the Settings option and use the search bar to find the Autofill and Passwords section. Within that section, you will see options to add payment methods, passwords, and addresses to be automatically filled in anytime you need them for a specific website. Keep in mind that you don't have to fill in every field — for example, if you're not comfortable giving Chrome your payment info, you can add just your name, address, and phone number.
Use Chrome's task manager

If you happen to be someone who keeps 50 browser tabs open at any given time, you've likely noticed that during the process of switching between these tabs, your browser's performance tends to slow down notably. This decrease in speed can even reach a point where slight freezing occurs when you shift tabs or scroll through web pages. Google Chrome browser has a function called the Task Manager for such an occasion — and it is completely different than the task manager on Windows or the activity manager on your Macbook. This is a special task manager that shows you which tabs are open and also which tabs are using more memory and CPU. To access the tool:
- Tap or click the three dots in the top-right corner of Chrome.
- Select the More Tools option.
- Select Task Manager.
With the Task Manager open, you can quickly scroll through and locate tabs that are hogging CPU and memory, causing your machine's performance to drop. Click or tap on any of these tabs, then hit the End Process button in the bottom right corner of the browser to end them.