11 Of The Best 3D Printer Upgrades Of 2023
We may receive a commission on purchases made from links.
There was a time when you got your new 3D printer home and the second week was spent printing upgrades — remember that fan duct that changed everything? (The first week, in case you've forgotten, was for resolving bed adhesion problems). A lot of those upgrades and mods are making their way into new off-the-shelf products, but there are still some that many users will want to reckon with. A few other upgrades are relatively new, if not in concept. then in the fact that they've been refined to the point that they're practical for a mass market to fiddle with.
The fun of owning a 3D printer is "fiddling with" it. Even the cheapest commonly available consumer printers (the Creality Ender 3, for example) will work out of the box, give or take that week spent on bed adhesion. With these consumer-grade 3D printer upgrades you can make your experience easier, more reliable, faster, or quieter, all while using an expanded slate of materials. Though, you'll still use FDM printing with standard poly filaments most often. Printing metal hasn't reached the home market yet (unless you have a nitric acid bath and a kiln sitting around in your rec room), binder jetting will set you back $100,000, and newer methods like injection continuous liquid interface production are just a happy dream so far.
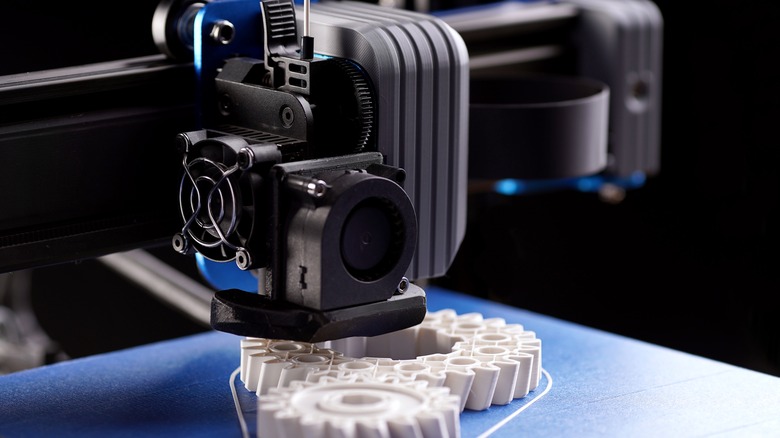
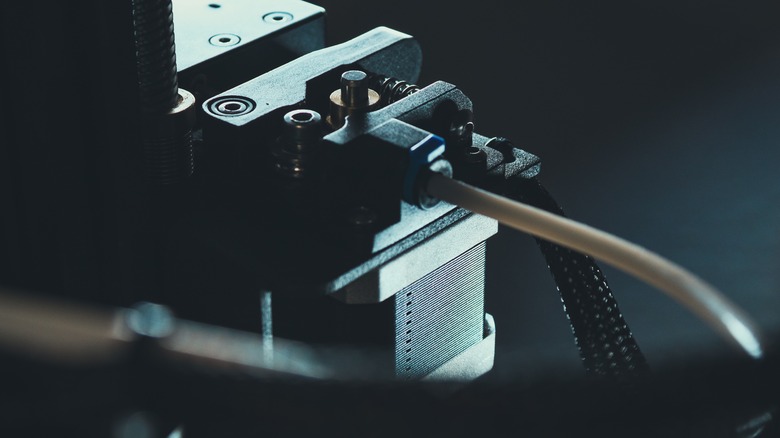
Revo Hotends
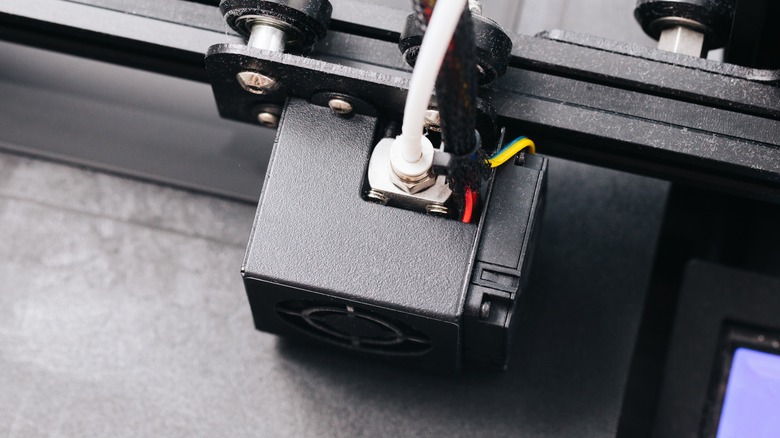
Not so long ago, the hotend upgrade craze was mostly about all-metal hotends, like the ubiquitous Micro Swiss models. Doubt has crept in about those in general, but the new E3D Revo Six hotends are the new, hot (ahem) thing. Hotends are a bit of a hot-button issue. On one hand, they enable printing with a broader palette of materials, including nylon, polycarbonate, and carbon fiber. On the other hand, they are fussy, and it can be frustrating to finally dial in your printer, get the confidence to branch out into new materials, then set yourself back to the starting line with difficult-to-resolve clogs and jams.
Incremental improvements via Creality's Spider, the Mosquito, and E3D's V6 hotends began to make this approach feel practical, and E3D has upped the ante with the Revo line. Incorporating the best features of the V6 (the Revo Six is a drop-in replacement for the V6), such as the more efficient round heat sink, the Revo hotends support temperatures up to 300°C (the practical upper limit for a desktop printer) and introduce a quick-change nozzle mechanism that makes it a breeze to clear jams when they do happen. The CR model is tweaked directly for Creality printers, eliminating the need (and the fun) for 3D printing mounting brackets for your printer.
Automatic bed leveling sensors
Of course, some things never change at all. Remember how cool the idea of automatic bed leveling was a decade ago? If you're in the market for a new printer, you'll probably end up with one. But let's take a step back.
Bed leveling was long a kind of grueling rite of passage involving temperamental springs, counterintuitive Marlin menu-diving, and sliding cardstock of just the right thickness under your nozzle until you found just the right resistance. After a brief flirtation with Harbor Freight dial indicators, along came automatic bed leveling. At the time that mostly meant the BLTouch, a vaguely indecent-looking, syringe-like contraption that (like so much of 3D printing) seems like an idea that's too basic to actually work. It was an open-source Indiegogo project that used a metal pin and a hall effect sensor to map the Z-axis height of your print bed at various points. It doesn't actually level your bed but adjusts your g-code output to compensate for differences in height.
The BLTouch was the only commercial product you could find for a while, but the market has fairly exploded with options. BLTouch has graduated from Indiegogo to OEM, and most new printers have some form of auto-leveling. Competition brought alternatives like the CR Touch's use of an optical sensor rather than a hall effect sensor. If you're looking to upgrade an older printer, a newer auto-leveling sensor might be just the thing.
Silicone solid bed mounts (for Creality CR-10 and Ender printers)
Remember those yellow springs that have long been a traditional upgrade for almost everyone with a CR-10 or Ender 3? It was quite a score. You could dramatically improve your printer heat bed's ability to stay leveled by buying springs for a few bucks. They were a great improvement over the universally panned factory springs, and Creality — never missing a trick — started marketing its own line of yellow springs to replace its terrible OEM springs.
The new(ish) silicone bed mounts for Creality printers are an upgrade from that upgrade. The yellow springs were an improvement, to be sure, but it appears that the whole concept of using a compression spring might not have been optimal. These silicone cylinders maintain firm pressure so that your bed doesn't slip out of level, and does not wobble nearly as much when printing.
A better Bowden Extruder (or upgrade to a direct-drive extruder)
Sometimes upgrades aren't about performance improvement but about proper function. The all-metal Bowden extruder is a great example. Many printers use a Bowden tube setup, including those from Creality and Ultimaker, and some of the stock extruders are surprisingly fragile devices. It's more a matter of when the plastic components on the older extruders will break than whether they will. An aluminum extruder is immensely stronger and more durable, and can even come with Capricorn tubing, which some find helps with printing TPU. You can also upgrade your printer's brass extruder gear to a steel version that may be more durable and less prone to slipping. You can even upgrade the push fittings that attach your Bowden tube to your extruder and hotend. Each upgrade makes a little difference in a hobby where a little difference is sometimes all the difference you need.
Some upgrades make a substantial difference, like moving to a direct-drive extruder. Bowden setups have their attractions (including a lighter, faster print head), but a direct drive setup dramatically shortens the distance between the extruder and the hotend, which eliminates most of the play in the filament and shortens retraction distances. This makes the use of flexible filaments far easier. But it's possible that direct drive extruders can also lead to problems with extrusion consistency, as Prusa users found out when it became obvious that the Bowden setups on cheaper Ender 3 printers outperformed Prusa's direct drive.
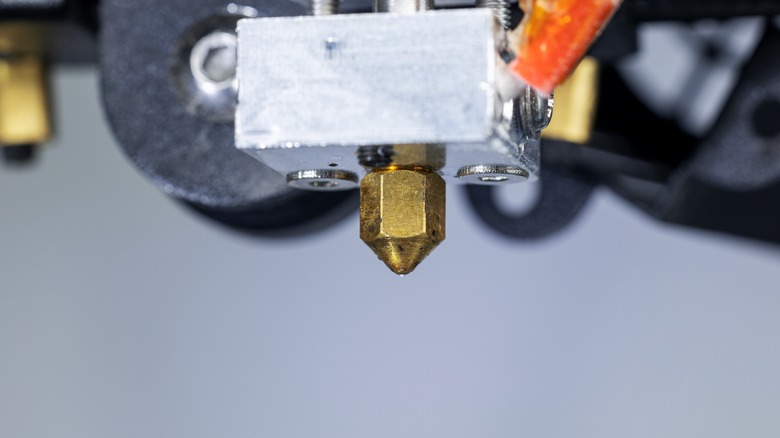
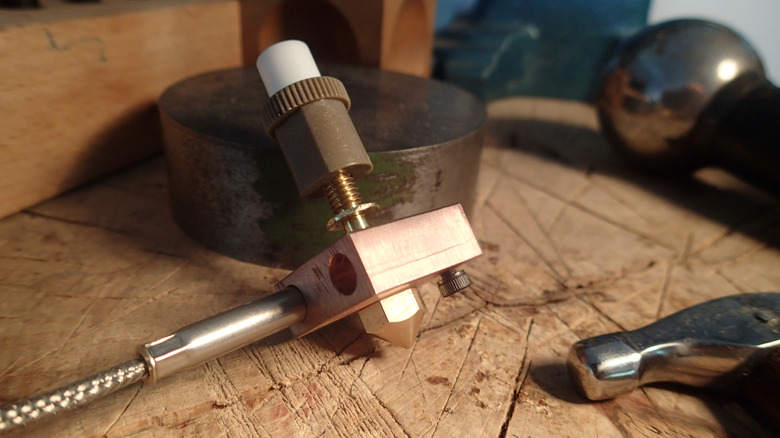
Nozzle upgrade options
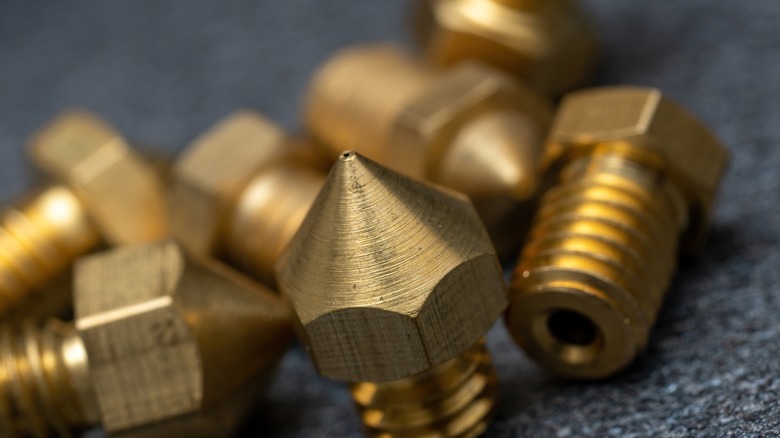
Upgrading your 3D printer's nozzle is one of the things you definitely want to do, but how you do it depends on several factors. Simply moving to the newest thing is decidedly not a good idea. Let's take a brief look at what each type of possible upgrade accomplishes. Simply having a set of nozzles in various sizes will improve your flexibility compared with always using the default .4mm standard nozzle. Finer extrusion will slow your printer, but also improve its quality.
Upgrading to a hardened steel nozzle can be a good idea, depending on your printing habits. Micro Swiss, for example, makes a line of hardened tool steel nozzles and a line of nickel-plated high-speed steel nozzles. Both have nonstick coatings. The high-speed steel is slightly harder than the tool steel nozzles, but this is only an advantage if you print using abrasive filaments. Steel nozzles can handle higher temperatures, but they don't conduct heat as well as brass. Therefore, if you don't print carbon fiber or other abrasive filaments, you might be better off sticking with brass. Micro Swiss also offers non-stick plated brass nozzles with a coefficient of friction as good as their tool-steel nozzles.
A ruby or polycrystalline solid diamond-tipped nozzle can add abrasion resistance to a brass nozzle, giving you the best of both worlds at a price of about $30 for this ruby nozzle and $95 for a diamond nozzle – far more than a set of standard brass nozzles.
Stepper motor dampers
You can certainly upgrade your printer's motherboard to reduce noise, but there's a simpler way. So simple, in fact, that one wonders why the printer's manufacturer didn't do the upgrade in the first place. Rubber motor dampers predictably reduce the noise of your printer's stepper motors, and reduce the transmission of vibrations to the other parts of your printer. Like the rubber decouplers used for audio monitor stands, these dampers would physically isolate the 3D printer's frame from its stepper motors. It accomplishes this by being screwed only to the frame on one side, and only to the motor on the other. No screw attaches to both the frame and the motor, so the only connection is vibration-dampening rubber. Some also speculate that the reduced vibration must necessarily mean higher-quality prints. You can pick up a motor damper and a heat sink for a NEMA 17 motor for $8 at PrinterMods, which claims a 5-10 decibel reduction in printer noise.
TL Smoother
The TL Smoother falls into the same category as motor dampers — if it works so well, and the technology is this old, why is it not built into printers? In fact, some printers don't need this PCB, while others should have had this feature built-in from day one because its function is basically to correct a shortcoming of the 3D printer's own signals.
Here's how it works. The TL Smoother is a small printed circuit board that is installed between a stepper motor drive and the motor itself. Its job is to improve the signal from the driver to the motor, which can suffer from a flaw in which lower currents at slower speeds don't get output at all, resulting in jerky and loud operation, and inevitably in quality issues in the final print. The TL smoother board simply increases the voltage supplied when the stepper is moving slowly. If your DRV8825 stepper motor drivers suffer from this problem, a set of TL smoothers is a great upgrade option. Affordable, too, at $6.80 for three boards.
Control board 32-bit upgrade
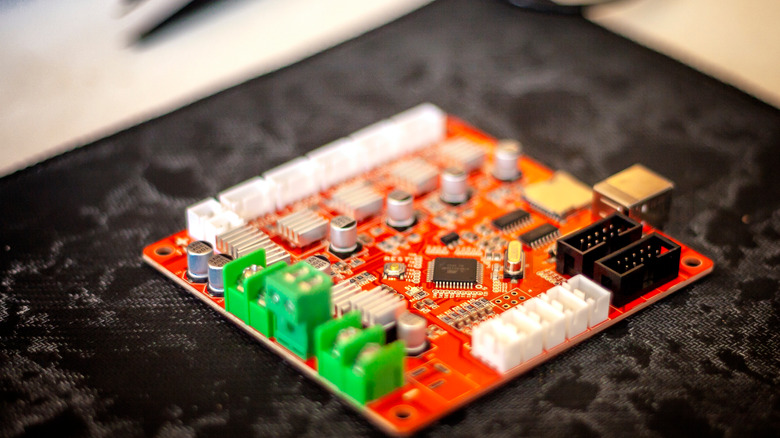
If you have an older printer and you want to move forward without the expense of buying a new model, a motherboard upgrade might be the approach for you. They're mostly touted as quiet-running control boards, but there are a lot of potential benefits under the hood. The most obvious is that the 32-bit microcontroller that replaces your old 8-bit microcontroller is much faster. That faster, smoother operation leads to reduced noise and, in fact, one manufacturer's upgrade board is even called the Silent Motherboard. Depending on the model of upgrade board you choose, other benefits include increased precision; newer versions of printer firmware; updated, higher-quality driver boards; support for Wi-Fi and cloud printing; support for touchscreens; and faster printing.
Popular higher-end upgrade boards like the Duet 2 can be pricey, costing upwards of $200, and include better drivers like the TMC2660, which offers more micro-stepping levels for smoother and more precise operation. But you can get a 32-bit board for far less. The Creality offering is about $40, while the BIGTREETECH SKR Pro V1.2 Control Board runs about $60.
Laser engraving module
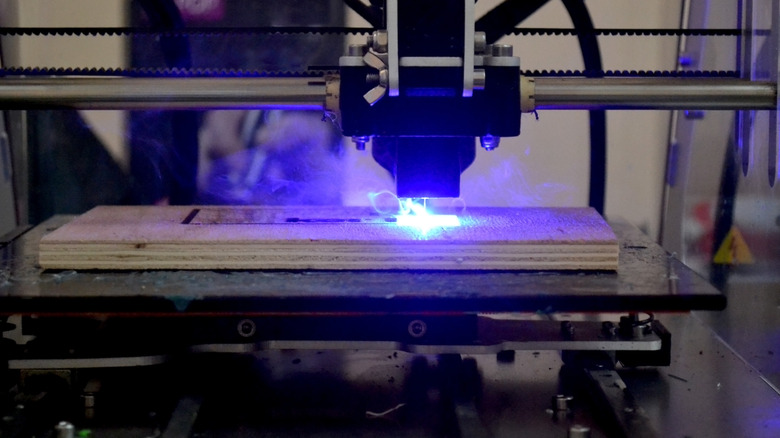
Is it an upgrade when it changes the basic function of your printer? Generally, it is, so long as you can switch back to additive manufacturing when you want to. Meanwhile, the availability of laser engraving modules at a small fraction of a laser engraver's price is a spectacular turn of events. These devices seem to be mostly available for Creality printers, so it's interesting to note that Creality now offers laser engravers/cutters for $199-1,699. The Creality module for 3D printers, on the other hand, runs $65 and includes a 500mW laser, optical coated glass, super-quick magnetic mounting, and works with a wide range of materials including MDF, wood, paper, fabric, plastic, leather, foamboard, and coated aluminum.
Competing models offer similar specs, occasionally adding materials like acrylic, ceramics, and stainless steel. The Creality Falcon laser engraver module uses "multi-lens technology" to accomplish .05-1mm high-precision engraving, and can supposedly be installed in as little as 60 seconds.
Multi-color/multi-material system
If you've listened to the 3D Printing Today podcast, you've heard hosts Andy Cohen and Whitney Potter endlessly discussing tool-changing and multi-material printing. Indeed, multi-material upgrades have been in the air for years, but simply didn't work very well (or, at least, weren't friendly for the average consumer), until now. There are actually a number of viable technologies in the wild these days, including dual extruders and systems with multiple nozzles to handle different materials. But the most successful so far seem to be multi-material filament handling systems like the Mosaic Palette 3 and Prusa's Multi Material Upgrade (currently MMU3).
The Mosaic device works by splicing together as many as four different filaments. It is platform-agnostic and can be had as either an add-on to any 1.75mm desktop 3D printer or as a dedicated, fully enclosed commercial printer that can handle as many as eight filaments for as much as $11,499. The Prusa offering, out of stock at the time of this writing, runs $299 and reflects lessons learned during the previous MMU generations. The Prusa MMU3 is compatible with the Original Prusa MK4 and Original Prusa i3 MK3S+.
Heater cartridge
If you have an inconsistent or low-wattage heater cartridge, upgrading to a 30W or larger precision ceramic cartridge can change your entire experience of 3D printing. It's another dirt-cheap upgrade that will make a big difference. The heater cartridge's job is to make sure the hotend can get to the specified temperature. So it is, of course, a critical component of a 3d printer, to say the least. A heating element converts electricity to heat, which is then made available to the hotend.
This heating element works via resistance, like many electric heaters and old-school incandescent light bulbs that gave off lots of heat. A solid upgrade would include a 30W cartridge (or more, though you don't really need more as a 30W cartridge can usually reach 300°C) and a high degree of precision achieved by component quality and precision machining. Note that a cartridge larger than 30W can present some safety hazards not usually present in lower-wattage cartridges.
Filament runout sensor
This simple, cheap upgrade doesn't make your printer work better, but it makes you work better with your printer. Long in the domain of DIY mods, now commercially available runout sensors can, for a few bucks, prevent failed prints that waste an enormous amount of time. They also now come standard with many new printers.
The idea behind the filament runout sensor is simple. A basic switch determines mechanically when the filament is no longer present in the feed leading to the extruder. When this switch is thrown, an OctoPrint plugin handles the news by pausing the printer. OctoPrint is the easiest way to handle runouts, but the mechanism can also be directly wired to the control board. There are a few plugins available to handle the filament runout event, each with different capabilities and supporting different sensor configurations. Unfortunately, none appear to handle sending notifications (aside from desktop pop-ups), but notifications can be accomplished using webhooks and other methods.