Zoom Features That You're Missing Out On

You've probably used the phrase "Can you hear me?" over the past few years more than you ever did before 2020. While we're back to working at the office, the Zoom calls have managed to stick around. A June 2022 Gallup survey reveals three in 10 people are working exclusively remotely, while five in 10 are working a hybrid of remote and on-site. The result? Zoom's making money, and you're facing Zoom fatigue.
Even with its cons, Zoom is one of the most common tools we use for work today. However, it's surprising how many people don't make the best use of Zoom's features. Being able to use all Zoom features empowers you to use the tool to its full potential and improves your overall video conferencing experience.
For example, did you know you can integrate Zoom with Slack, configure shortcuts, and participate in team-building activities using breakout rooms? If those Zoom features sound interesting, we've got an excellent collection of Zoom features for you in this guide.
Enhance Zoom video
When you're working from home, you might not have the best lighting setup at your desk. After all, it's a home office and not a studio. However, Zoom can help you enhance your video.
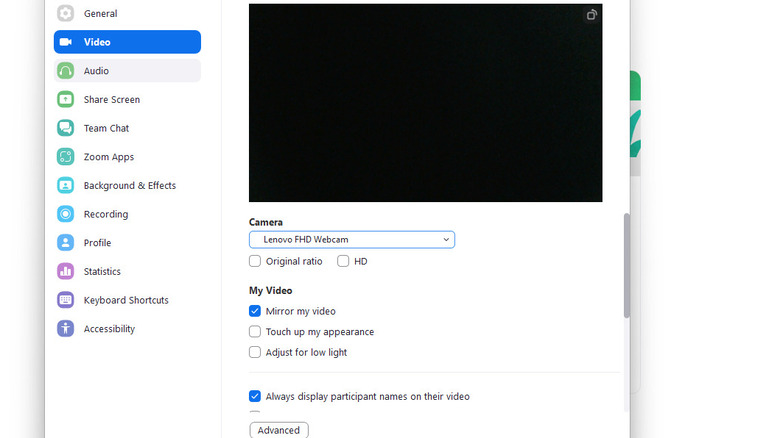
Zoom offers two settings to improve your video quality. The first is the HD option. Enabling HD allows you to stream in 720p. However, Zoom offers this feature only on the Pro account and allows streaming in HD only when the meeting has a maximum of two participants. To enable HD, go to Settings > Video, and click HD. Note that you still need to meet the bandwidth requirements to stream video in HD.
Another way you can use to improve video quality is by adjusting for low light. To use this feature, click on your profile picture, select Settings > Video, and enable "Adjust for low light." You can also adjust the light manually by using the seek next to the "Adjust for low light" option.
Integrate with Slack
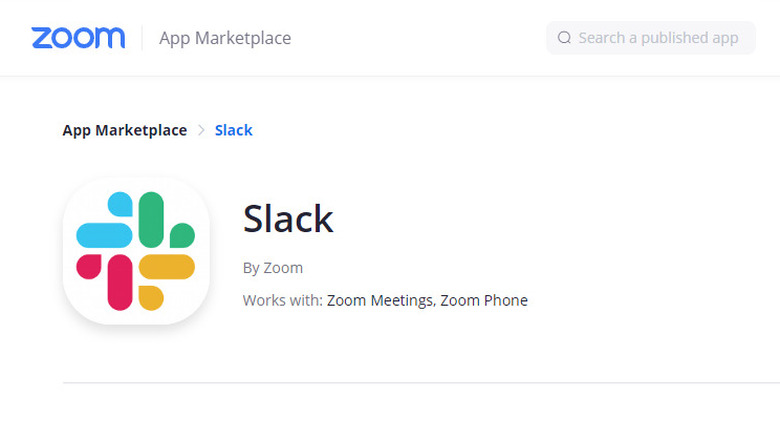
Like Zoom, Slack has become a staple for remote teams. Slack's video calling capability isn't all that impressive, and Zoom doesn't allow text-based communication outside of a call. Integrating the two tools enables you to make the best use of both of these apps.
However, note that only users on the Pro, Business, Education, or API plan can integrate Slack with Zoom. You also need the same email on both Zoom and Slack to set up the integration.
To get started, you'll need to request the Zoom administrator to approve Slack installation from the Zoom marketplace. Then, you'll need to add the Slack integration from your Zoom marketplace to Slack. When you're done, go to your Slack workspace, click Zoom on the list of Recent Apps, and select Authorize Zoom.
Once you're done, you'll be able to start using the /zoom command. You can use Zoom prompts to initiate calls, schedule calls, or join meetings using a meeting ID.
Meeting transcription

Meeting transcription wasn't originally available on all Zoom plans. This left hearing-impaired users with limited options. Accessibility advocates pushed Zoom to make the captioning option available to all users, and fortunately, everyone has access to Zoom's captioning feature now.
There are two methods for captioning Zoom calls (and breakout rooms). You can use a third-party service like Rev to transcribe Zoom calls. Alternatively, you can use Zoom's built-in captioning feature (called live transcription). The host or an attendee assigned by the host can enable manual captioning. However, only the host or a panelist can enable live captioning during a webinar.
To enable manual captioning on Zoom, the host should go to host controls, click More, and select Captions. To set up automated captioning, sign into the Zoom web portal as an admin, and click Show Captions under Your Caption Settings.
Click on "Set up manual captioner" in host controls, and click on the On option under "Enable manual captioner." Then, select the relevant option — you can assign a participant to type the captions, type captions yourself, or use a third-party captioning service.
Reduce background noise
When you're working from home, life and work have a tendency to clash. Your dog might bark incessantly, or maybe your baby won't stop crying. Even when you shut the door, you can hear those sounds in the background, and so can the person you're talking to over Zoom.
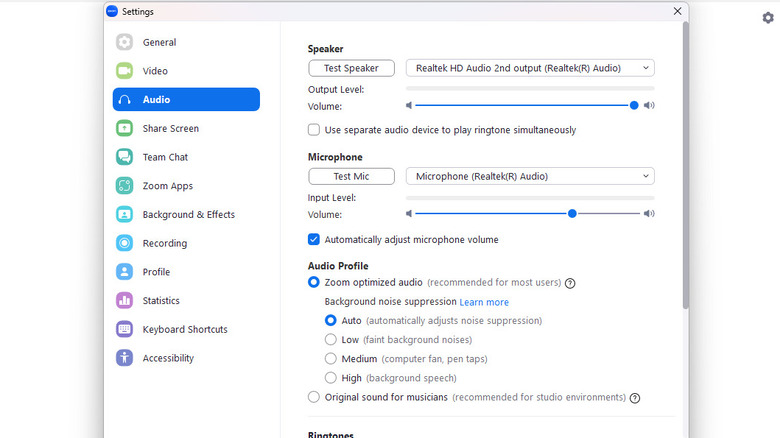
Fortunately, Zoom helps configure audio settings to reduce background noise, so other meeting participants don't have to listen to the distracting noises coming from your physical background.
Zoom automatically uses noise suppression and echo cancellation to optimize your audio input quality. However, sometimes, you might need to increase (or decrease) suppression based on your background.
To adjust suppression, click on Settings, go to Audio, and select "Zoom optimized audio" under Audio Profile. Select the level of suppression as per your preference. The options include Auto (default), Low, Medium, and High. Note that using this feature can impact your CPU.
Configure hotkeys and shortcuts
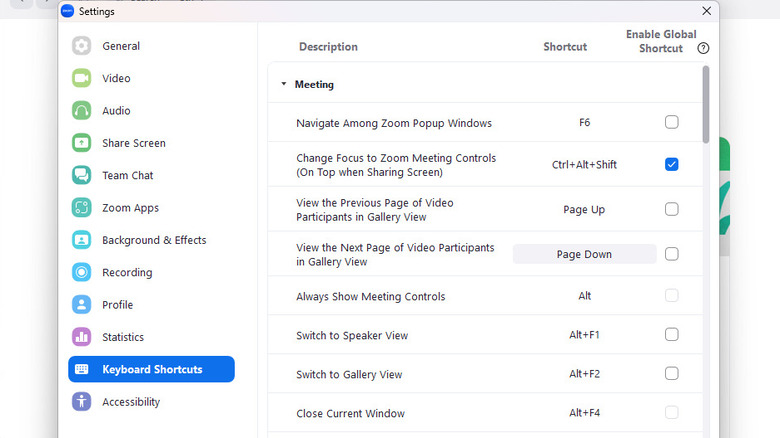
If you're one of those people who like to use the mouse only as a last resort, you'll appreciate that Zoom has a long list of keyboard shortcuts. These shortcuts allow you to use the app and navigate the settings without ever touching the mouse.
However, what's even better is you can configure the shortcuts so you can remember them more easily or tweak them according to your muscle memory. For example, you can change the shortcut for viewing the previous 25 participants in gallery view from Page Up to Up Arrow if that feels more intuitive.
To view and edit shortcuts, launch the Zoom desktop client. Click on your profile picture and select Settings. Then, click on Keyboard Shortcuts. You'll see the list of keyboard shortcuts here.
To edit any of these shortcuts, click on a shortcut and then press the shortcut key combination you want to use. You can also apply a few of these shortcuts globally, which means they'll work even when the Zoom window isn't in focus.
Non-verbal communication options
Zoom meetings can quickly turn chaotic, especially when the meeting has dozens of participants. The result is counterproductivity where team members find themselves disoriented and deviated from the primary topic of discussion.
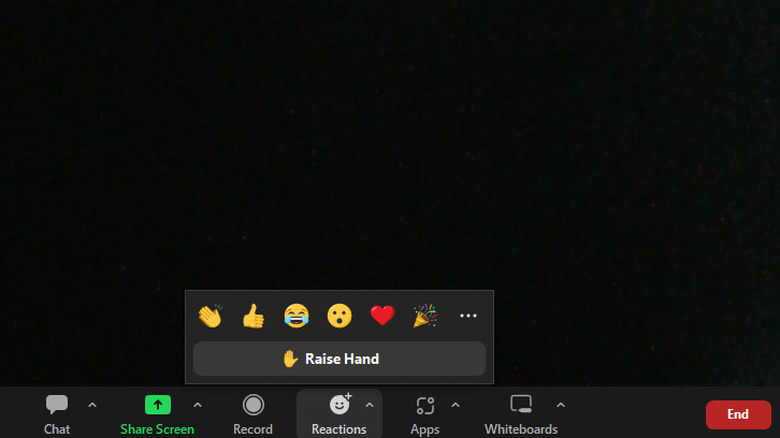
The easy solution? Non-verbal feedback. Zoom allows meeting participants to communicate non-verbally so the meeting can conclude with everything on the agenda accomplished.
To enable non-verbal feedback, sign into Zoom's web portal as an administrator. You'll need the privileges for editing account settings. Navigate to Account Management > Account Settings. Go to the Meeting tab, and verify that the "Non-verbal feedback" setting is enabled under In Meeting (Basic). If it's disabled, toggle on the button.
Similarly, you can also enable meeting reactions for non-verbal communication. To enable meeting reactions, search for the "Meeting reactions" setting under In Meeting (Basic). If it's disabled, enable it. Click Save before you exit the settings. You should now be able to use reactions during a call by clicking on Reactions from the controls at the bottom.
Use focus mode
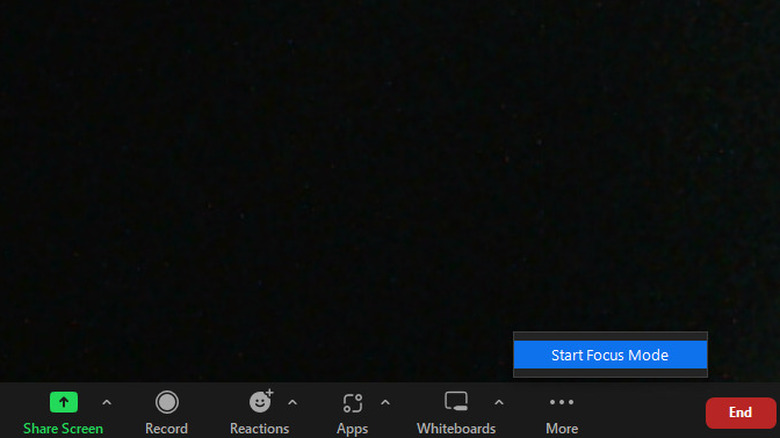
Focus Mode allows you to eliminate distractions from your Zoom screen. Zoom designed the feature primarily for providing students with a more focused digital learning environment. However, it's just as helpful when working. Let's face it, we've all gotten distracted by notifications and watching our teammates on video during an important presentation on Zoom.
Focus Mode allows the host to view everyone. However, the participants can only view their own video and the host's. Participants can only view other participants' names, non-verbal feedback or reactions, or listen to them when they're unmuted.
To allow meeting hosts to use Focus Mode, log into the Zoom web portal as an admin and account editing privilege. Click on Account Management > Account Settings. Go to the Meeting tab and enable Focus Mode from under In Meeting (Advanced).
As a user, you can enable Focus Mode from the Settings in the Zoom web portal. Go to the Meeting tab in Settings and enable Focus Mode from under In Meeting (Advanced).
Add virtual background
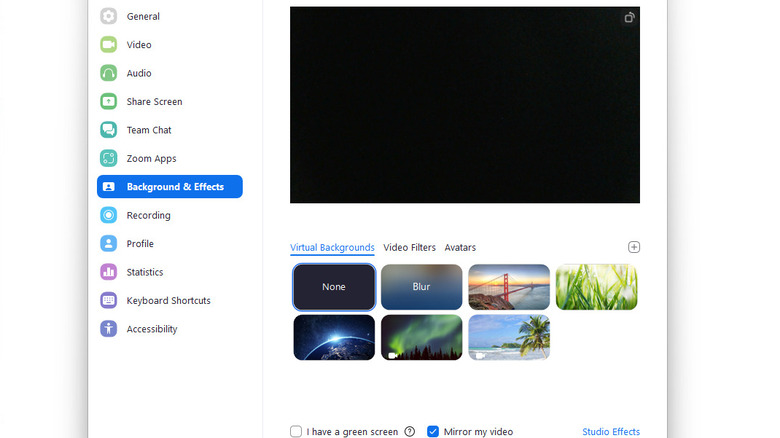
Ever had to move away from a comfortable place to your desk because the background wasn't decent? Fortunately, Zoom can help you work from the most comfortable spots by changing your background.
You can hide the background by adding a virtual background, which can be an image, short video, or just a blurry layer. Virtual backgrounds are great to put yourself in a professional setting, or you can also get creative with your Zoom backgrounds. For example, you can use a background that makes it look like you're in the cafeteria from "Seinfeld." Note that if you want to use one of your own images or videos, you'll need to check the specifications.
Virtual backgrounds are enabled by default. Assuming they're enabled on your account, you can apply a virtual background by clicking on your profile picture from the Zoom desktop client, and selecting Settings > Backgrounds & Filters. Select the Virtual Background tab and choose a background you like. You can also add an image or video background by clicking on the + sign.
Remote control
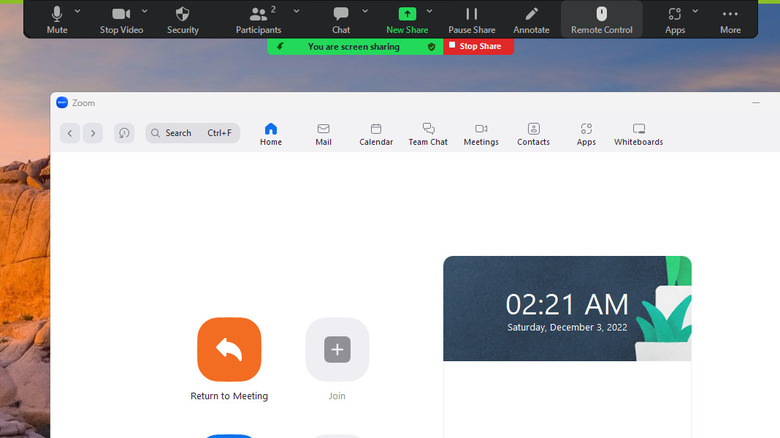
You might have used apps like AnyDesk or TeamViewer in the past. These apps provide remote control of another person's screen. However, since many people are now using Zoom for communicating online, it makes sense for Zoom to have a remote control feature. This way, you can request help from a participant when sharing your screen and interact more contextually.
To request remote control of the host or participant's screen when they're sharing the screen, select View Options drop-down menu from the top of the meeting window. Select Request Remote Control, and click Request.
On the other hand, if you need to provide a participant access to your screen, click on Remote Control when sharing your screen and select a participant you want to give control to. If you want to allow the participant to copy text, click Remote Control again and select Share Clipboard. The remote control feature works on Android and iOS devices too.
Breakout rooms
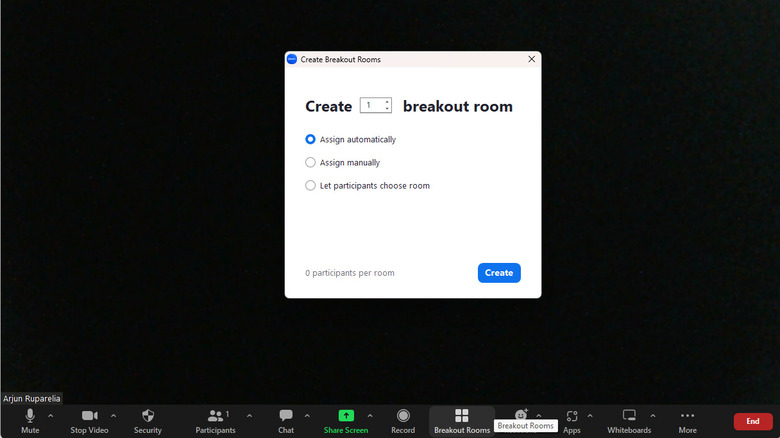
Remote work can feel lonely. You're locked away at home, working full-time, with minimal interaction with colleagues. That's why companies are focusing on team-building activities.
Breakout rooms have become a popular way to allow your employees or team to interact with a smaller group. Breakout rooms are a Zoom feature where you can split your team into smaller groups, so each of those groups is now in a different room. For example, you can break a room of 50 people into groups of five and create 10 rooms for each group.
Note that your account administrator must have breakout rooms enabled for you to be able to use them. Assuming breakout rooms are enabled, select the breakout rooms icon (the four windows) in your main toolbar during a call. Then, select the number of breakout rooms you want to create. You can break the room by group participants at random, manually select each room's participants, or let participants decide. When you're done, click the Create button.
Schedule reminders

When you receive a Zoom Team Chat message, there's always a chance that you might forget about it later. You quickly rush to make a note of that message, but that might mean missing a conversation when you're in a meeting.
To help you avoid this, Zoom allows setting a message reminder in Zoom Team Chat. Zoom makes the process fairly quick with preset options, and you can also input a custom date and time. To set a reminder for a message, click the Team Chat tab, find the relevant message, click on the ellipsis icon, and select "Set a reminder." Then, choose when you want to be reminded about the message. You can select a preset option (such as 30 minutes, an hour, etc.) or input a custom time and date. Click Save when you're done.
Once you've set the reminder, you can view it in the Team Chat tab's Reminders section. All scheduled reminders for messages remain here until you mark them as done.
Increase gallery view size

It's annoying to have to slide through views to see all your colleagues. Gallery view is already the view that accommodates the most participants. If you're using one of the different Zoom views such as speaker view or immersive view, switch to the gallery view.
While you'll always have limited screen estate, Zoom makes things a little better by allowing you to increase the gallery view size. For example, instead of displaying 25 participants on a single screen, Zoom allows displaying up to 49 participants.
However, this isn't always possible. Your system needs a supported processor and a large enough screen. To increase the gallery view size to 49 participants, click on your profile picture in Zoom and select Settings. Select Video from the left sidebar and scroll to the bottom of the right pane. Select "49 participants" under "Maximum participants displayed per screen in gallery view."
This does mean you'll see every participant's video in a small window, but at least you won't have to keep swiping through screens.
Quick invite

Zoom is tailor-made for working professionals, which is reflected in its feature set. Zoom makes it easy to invite participants to a meeting with just a URL, making it as easy as a single click to join a meeting.
In fact, Zoom allows inviting participants in various ways. You can use email, directly send invites to contacts via Zoom, or share the meeting's URL or invitation text. As you can imagine, sharing the URL is the quickest way to invite someone to your Zoom meeting. Just copy the URL and send it to the invitee via an instant message app.
You can also schedule meetings and use the same methods to invite participants. When you schedule a meeting using Zoom's desktop client, you'll see the option to Copy Invitation right after you've scheduled it. You can share the meeting link on a Slack channel, the company's intranet, or a personal messaging app.
Record meetings
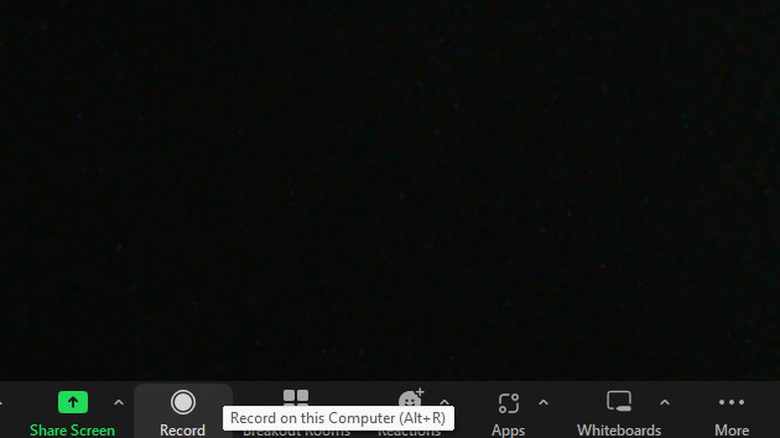
Recording your meetings can be a great way to create a resource library or compile some training material. In some cases, it might even be legally required.
Zoom has a built-in option to record meetings. You get two options when recording meetings if you're a paid user. You can record meetings and store them locally or on the cloud. If you're not a paid user, you can only store recorded meetings locally on your computer. Both options provide you with MP4 video, MP4 audio, and chat text files.
When you want to start recording a meeting, click Record at the bottom of your Zoom meeting window. If you're a paid user and have enabled cloud recording, you'll need to select whether you want to store the recording locally or on the cloud.
Once the recording starts, you'll see a Recording tag at the top-left of your Zoom screen. When you're done, you'll find your recordings in the Documents folder (the default location), unless you've chosen a different location, or in the Zoom cloud if you're a paid user and selected to store the video in the cloud.