Everything You Need To Know About Running Android Apps On Windows 11
We may receive a commission on purchases made from links.
Running Android apps on Windows was once a demanding, arduous task. You needed clunky third-party emulators often riddled with bugs and crawling with intrusive ads. Even when the Android emulator worked just as it was supposed to, the app performance was painfully poor. But that changed with Windows 11 when Microsoft announced native virtualization support for running Android apps.
Microsoft partnered with Amazon and Intel to bring the Amazon Appstore and support for all processor types (AMD, Intel, and Qualcomm) to Windows 11 (via Microsoft). The Amazon Appstore lets you download and install Android apps, officially. It's backed by the Windows Subsystem for Android, much like the Windows Subsystem for Linux.
You only need to get the Amazon Appstore from the Microsoft Store; the Windows Subsystem for Android will be quietly auto-installed behind the scenes.
While there are workarounds (and we'll get into those later), the Amazon Appstore is required because it's the official way to run Android apps on Windows 11. It's only available in select countries and naturally requires an Amazon account.
Get your Windows 11 device ready for Android
If your machine is running Windows 11, it is also compatible with the Android Subsystem. But it has to be a recent build of Windows 11 — build 22000.593 or up (via Microsoft). You also have to enable virtualization, Virtual Machine Platform (VMP), and Windows Hypervisor Platform (Hyper-V).
Virtualization allows your computer to layer a virtual device on top of Windows 11. Most modern PCs have virtualization enabled by default (via Microsoft). Check if it's already enabled for you.
If not, you'll need to shut down your machine, enter the BIOS or UEFI utility, and manually toggle on virtualization. The step-by-step varies between manufacturers; consult the user manual for your computer if you can't access the correct settings.
To check if virtualization is already enabled:
1. Press Ctrl + Shift + Esc. Or, search "task manager" in the Start menu.
2. In the Task Manager, switch to the Performance tab.
3. Select CPU.
4. You'll find all the CPU specs grouped at the bottom.
5. Note if it says "Enabled" next to Virtualization.
Next, search Windows Update and make sure you're on the latest version. Then open the Microsoft store, select the Library tab, and click Get Updates.
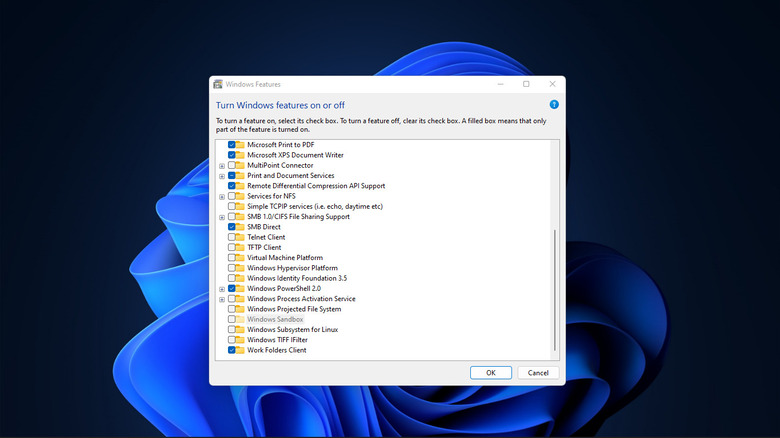
Now turn on the virtualization features in Windows 11.
1. Click Start and enter "windows features".
2. Click Turn Windows features on or off.
3. Toggle on Virtual Machine Platform and Windows Hypervisor Platform.
4. Restart your PC.
How to set up Android on Windows 11
With the latest build of Windows 11, the newest version of the Microsoft Store, and all virtualization features active, your device is ready to run the Windows Subsystem for Android (WSA). The Subsystem currently runs Android 12, powered by the Android Open Source Project (AOSP).
The whole build is installed in the background when you get the Amazon Appstore. So it's simple enough to set it up.
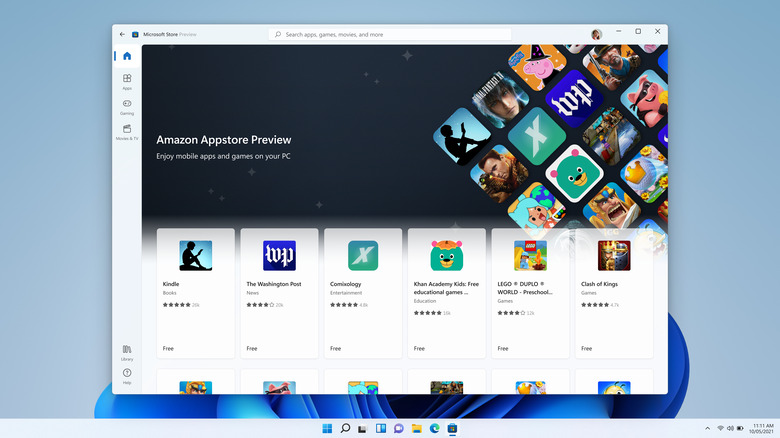
1. Open the Microsoft Store.
2. Type "Amazon Appstore" in the search bar and hit Enter.
3. Click Get to install the Amazon Appstore.
You'll find the Windows Subsystem for Android and the Amazon Appstore shortcuts in the Start menu when it's finished. Launch Amazon Appstore and Sign-in with your Amazon account. If you don't have Amazon, you'll need to create a new account.
At the time of this writing, the Amazon Appstore has 50,000 apps in its catalog (via Amazon). To get an app or game, simply search for it in the Amazon Appstore and click install. It'll appear in the list of apps on the Start menu.
All the apps are optimized and integrated into the Windows environment. So you'll get notifications in the Notifications Center; you can switch clipboards between Android and Windows; even some accessibility features are offered (via Microsoft).
How to Manually get Android on Windows 11
But if your app is not in that catalog, you can sideload the apps. Or, even manually install the whole Windows Subsystem for Android. First, check and ensure that your system meets the minimum requirements for Android. Also, virtualization should be active and Windows 11 should be updated.
If you've already managed to get the Amazon Appstore (the Windows Subsystem for Android already packaged with it), you can skip the following steps.
To install the Subsystem manually:
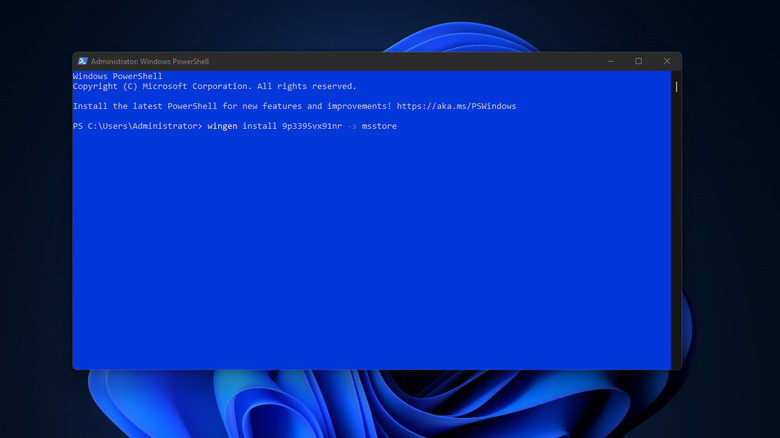
1. Open the Powershell with elevated privileges. Type "windows powershell" in the Start menu, select Windows Powershell, right-click, and Run as administrator.
2. Click Yes when prompted.
3. Copy-paste the following command in the Powershell terminal (right-click or Ctrl+V to paste):
winget install 9p3395vx91nr -s msstore
4. Press Enter
5. Press Y and then Enter as prompted twice.
Wait for the Windows Subsystem for Android to be downloaded and installed. The Powershell and Windows Notification Center will both notify you if the installation is successful (via Github).
Set up for sideloading Android apps on Windows 11
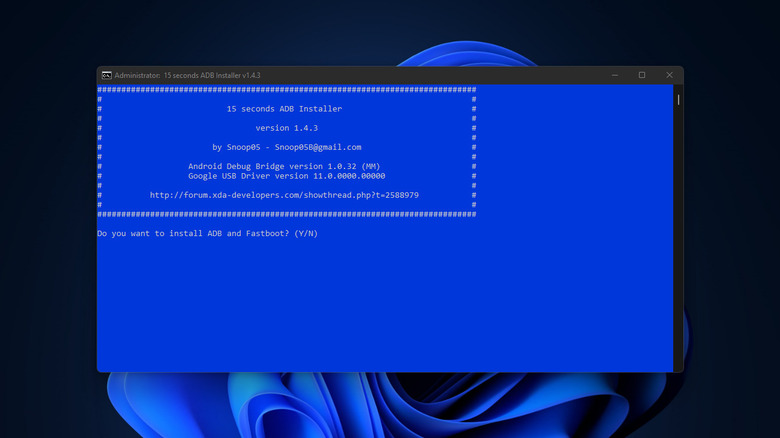
Other than the app stores, Android apps are also distributed as APK packages. To get the app of your choice, you only have to download and sideload its APK file. And you can use the Android Debug Bridge (ADB) tool to do it. Here's how:
1. Click this direct link to get the ADB installer.
2. Extract the zip archive.
3. Double-click the exe file in the folder.
4. When the ADB installer launches, press Y, then Enter as prompted.
5. ADB installer will also install device drivers for you (press Next if requested).
Also, search "Windows Subsystem for Android" in the Start menu. In Settings, find the Developer menu and flip the Developer mode switch on (via GitHub).
On the same page, find the IP address tab and copy the address.
For the last prerequisite, download the APK file from your chosen trusted source. With ADB installed, Developer mode on, IP address retrieved, and APK file downloaded, we're all set to sideload your Android app.
How to sideload Android apps on Windows 11
Before we start, take note that sideloading Android apps on Windows is not without its flaws since unofficial APK files can pose security and privacy risks.
1. Open Powershell again with administrator privileges.
2. Type in the following command but replace the example IP address with the one you copied (via GitHub):
adb connect 182.195.132.52
3. Hit Enter.
4. ADB will connect to the Subsystem "device".
If you type in adb devices and hit Enter, the virtual device should show up alongside its IP address.
5. Next, open File Explorer and locate the downloaded APK file. We're using the Merriam-Webster Dictionary APK as an example. It's also convenient to rename the APK file to something simple.
6. Click the Navigation bar and copy the path to your APK file.
7. In the Powershell terminal, type in:
adb install C:\Users\SlashGear\Downloads\dictionary.apk
8. Replace the APK file name and path with your own.
Wait for the installation to finish. ADB might display a message that it's performing a streamed install, followed by "Success" (via Microsoft). You can now launch the new app by looking it up in the Start menu.