Google Daydream Controller Teardown : Red Flags
Our teardown of the Google Daydream controller shows how simple it is to control the virtual realm. What we expected was something similar to what the HTC Vive presents, in a slightly smaller form. What we've found is an interesting combination of chips, battery, and metal. While the outside might be fully ABS plastic in makeup, the internal structure has one piece of metal right where we did not expect it.
The photos you're about to see (above and below) have been sent to us by an expert device fiddler who also has early access to the Google Daydream headset and controller. All mentions of teardown methods and hardware breaking, etcetera, are based on our communication with him. As such, any replies to questions about this teardown may take longer than usual.
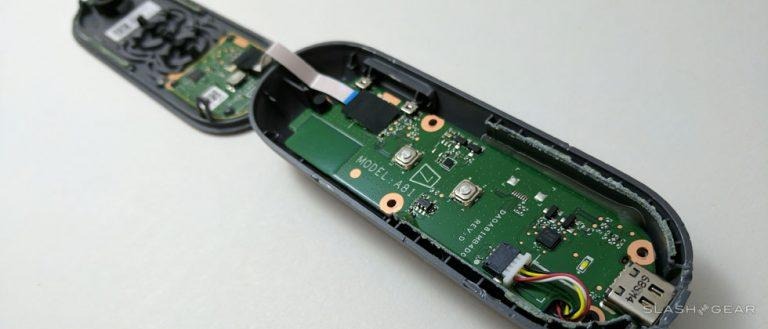
The Google Daydream controller's exterior is made up of two parts (not counting the buttons). The top panel must be removed from the bottom with care. Said removal will very likely result in a controller broken beyond repair – from a certain point of view. It'll still function, but it wont look nearly as good as it once did.
The top of this controller is glued to the bottom along the left and right edge of the back, meaning you're going to need to do something drastic to begin. Heating up the back half of the controller could potentially work, but too much heat could result in the plastic being bent or misshapen. If the controller were ever offered for sale on its own, it would likely be more cost-effective in buying than trying to repair.
The good news is that once any repairs have been made to the controllers insides, the back side can simply be kept in place with a piece of masking tap. Of course then it looks terrible, but it still works just as well. Carefully applied glue in the same place as was originally broken could potentially work, too.

Once opened and a set of simple Philips-head screws are removed from the main board, another slug of glue denies us access to the battery. To move the lowest board in the controller, one must first carefully pick out the glue. This is difficult due to the board's proximity to the sides of the controller. Once enough glue has been removed, the board can be wiggled back and forth until it is no longer held down by additional glue.
Part 68SM4 is a power regulator unit – in this case, part of the USB-C port at the end of the larger chip. This is a power regulator chip.

To move forward, one must remove the wire between the touch panel and top from the larger board at the bottom. This cord can be removed by pulling one single piece of black tape up and off, then an off-white clamp back (towards the blue). The wire will be able to be slid out easily.
This battery has the code CA491539P, which means it was manufactured by Coslight. This battery has a normal capacity of 218-mAh, and discharge current: 0.2C. Dimensions given by Coslight are 4.6 x 15.2 x 37-mm, give or take 1-mm on any of the three measurements. This battery is lightly glued to the base of the controller, and a light tug at a couple of sides should allow it to break free.

Also attached to the bottom of the controller is a piece of metal. This is almost certainly a weight put in place to allow the controller to have some heft. This might come as a surprise to anyone who has the controller in-hand, as it remains extremely light despite the added weight. It could also be that this metal is in place for future magnetic purposes – accessories, sensors, and the like.

Again, you'll see the back and of this controller's bottom busted out because of our teardown method's lack of finesse. If our teardown expert had guessed at a glue hold around the bottom back, more damage count have been avoided. Battery glue should remain sticky enough to be re-used to put the device back together again – there's also a snug fit for the battery here, resulting in little worry of parts jumping out unexpectedly.
You'll also notice the volume buttons have been connected to the base's bottom with a couple of pressed fasteners. Fixing the volume buttons would require these fasteners to be replaced as well, as they wont likely survive their own removal. As it is with most elements in this device, the cost of a new controller might be worth the hassle of replacing any one part.
The bottom shows PC+ABS, which is a thermoplastic material – acrylonitrile butadiene styrene, AKA the same ABS plastic in most smartphones. There's also a date in here for manufacturing: 20160906, or 2016, September, 6.

Along the underside of the HSB J MV-6 board is a Dialog DA14881 power management chip. Many companies use this same company for power management chips, including Apple. Or, at least, they used to, as the last time iFixit found a Dialog chip inside an iPhone, it was the iPhone 6. Companies that make smartphones with Qualcomm processors often use Qualcomm (PMIXXXX code) power management chips.
At the back of the touch panel is a chip with the code IQS525. This indicates that it is an IQS525-XXXX capacitive touch and proximity trackpad/touchscreen controller implementation for the IQS550 platform. This chip and technology come from Azoteq, and is part of the ProxSense collection.

This touch panel technology works with low power proximity detection which Azotech says "allows extreme low power operation." Azoteq has also suggested that this touch controller works with both 1-finger and 2-finger gestures – though the pad is so small, it'd be odd to use two fingers at once. This touch sensor has a 1280 x 768 max resolution.
Unfortunately we've not come across any brand names that've allowed us to make a judgement call on the manufacturing group with which this was made. We knew about the Pixel phone being made in collaboration with HTC, but finding an HTC-made battery inside was like sprinkles on the cupcake. Now we've got no such confirmation from any party – so it's been Google making this controller and headset in their garage as far as we know.
This controller is available with the headset right this minute from Google. The Google Daydream controller cannot currently be purchased without the full Daydream headset package. The Daydream headset with the controller will cost users $80 straight from Google in the Google Store. It'll also be available for purchase in physical locations with Verizon across the United States.