How To Clear Cache On Windows 10
Has your computer been running a little slow? Have you experienced mysterious freezes during loading times? Or perhaps you're low on storage and want to reclaim some disk space. Your first step for all three of these problems should be to clear your cache in Windows 10. A cache is a set of temporary files that builds up over time. The more unnecessary temporary files your computer stores, the slower it may run.
The term "clearing the cache" is usually used in reference to browsers, such as Google Chrome, Firefox, or Microsoft Edge. Your browser stores its own set of temporary files that speed things up when you load the same website for a second time. Seeing as most websites have some common elements across all of their pages, such as the logo or some pieces of code, temporary files are used to store this information and make every page quicker to load across the entire website. The cache in Windows 10 has a similar purpose — it helps you load things faster, but when it's overloaded, it may work against you and slow things down.
There are no major downsides to clearing your cache in Windows 10. You may experience slower loading times once per app, but overall, things should be running a lot more smoothly. Fortunately, clearing your cache should take you five minutes at the most if you follow this step-by-step guide.
How to clear cache on Windows 10 through Disk Cleanup
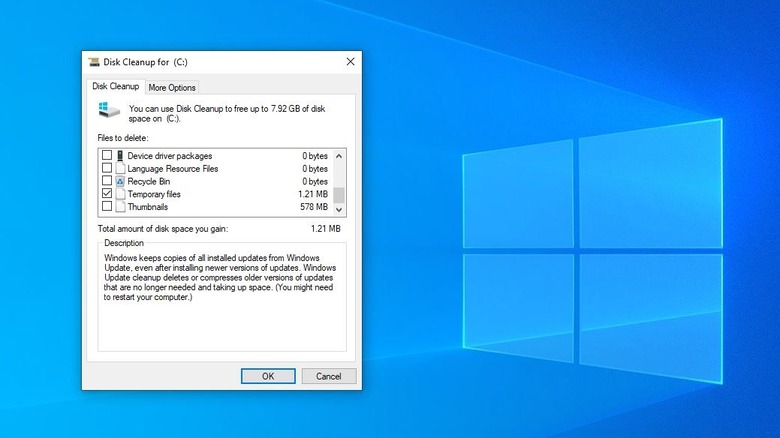
Windows 10 has a number of built-in tools that help you keep your PC in top condition. One such tool is called Disk Cleanup. Before resorting to any third-party programs, which might be unsafe and could damage your computer, it's best to rely on what Windows itself has to offer first, which is why Disk Cleanup should be your go-to method. If that doesn't help, you'll be able to move on to our next steps.
- Access your Windows search bar by clicking on the bottom-left corner of the taskbar or tapping the Windows key on your keyboard.
- In the search bar, type in "Disk Cleanup."
- If you have multiple drives, you will be prompted to choose which drive to check. Pick the one that your operating system (OS) is installed on. In most case, this means the C drive.
- The tool will then calculate how much room you can free up if you dispose of temporary files on your C drive.
- Click "Clean up system files."
- Scroll down in the window that pops up and select "Temporary Files."
- While you're here, feel free to get rid of some other things your system may not need, such as the contents of the Recycle Bin or your Downloads folder. Before you do, make sure that you're okay with getting rid of these files permanently.
- Click "OK" to finalize these changes.
How to clear the file explorer cache on Windows 10
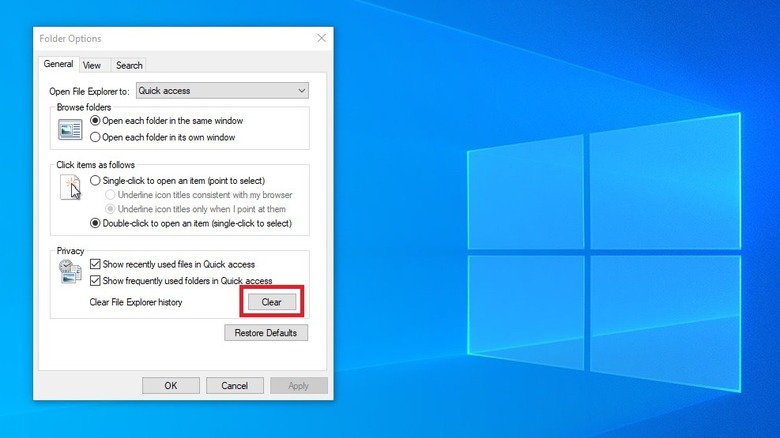
"File Explorer" refers to the file management application that Windows OS uses to help you browse through your files and various folders. As such, it too maintains its own cache that remembers recent searches. While it can be handy if you often look for things within your folders, it can also take up a little bit of disk space, and occasionally, it can slow down your searches. If you're not happy with your File Explorer performance, clear it out to give it a fresh start.
- Access File Explorer by opening any folder or typing in "File Explorer" into the Windows search bar.
- At the top of the window, click "View."
- Click "Options" on the far-right side of the View menu, and then pick "Change folder and search options."
- In the Privacy section at the bottom, tap "Clear." This will clear out your File Explorer history.
How to clear DNS cache on Windows 10

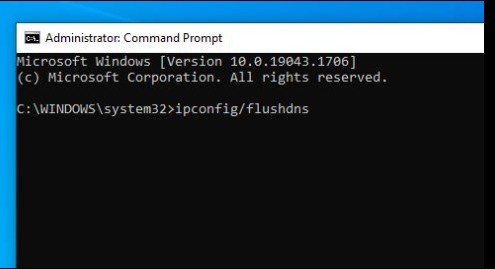
Windows 10 also stores something called "DNS cache." DNS stands for Domain Name System and is responsible for storing website information separately from the browser cache. Sometimes, errors in the cache may result in slow loading times or even issues connecting to the internet at all. As such, you might want to flush your cache every so often, especially if you've run into DNS errors when trying to load certain websites. When in doubt, it's not a bad idea to clear your DNS cache in Windows 10.
Keep in mind that flushing your DNS requires using your Windows command prompt to input the required commands. If you're new to Windows, it might seem a bit tricky, so make sure you follow our steps to a T and take your time.
 Monica White/SlashGear
- In the Windows search bar, type in "CMD" or "Command Prompt."
- Right click the search result and choose "Run as Administrator."
- In the black window that pops up, type in exactly as follows: ipconfig/flushdns
- Press Enter to complete the process.
Is it safe to use third-party programs to clear your Windows 10 cache?

If you browse around for answers to "how to clear your cache in Windows 10," you may find some websites recommend using third-party programs to give your PC a nice, thorough clean. While trustworthy programs exist, it's best not to make yourself vulnerable to potential viruses and malware. And you won't know until you try whether the program in question is safe or not.
Viruses and malware are not the only concern in this situation. While a program may be entirely safe, it could still remove more than you intended, and those files can be difficult or impossible to restore. When you clear your cache yourself, you have more control over what is removed.
If you do decide to use third-party programs, one popular tool is CCleaner. There's no guarantee you won't accidentally allow it to remove more than you planned, so using it should only be used at your own risk.