The Best DIY Method To Make Your Headlights Look Like New
We may receive a commission on purchases made from links.
In the not-so-olden days, new vehicles came with sealed-beam headlights. According to CARiD, laws from the 1940s to the early 1980s required all U.S.-spec cars to have sealed-beam headlights, which was a typical headlamp assembly that consisted of an enclosed bulb in a glass lens. When the bulb inside one of these units breaks or goes flat, you need to replace the entire headlight assembly. It may sound tedious and costly, but the advantages are hard to ignore. Glass lenses are more resistant to yellowing, fading, and UV damage — but then again, they are also expensive to manufacture and are prone to cracking, breaking, or incurring damages in a mild collision.
From the mid-1990s to the present, composite headlight assemblies with replaceable bulbs have replaced the outdated sealed-beam units. Plastic headlights are more economical to manufacture, easier to form into shape, more lightweight, and are impact-resistant. The first U.S.-made vehicle to have plastic headlights with replaceable bulbs is the 1984 Lincoln Mark VII, according to Motor Trend, and the automotive industry has never looked back.
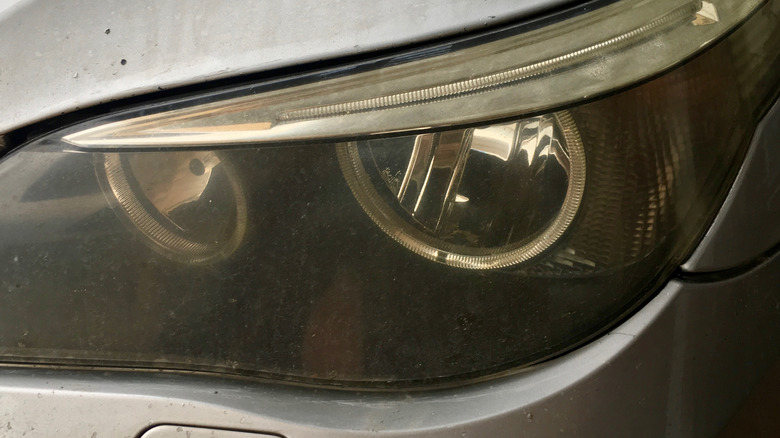
However, plastic headlight lenses lose their clarity with age and repeated exposure to the sun, rain, and other harsh elements, causing yellowing, fading, and oxidation. There's an old saying that our eyes are windows to our soul. In auto lingo, those dirty, tired-looking headlights will rob your vehicle of that coveted "wow factor," not to mention the safety issues you need to face due to sub-par illumination. Fortunately, it's often possible to restore a headlight's appearance with some effort and the right methods.
DIY methods to restore clear plastic headlights

There are specific DIY solutions that we highly recommend when it comes to cleaning or restoring your car headlights, and you can do most of them using everyday household items from your cupboard or garage. Of course, nobody's stopping you from ordering commercially available headlight restoration kits online, but most will cost $20 to about $100. In addition, using those kits is not merely a wipe-on, wipe-off affair (it takes time and elbow grease to do it right), and choosing which to buy can be bewildering, for lack of a better term.
Here are three methods to consider to make your headlights look new again, starting from the basic to the more advanced solutions. Choosing which to follow depends on the severity of the fogginess or yellowing of the headlight lenses. Remember to only work if the headlights are cool to the touch. Avoid working on hot headlight lenses to prevent burns or inadvertently damaging the surface.
Clean headlights with toothpaste
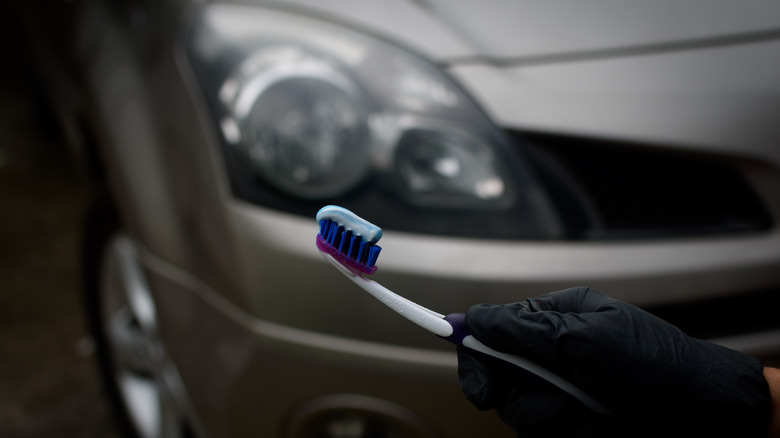
Plain white toothpaste has mild abrasives to clean your teeth. These abrasives are also excellent for removing hazy oxidation on plastic headlight lenses. The toothpaste method works well on mildly foggy or yellowish headlights. For this procedure, you need a small tube of white toothpaste, a small microfiber towel, some masking tape, and carnauba wax to seal the finish.
- Start with a clean surface. If the headlights are dirty, wash them with water and car shampoo. Do not rub anything over dirty headlight lenses to prevent scratching or marring.
- Grab the masking tape and apply it over the edges of the headlight lenses to protect the vehicle's paint. Remember that toothpaste is mildly abrasive, and it could scratch the paint on the fenders or bumper.
- Grab a microfiber or terry cloth towel and dunk it in a bucket of water. Squeeze out the excess until damp. Fold the wet towel and apply a coin-sized dab of toothpaste to one side. Rub the toothpaste firmly on the headlight lens in a circular motion. The idea is to cover the lenses with toothpaste as you rub. You can use more toothpaste if needed.
- Rinse the headlight lenses with water and wipe dry with a separate towel. Repeat Step 3 if the lenses are still foggy or yellowish. However, the headlights should be marginally clearer than before.
- It is necessary to apply a thin coat of carnauba wax over the lenses after rubbing them with toothpaste. Wax will help seal the finish and protect the lenses from UV exposure. Apply a thin coat of wax, allow to dry to a haze, and buff off the excess with a dry towel.
Restore foggy headlights with paint polish
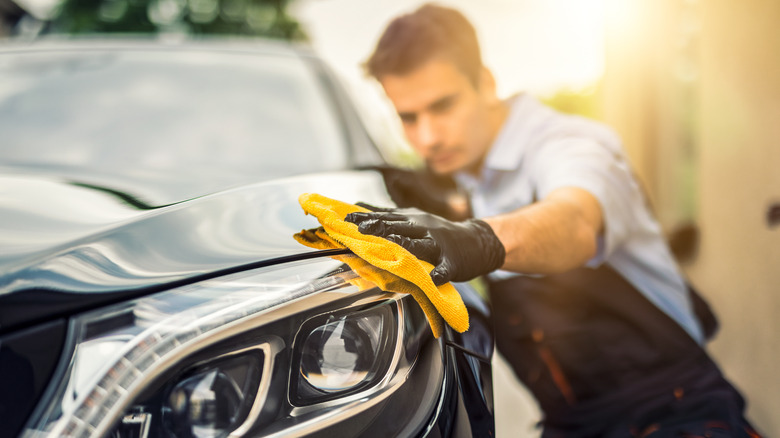
If you have a bottle of auto paint polish, you can use it to get rid of the fog, haze, and yellowing in your car's headlights. Unlike wax, genuine polish contains mild abrasives to smooth the paint finish and eliminate minor scratches, swirls, mild oxidation, and other imperfections.
- Clean the headlights with water and mask the edges with tape afterward.
- Grab a mildly damp applicator pad or microfiber towel and apply a coin-sized drop of polish to one side. Rub the headlight lenses with the polish vigorously, focusing on areas with thicker haze or yellowing.
- Before the polish dries, grab a separate dry towel and remove the excess. Turn the towel over and buff lightly to see the results. You can repeat Step 2 until the desired results are achieved.
- Do not forget to apply a thin coat of carnauba wax after polishing the lenses to protect against weather and UV damage.
Make headlights look new using sandpaper
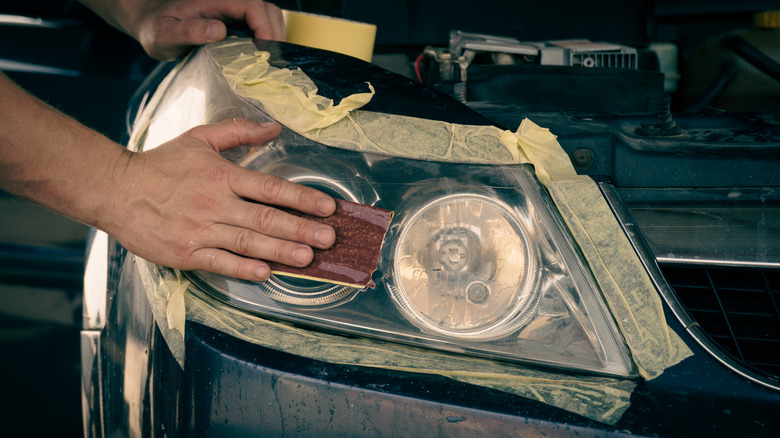
If the toothpaste and polish failed to restore the like-new clarity of your car's headlights, the sandpaper method would get it done. You'll need 1000-grit, 1500-grit, and 2500-grit sandpaper, a few microfiber towels, a small bucket of water, and some masking tape.
- Always start with clean headlights. Rinse with water or wash off with car shampoo to remove excess dirt and grime from the lenses. Apply masking tape over the edges to protect the surrounding painted areas from scratches.
- Wet sanding is the way to go when working with plastic headlight lenses. Grab a small piece of 1000-grit sandpaper and soak it in a bucket of water for five minutes. After letting it soak, use it to rub the headlight lens in left-to-right motions. Avoid sanding in circular motions. Dunk the sandpaper in water if it begins to dry while sanding. Rinse with clean water after rubbing.
- Grab a small piece of wet 1500-grit sandpaper and use it to rub the headlight lenses in an up-and-down motion. Rinse with clean water afterward.
- The last sanding part uses a wet piece of 2500-grit sandpaper. Rub over the lenses in left-to-right motions to minimize scratching and uneven surfacing. Rinse with clean water after rubbing.
- Apply polish to refine the lens surface. Wipe off the polish immediately after applying using a dry microfiber towel.
- The final step is to apply carnauba wax. Unlike polish, allow the wax to dry to a haze before buffering the excess with a dry towel. Remove the protective tape, step back, and give yourself a thumbs up!
Don't be disheartened if the headlights are still foggy after sanding. The damage may be too severe for a DIY restoration job in some cases. At this point, your best recourse is to replace the headlights entirely.