How To Get iPhone Assistive Touch On Your Android Phone

Given the usefulness of AssistiveTouch on iOS, it's a wonder that Google's not implemented a similar solution in Android. As Google suggests, Android lets you control your device in a variety of ways such as virtual buttons, gestures, voice commands, external hardware buttons, screen-readers, virtual magnification buttons, and gestures through accessibility settings. But users' access to these features depends largely on the version of Android they have loaded on their device, and — at first glance — there doesn't seem to be a function quite so elegant as AssistiveTouch on the platform.
For some users, it's just as important to have access to these features as it is to have a high-end set of cameras or a display with a high refresh rate. If you've been using iOS for an extended period of time and have gotten used to using the AssistiveTouch button, you'll likely be looking for an alternative if you've switched to Android.
Why get the iPhone's AssistiveTouch on Android?
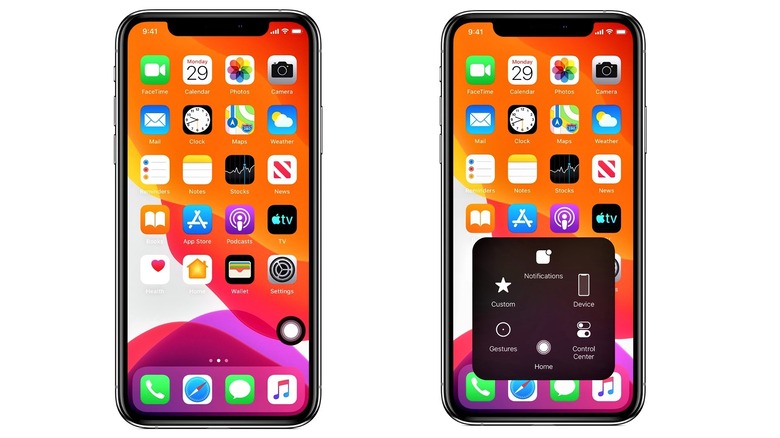
There are many ways to get around Android's interface using gestures and physical buttons, but nothing really compares to Apple's AssistiveTouch button for its simplicity and reliability. The AssistiveTouch feature allows you to control and navigate your device using a floating virtual button that can be customized in a variety of ways (via Apple). This can be useful for users with broken physical home buttons, as it can act as a substitute that easily lets you access multiple menus with just a couple of taps.
This feature also helps those having trouble navigating smartphones with larger displays, or users who often utilize single-hand usage, as the button can be dragged and moved to any section of an iPhone's screen. Finally, AssistiveTouch can consolidate a series of button presses into one convenient virtual touch key capable of functioning in most iOS versions, even older ones. Needless to say, Android could definitely use something as seamless and efficient as the iPhone's AssistiveTouch to make interface navigation as user-friendly as possible.
While it's possible to bring AssistiveTouch functionality to Android, it's not something that can be done with a stock device. Fortunately, there are various third-party alternatives that can help circumvent that dilemma.
An alternative app called Assistive Touch
While the iPhone's AssistiveTouch can't be found naively on the Android operating system, there are apps that can give provide a similar experience. The process itself isn't too complex, but it does require some familiarity with the feature, as it does take a lot of inspiration from the link mentioned above. First of all, download and install an app called "Assistive Touch for Android" from the Google Play Store.
- Tapping on the app for the first time leads to your Android settings menu for "Display over other apps," where you'll need to tap Assistive Touch and toggle "allowed."
- A virtual button will appear, tap this button and you'll be brought to your settings screen for "Modify system settings" which you'll also want to toggle to "allow."
- Tap the virtual button again to show a quick menu similar to iOS' AssistiveTouch feature.
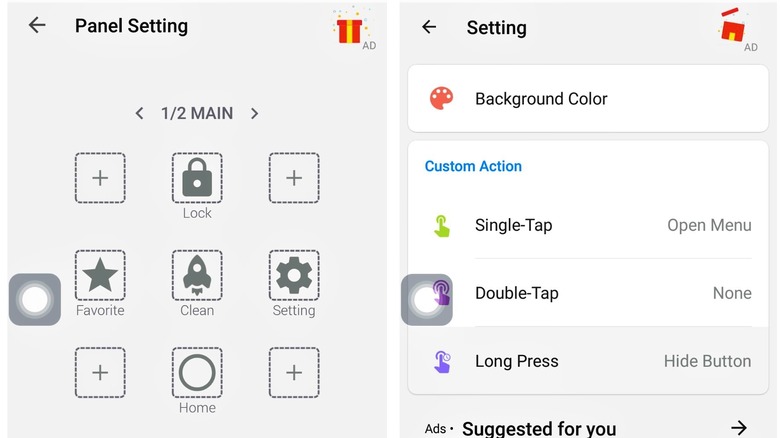
- To change the quick menu buttons, tap on "Custom Menu" from the app's home screen.
- Tap on any of the square boxes to change functions or add more buttons to the quick menu.
- To customize it to perform simpler functions, open the Assistive Touch app, then tap on "Setting."
- From here, tap on "Single-Tap," "Double-Tap," and "Long Press" options to set the specific actions to your desired function.
- To move its position, tap and drag the floating virtual button to your desired screen corner.
- To switch between enabling and disabling the button, simply tap on the "Assistive Touch" toggle from the app home screen.
Or just use Android's Accessibility Menu
There is a feature inside Android that's quite similar to AssistiveTouch. In Google's mobile operating system, the feature is called Accessibility Menu, and it is relatively simple to find and activate. You will need an Android device that's running at least Android 12, or this feature will not likely be present. To activate the Accessibility Menu feature in Android, use the following steps:
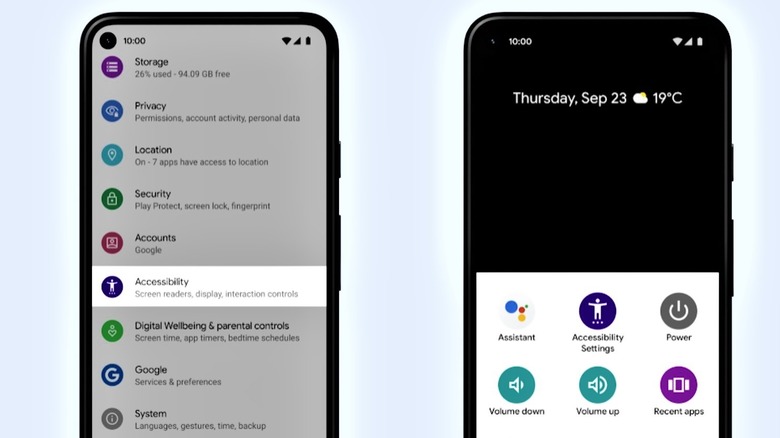
- Open Settings by tapping on the gear icon on your app tray.
- Select the "Accessibility" option.
- From here, tap on either "Accessibility Menu" for Pixel users, or "Advanced Settings" for other Android 12-based smartphones.
- Tap on the "Accessibility Menu" or "Accessibility Button" toggle found here.
- Select the "Floating Button" or "Floating over other apps" option under the "Location" section.
- Allow app permissions if asked.
- Once active, simply tap the floating virtual button to open Accessibility Menu shortcuts.
If you wish to move the position of the button, simply touch and hold, drag and drop the Accessibility Button to your desired area. You can also drag the button to the edge of your screen to decrease its size, or change its transparency by dragging the slider from the "Accessibility Button" sub-menu.