Here's How To Set Up An Amazon Basics Smart Light Bulb
We may receive a commission on purchases made from links.
Besides the ever-versatile smart speaker, some people start their smart home setups with a bright idea: the smart lightbulb, and for good reason. It's one of the most affordable smart home devices you can add to your home. Plus, it's quick to configure, simple to use and understand, and pretty much available anywhere with multiple options from different brands.
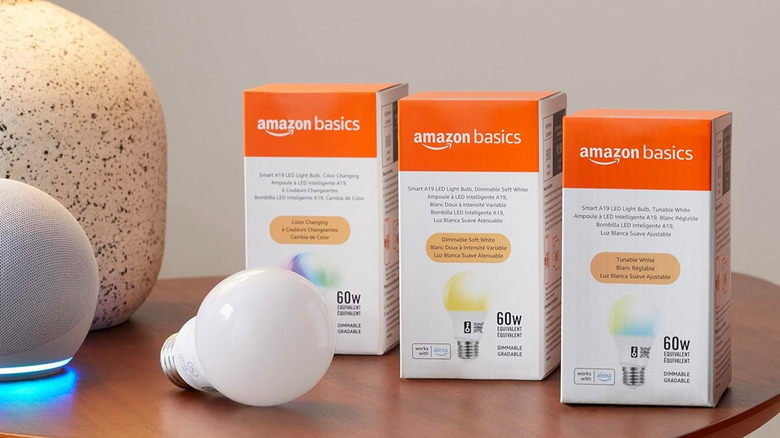
If you're looking to install a smart light bulb in your living space, then you've probably come across the Amazon Basics Smart Light Bulb as an option. It comes in a color-changing bulb with 16 preset colors and a dimming functionality from 5% to 100%. You can control the bulb via the Amazon Alexa app or using the Alexa voice assistant. And similar to the standard smart light bulbs, it can be grouped with other lights, assigned to a specific group, and controlled from anywhere. The setup process for the Amazon Basics Smart Light Bulb is also easy to do. Here's how.
Step-by-step guide on setting up your Amazon Basics Smart Light Bulb

Like most other Alexa-compatible smart home gadgets, you can easily set up your Amazon Basics Smart Light Bulb using the Amazon Alexa mobile app. Here's how:
- Turn on Bluetooth on your phone (you can turn it back off after setup if needed).
- Connect your phone to the Wi-Fi network you'll be using for your Amazon Basics Smart Light Bulb.
- Download Amazon Alexa from the Google Play Store or Apple App Store.
- Launch the app and give it permission to find nearby Bluetooth devices.
- Log in to your Amazon account or create one if you haven't already.
- Install the Amazon Basics Smart Light Bulb.
- Power on the light bulb.
- Wait for about a minute for the "Ready for setup" prompt to pop up on the Alexa app.
- Hit Continue on the pop-up.
- Press Next.
- Select Yes on the "Is your light powered on?" screen.
- Tap on Scan Code.
- Scan the QR code on the bulb or in the quick start guide.
- Wait for the connection process to finish.
- Tap on Next on the "found and connected" screen.
- Choose which room your bulb is installed in.
- Hit Done to exit the setup.
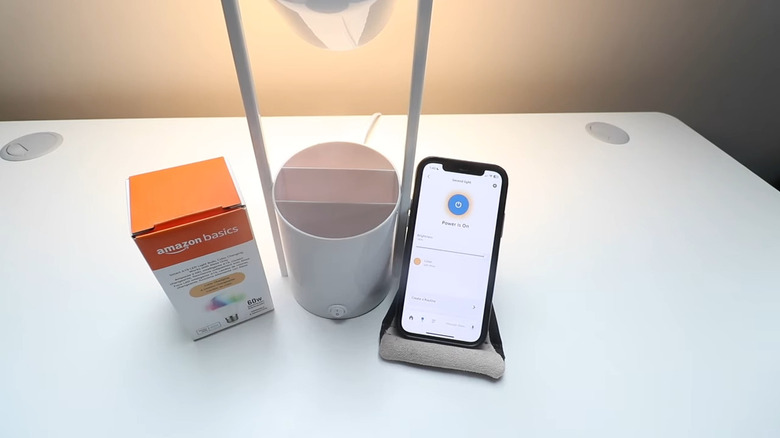
When you go to Devices, you should see the bulb on the list. Tap on it to view the controls, which include a button for turning the light on or off, a slider for adjusting the brightness, and a menu for changing the color. You can also use your phone or a connected smart speaker to control the bulb with voice commands.
Troubleshooting your Amazon Basics Smart Light Bulb
You might encounter instances when your Amazon Basics Smart Light Bulb becomes unresponsive to your voice commands or app controls. When this happens, first check if the bulb is connected to the Wi-Fi network. Go into the Devices section in the Alexa app and see if you can select the bulb. If it says "Device is unresponsive," it means it's disconnected from the internet. Restart the light by switching it off and on again. After one minute, check its status on the Alexa app and try controlling it. If the bulb remains offline, move the router closer (but not less than six feet). Check if you're not having router-related Wi-Fi connection problems too.
Position-wise, make sure the bulb is within the 30-foot range of your phone and Echo device to maintain the Bluetooth connection. Otherwise, your controls and voice commands might not work. If the bulb is still unresponsive, it might be time for a reset. Follow these steps to reset your Amazon Basics Smart Light Bulb via the Alexa app:
- Tap on the bulb icon at the bottom.
- Under Devices, select the light bulb.
- Go to the device settings by pressing the gear icon in the upper-right corner.
- Hit the trash icon in the top right.
- Choose Delete to confirm.
If you can physically access the light switch for the bulb, simply turn it on and off five times. Then, power it back on. You should see the bulb blinking a couple of times and the "ready for setup" pop-up on the Alexa app after a few seconds.