How To Use An Amazon Fire TV Stick On A Laptop
We may receive a commission on purchases made from links.
Most modern day smart TVs can connect to the internet and stream content on their own. But if you have a non-smart TV or just don't like your TV's interface, an Amazon Fire TV Stick can be a great option. It also works with a computer monitor, since most of them have HDMI input ports. But what if all you have is a laptop? Can you still use a Fire TV Stick with that?
The short answer is yes, but it's not as simple as just plugging it in. Fire TV Sticks are made for TVs, which have HDMI input ports. Most laptops, though, only come with HDMI output ports, meaning they can only be used to send signals to other devices, like monitors and TVs. In other words, directly connecting the Fire TV Stick into your laptop's HDMI port won't do anything, as both devices will try to send a signal, not receive one.
If you want to use the Fire TV Stick with your Windows or Mac laptop, you'll need a video capture card. If you don't have one already, you can get a decent one from Amazon for around $21. The capture card can take the HDMI signal from the Fire TV Stick and convert it into a USB feed that your laptop can read. This way, you can view the Fire TV's output directly on your laptop screen. Here's how to set it up.
Setting up the Fire TV Stick with a laptop

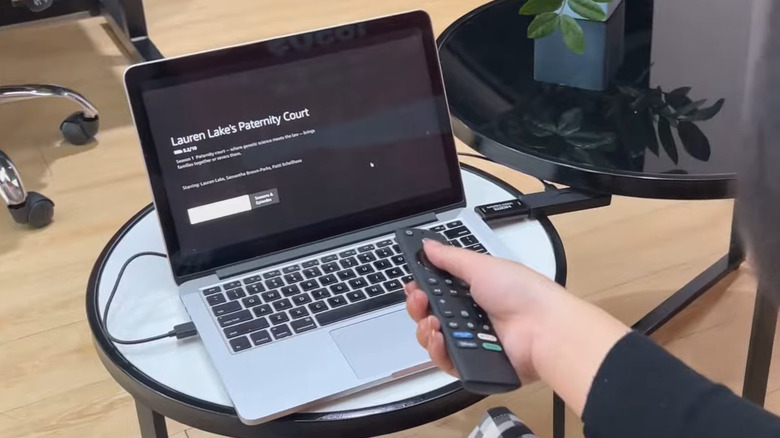
Once you've got your capture card, plug the Fire TV Stick into its HDMI port. Then, connect the capture card to one of your laptop's USB 3.0 ports. Note that the Fire TV Stick still needs a power source, just like it does when it's plugged into a TV. You can use a spare USB port on your laptop for that, or power it using a power bank or a wall adapter.
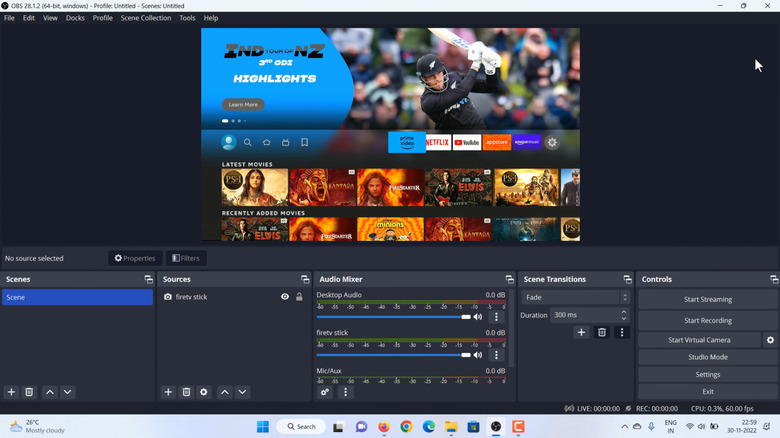
One of the most common Fire TV Stick issues includes not showing up on the screen right away. To make it work, you'll need a software like OBS Studio. It's a free, open-source tool that works with a capture card to stream content. Download and install OBS Studio on your Windows or Mac computer. Once you've done that, use these steps to set up the Fire TV Stick stream on your laptop screen:
- Open the OBS Studio app on your computer.
- Go to the Sources section, click the plus button at the bottom, and select Video Capture Device from the list.
- Enter a suitable name for the source and click OK.
- In the Properties window, click the Device drop-down menu and choose USB 3.0 Capture option. If your device doesn't show up, try unplugging and plugging it back in.
- Scroll down and click OK to confirm.
Once you select the capture card as the source, the Fire TV Stick screen should show up on your laptop.
Configuring audio and video settings in OBS Studio
By default, your Fire TV Stick won't show in full screen or play any sound when you stream it through OBS Studio. Fortunately, that's easy to fix. Here's what you need to do:
- In the OBS Studio app, go to the Controls section in the bottom right corner, and click Settings.
- Select the Audio tab in the left pane.
- Scroll down to the Advanced section, click the Monitoring Device drop-down menu, and choose your preferred audio output device.
- Hit Apply followed by OK.
- Now, go to the Audio Mixer section in the OBS Studio and click the gear icon.
- Click the Audio Monitoring drop-down menu next to Fire TV Stick and choose Monitor and Output.
- Finally, right-click on the empty spot next to your Fire TV screen and select Fullscreen Projector Preview > Laptop Screen Resolution.
That's all you need to do. You should now be able to use your Fire TV Stick with its remote to stream your favorite shows or even play games. Sure, you could do the same from your laptop's browser, but the Fire TV Stick makes things a lot easier by letting you control everything with a remote. It's an especially handy option for travel, since you don't need to lug around a full TV setup.