How To Use The Guided Frame Feature On Google Pixel

Google has spent the last few years adding AI-powered features to its Pixel line of devices. Many of these features revolve around photography, something people tend to use their phones for a lot these days. Some of the AI tools will help you take that perfect picture by fixing out-of-focus shots, cropping out unwanted objects, or adjusting skin tones to seem more true to life.
What if you struggle to take a snap because of something like a visual impairment? Well, Google has you covered there, too, thanks to its Guided Frame feature. The AI tool will help users frame a shot by working out what they're aiming at, telling them where to point the camera, and then snapping the pic automatically when everything is lined up just right.
The feature isn't enabled by default, but setting it up is a breeze once you know what you're doing. There are some limitations, and like almost everything else, getting the most out of Guided Frame will take some practice. Once you get the hang of it, the tool can be used to take some great shots. Here's what you need to know about setting up and using Guided Frame, its limitations, and who exactly the feature is for.
How to enable and use Guided Frame
Enabling Guided Frame isn't difficult, but may not be expressly obvious if you don't know what you're looking for. The feature is part of Google's TalkBack suite of accessibility tools, so to enable it, you'll have to start by enabling TalkBack. This is done by going to your device's settings menu, searching for TalkBack, and then turning "Use TalkBack" on.
If you don't want to use the search function, TalkBack can be found by going to Settings, then selecting Accessibility, before finally selecting TalkBack which is found in the Screen Reader section. With TalkBack enabled, Guided Frame will also be enabled by default.
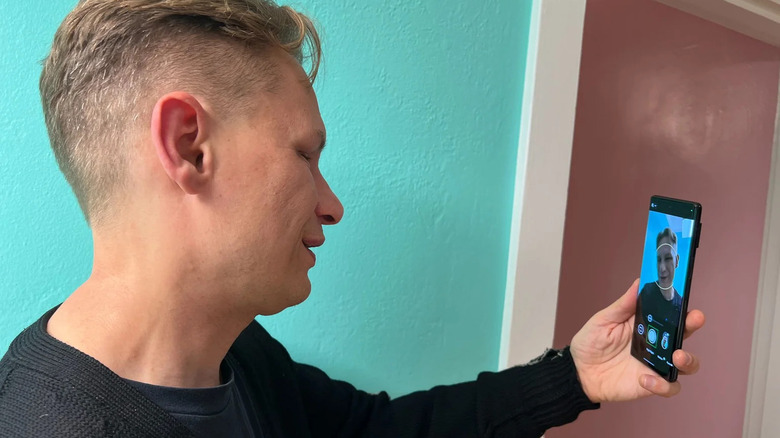
To actually use Guided Frame, you'll have to open the camera app. From there, select the camera you want — be it one of the outward-facing cameras or the front-facing selfie camera — and point the phone at the soon-to-be subject of your photo. You can switch between the cameras by double-tapping the front or rear camera button.
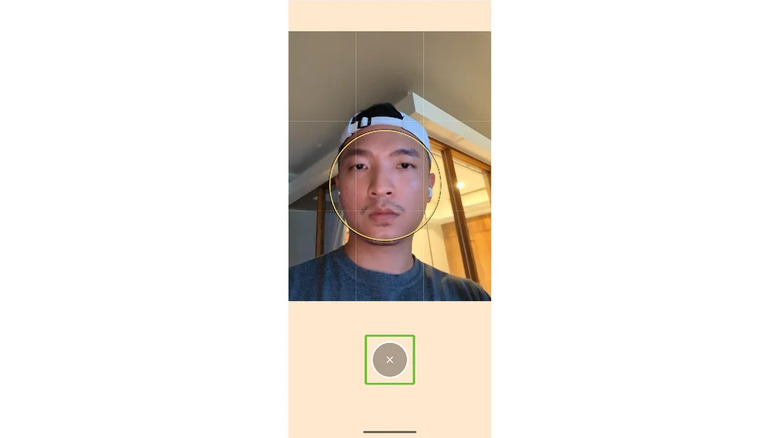
You can then either follow the audio instructions your screen will provide, or the vibrations it uses to indicate useful adjustments to your camera angle. Once the phone thinks your shot is lined up properly, the photo will be taken automatically. If you want to manually take a photo, you can do so by double-tapping the volume button.
When should you use the Guided Frame feature?
As Guided Frame is an accessibility feature, many people won't have a need to use it. Conversely, if you're visually impaired and fond of taking selfies, then you'll want to use it. Depending on the level of visual impairment involved, and the circumstances in which the photo is being taken, then there may be times when Guided Frame is a big help and other times when it's not. Essentially, enable the feature whenever you believe it will make picture-taking a little easier for you.
Similarly, it works best with a single subject, so it's best avoided if you're snapping something more complex. Google also lists objects that the AI can recognize as: faces, pets, food, drinks, documents, electronic devices, and vehicles. If you're using the front-facing camera, only faces will be recognized.
It may work for multiple objects, and objects not on the list, but the chances are things will get trickier and results will get worse the further you make Guided Frame operate outside of its comfort zone.
It's also important to point out that the Guided Frame feature is exclusive to the Google Pixel line of phones. It needs a relatively recent Pixel, too, so make sure you have access to a Pixel 6 or later if you want to try it out. Other Android users, and iPhone users, can't currently access this feature — but Apple fans do have their own suite of accessibility tools to make use of.
Can you use Guided Frame without a visual impairment?
You can use Guided Frame without a visual impairment, just as you can use any of your phone's other accessibility features should you want to. However, it's probably not a good idea.
If you aren't visually impaired, then TalkBack may actually make using your phone more difficult. In addition to a voice describing everything that happens on screen, navigating the phone involves looking at a lot of green boxes highlighting the currently selected option, double-tapping to confirm actions that normally take one button press, and having your phone describe everything that's happening on-screen constantly.
While this is of great benefit to people who struggle with their eyesight, it will likely slow down and frustrate phone users whose vision is working just fine. Still, there is at least one benefit to trying out the feature even if your eyesight is 20/20. Navigating the settings menu with a visual impairment can still be tricky, but if you know how to enable and adjust features like TalkBack, then you can help a visually impaired friend set their phone up — likely saving them a bit of trouble in the process.