How To Take Long Exposure Photos On Your iPhone
Your iPhone isn't just a communication device; it's a versatile camera, too. With modes like Time-Lapse, Slo-Mo, Cinematic, Portrait, and Pano, your iPhone can click creative pictures and videos in almost any scenario. However, there's one hidden mode, rather a feature, that lets you take long exposure photos right from the native Camera app, but it's hidden.
For those unfamiliar with the vernacular, long exposure is a photographic technique where the shutter is left open for an extended duration to capture as much light as possible. However, when combined with timed action, long exposure often results in artistic images that capture the movement of the dynamic elements in the frame.
By now, you've surely seen those images where most of what's in the frame is crystal clear, except, say a blurred streak of flowing water or streaks of vibrant light on city streets; such pictures are captured using the technique of long exposure. One can achieve the look on professional cameras by lowering the shutter speed to a few seconds. The iPhone has this capability, but it's not abundantly obvious, particularly for the casual shutterbug, to know how to adjust the virtual shutter speed. Lucky for you, we're here to let you in on how you can toggle a long exposure on your iPhone.
Use Live Photo effects
Though you aren't able to take long-exposure shots manually, using the Live Photo options will produce the same effect. Here's what you need to do.
- Launch the Camera app on your iPhone.
- Ensure that Live Photos is enabled. If not, tap the circular icon at the top right corner. You can also swipe up on the screen to open more camera settings, select the Live Photos icon, and set it to "On" instead of "Auto."
- Tap the large shutter (picture-taking) button on the bottom of the screen and remain as still as possible.
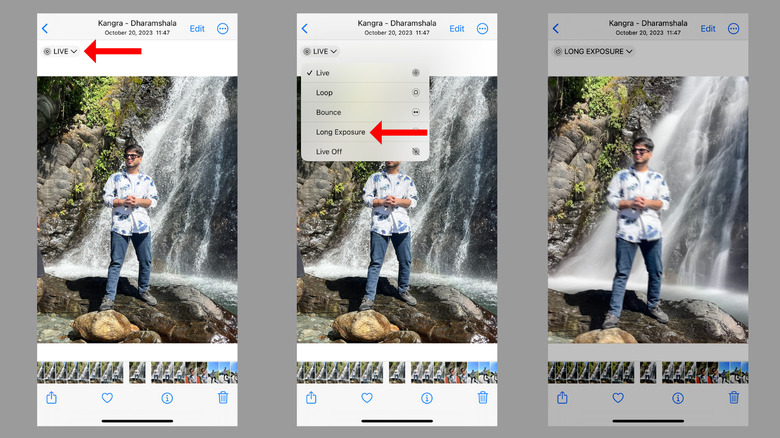
- Once the app takes the picture, tap on the little preview at the bottom left corner to open it.
- Now hit the Live option from the dropdown at the top left of the screen.
- Select "Long Exposure" from the options.
This should convert the regular-looking image into an artistic, long-exposure picture, applying a dreamy effect on any motion captured in your shot. Once done, you can share this image with your friends and family by tapping the Share button and selecting the preferred app. Interestingly, you can also apply the effect to any old Live Photos you've taken.
However, there are a couple of third-party apps that provide you more control over the shutter speed.
Use third-party apps
Some applications offer features beyond what the stock Camera app on your iPhone can do. They allow you to manipulate the shutter speed, making taking long-exposure pictures easier.
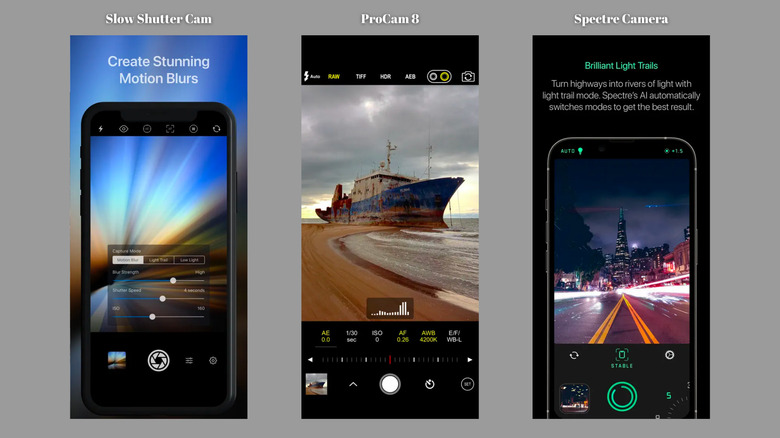
For instance, there's the Slow Shutter Cam ($2.99) by Cogitap Software. It has several presets, like Motion Blur and Light Trail, with manual shutter speed selection, which increases/decreases the blurry effect.
For professionals who like to have complete control of the exposure settings, ProCam 8 ($9.99) by Tinkerworks Apps enables RAW photos. Further, it provides options to adjust focussing distance, white balance, ISO, shutter speed, and image resolution.
You might find some free alternatives on the App Store, but they aren't as effective as the paid ones. Even if you get one that's functional, extended shutter speeds might be locked behind a paywall. For instance, the Spectre Camera by Lux Optics only provides a three-second exposure for free.
It is important to note that the Live Photo effect we've explained in the previous section should be enough for most users. Hence, unless you really want to click your star trails photo a certain way, there's no need to pay for the third-party apps.
Things to keep in mind while clicking long exposure pictures
Third-party apps might unlock slower shutter speeds for capturing better shots of city traffic or seascapes, but there's a chance that the results will not match the quality offered by the stock app. Even if it's designed for a mass market, Apple does no small amount of R&D to optimize its native applications so it provides outstanding results for most use cases. Further, many apps rely on software as opposed to the raw image data to apply long-exposure effects, hence, if you're going outside of the native applications, you can occasionally expect to deal with blurs, color shifts, and other unpredictable results.
On the bright side, here are a few things you can do to improve the long-exposure pictures.
- Mount your iPhone on a tripod. Whether you capture via the Live Photo method or a third-party app, long exposure requires your phone to be as stable as possible. Even though you'll try to remain still while holding the phone, the slightest shake or movement can spoil the picture. If you don't have a tripod, look for a wall or a surface and rest your phone against it.
- If you have wired AirPods or an Apple Watch, use the remote shutter feature to avoid shaking the phone while hitting the shutter button. Professionals can consider purchasing remote shutter controllers that come in handy while clicking long-exposure pictures or selfies.