How To Troubleshoot Critical Process Died On Windows

The Critical Process Died error results in a Blue Screen of Death (BSOD) and occurs when a critical process on which the system relies has unexpectedly crashed. This can result from various factors, such as hardware problems (like faulty RAM or hard drives), incompatible or outdated drivers, conflicts between software applications, or corruption in system files. While the error itself does not mention which critical process has crashed, there are multiple ways to identify the cause of the problem and fix it. Below, we share the different troubleshooting methods you can try.
However, these methods require you to access your system to perform the steps. If you are unable to do so because of the error, boot into Safe Mode before you proceed. For that, power on your computer and press the F8 key repeatedly before the Windows logo appears. This action will bring up the Advanced Boot Options menu. In this menu, navigate to the Safe Mode with networking option using the arrow keys, and then press Enter to initiate the boot process. Safe Mode loads Windows with only essential drivers and services, enabling you to troubleshoot and resolve issues that might be causing the system to crash or display errors.
Repair corrupt system files
Your operating system relies on a multitude of files to perform essential functions and maintain system integrity. When these files become corrupted or go missing, it can lead to a breakdown in the execution of critical processes, ultimately resulting in system errors like the Critical Process Died blue screen.
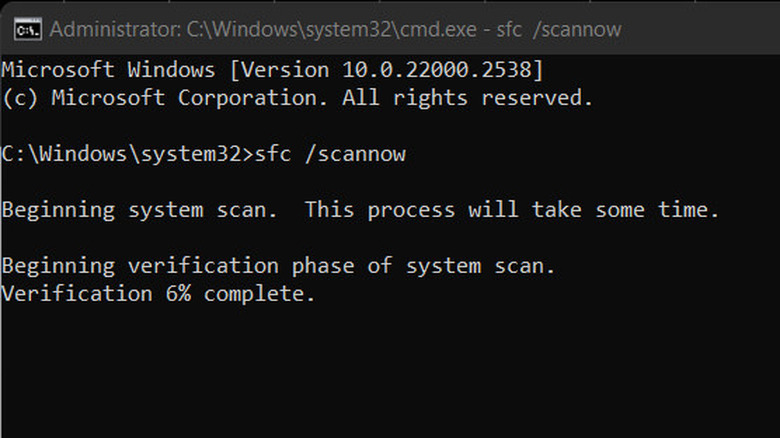
To check if these files are the culprit in your case, you can use built-in tools like the System File Checker (SFC) and Deployment Image Service and Management Tool (DISM). The former functions by scanning the Windows operating system for corrupted system files and then replacing or repairing them. DISM, on the other hand, serves a complementary role by addressing more complex system file corruption scenarios. It can download clean copies of corrupted files from Windows Update or other specified locations, which can come in handy when SFC alone may not be sufficient.
To run these tools:
- Press the Win + R keys together to open Run.
- Type cmd in Run and hit Ctrl + Shift + Enter on the keyboard to open Command Prompt as an administrator.
- Type sfc /scannow and press Enter. The SFC tool will scan and repair any corrupted system files. This process may take some time.
- Once done, type DISM.exe /Online /Cleanup-image /Restorehealth and click Enter.
- After the DISM process is finished, restart your computer.
You can now check if the issue is fixed.
Fix hardware issues
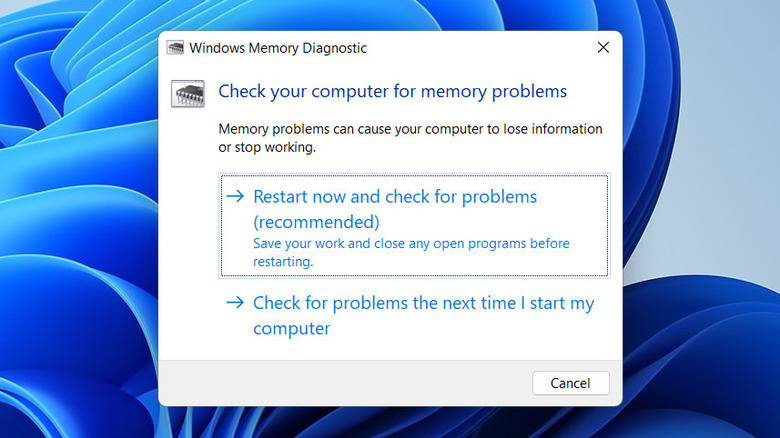
Hardware issues can contribute to the blue screen error as well. One common hardware-related factor is faulty RAM, which can lead to data corruption or hinder critical processes. To check for faulty RAM in Windows, you can use the built-in Windows Memory Diagnostic tool:
- Press Win + R to open Run.
- Type mdsched.exe and hit Enter.
- You will see two options: Restart now and check for problems, or Check for problems the next time I start my computer. Choose the option that suits you best.
The Windows Memory Diagnostic tool runs several passes of different memory tests. It might take some time, and you'll see a progress indicator. Once the tests are complete, your computer will restart automatically. Upon reboot, you can check the results in the notification area. Press Win + A to open the Action Center, and you should see the results of the memory test. Alternatively, you can view the test results by opening the Event Viewer and looking for the MemoryDiagnostics-Results entry under Windows Logs > System.
While you are at it, we also recommend checking for any issues with your hard drive or SSD by using the CHKDSK tool:
- Open Command Prompt as an administrator.
- Type chkdsk /f /r and hit Enter.
Follow any on-screen instructions and allow the process to complete. This may require a system restart. Once the test is complete, review the results, and if any issues are identified, follow the recommended solutions.
Update your drivers

The Critical Process Died error may also occur if a crucial system process is unable to function properly due to issues with related drivers. It is common for outdated and corrupt drivers to conflict with the latest updates or changes in the operating system, which can lead to unexpected errors and crashes. The easiest way to fix most issues with the drivers on your system is by updating or reinstalling them. To update the drivers:
- Type Device Manager in the Windows search and hit Enter.
- In the following window, look for any drivers with an exclamation mark associated with them. This sign is an indication of something being wrong with the driver.
- Right-click on the faulty driver and choose Update driver.
- Choose Search automatically for drivers, and if an updated version of the driver is found, follow the on-screen instructions to install it.
- If not, click on Search for updated drivers on Windows update. This will help you find and install the latest drivers for your devices from Windows Update.
If updating the faulty drivers does not fix the problem, you have the option to reinstall them as well. For that, In the Device Manager, right-click on the driver you want to reinstall, choose Uninstall device, and then restart your computer. Windows will automatically reinstall the driver upon reboot, or you can manually install it using the latest version from the manufacturer's website if needed.
Undo the recent changes
Have you been encountering the blue screen of death error since making changes to your system? This could be a result of a recently installed update or a program conflicting with crucial system processes, introducing incompatible elements and causing system instability that triggers this error.
To address this issue, you can undo the changes and see if that helps. This can be done in two ways — uninstall the update or the program manually or use the system restore utility to revert the system to an older, error-free state. To undo the changes manually:
- Open Run, type control, and press Enter.
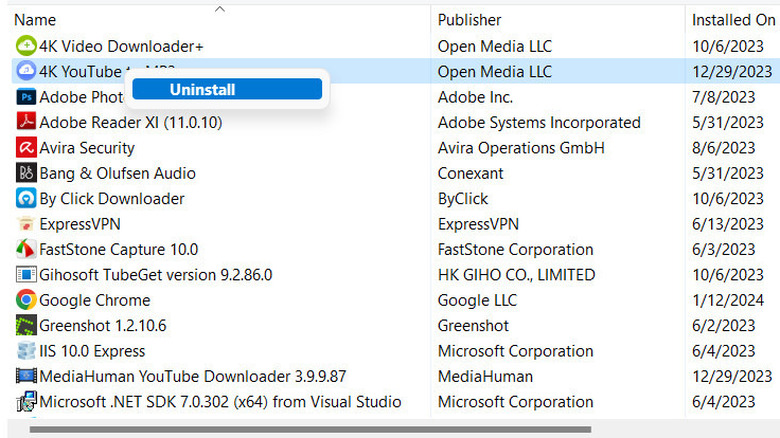
- In the Control Panel, navigate to Programs > Uninstall a program.
- You should now see a list of all the apps installed on your computer. Right-click on the targeted app and choose Uninstall.
- To uninstall updates, click on View installed updates in the same window.
- Right-click on the targeted update and choose Uninstall.
Keep in mind that uninstalling updates may expose your system to known security vulnerabilities or bugs fixed by those updates. Thus, only uninstall an update if you are sure it is causing the problem at hand. If an installed app was the culprit, make sure you download and install apps from trusted sources to avoid such issues in the future.
Check for viruses and malware
At times, malicious software can interfere with essential system processes, leading to system instability and crashes. To check if your system is infected, you can run a thorough anti-virus or anti-malware scan to detect and remove any malicious entities that may be contributing to the error.
If you are using a third-party security program, launch it and look for an option like Scan or Full Scan within the software interface. Select the appropriate scan type, and the anti-virus will start scanning your entire system for malware and viruses. Follow any on-screen instructions or prompts to quarantine or remove any threats detected during the scan. If your current third-party security program isn't strong enough, it is best to switch to any one of the most popular anti-virus programs for improved protection.
For Windows Defender:
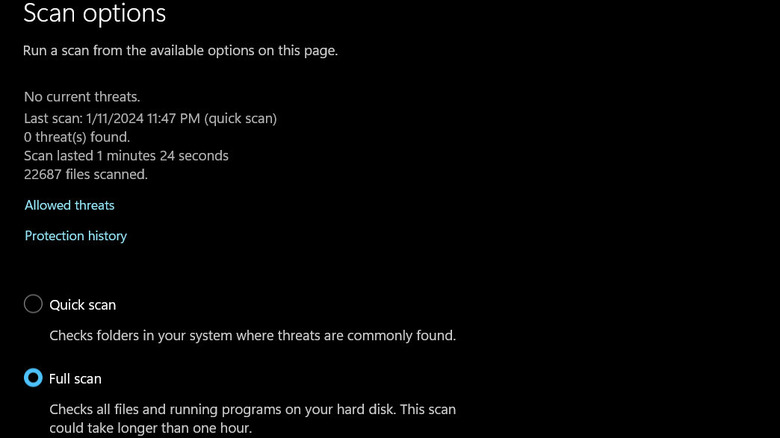
- Open the Windows Security app and click on Virus & threat protection.
- Click on Scan options under Current threats.
- Choose Full scan and click Scan now. This scan will thoroughly check your system for any malicious files and programs.
Allow the scan to complete, and if any threats are detected, follow the on-screen instructions to take appropriate actions, such as quarantining or removing the malicious files.
Update BIOS

The BIOS, or Basic Input/Output System, plays a critical role during the system's startup. It functions by initializing and managing essential hardware components of your device, ensuring they function cohesively.
If your computer's BIOS is outdated, it may struggle to handle the latest advancements, such as improved hardware compatibility and support for updated operating system features. This mismatch between an aging BIOS and the requirements of a modern system can result in conflicts, instabilities, and errors in critical processes. One common manifestation of these issues is the Critical Process Died error in Windows.
If the system-related troubleshooting methods have not worked for you, consider updating your computer's BIOS:
- Identify your motherboard model.
- Visit the manufacturer's website and locate the BIOS updates section.
- Download the latest BIOS version for your motherboard.
- Follow the manufacturer's instructions precisely, usually involving creating a bootable USB and running the update tool during system startup.
It is crucial to exercise caution during this process, so ensure that you have a stable power source and avoid interrupting the process, as a failed update can lead to irreversible damage.