The Most Important Tool You Need To Start Using On Windows 11

Imagine trying to troubleshoot a malfunction with your Windows 11 machine, such as broken drivers or a stuck Windows update, but to no avail. System-wide changes involving the registry always run the risk of corrupting your installation, and it's not always easy to pinpoint the errors and fix them. When troubleshooting doesn't work, it might seem like your only option is to reinstall a fresh copy of Windows, but there's a better way: you can use a tool that has been an important part of Windows for the past two decades called System Restore.
System Restore creates snapshots of your Windows PC every time a system-wide change is applied, whether to the registry, drivers, or programs. The snapshots are called restore points. If a change breaks your installation and troubleshooting the issue fails, you can roll your Windows back to the date and time of the restore point (via Microsoft). Though this may sound daunting, it's easy to perform a system restore and even easier to set up restore points.
Getting things ready

It's important to note that System Restore is not a backup utility; it doesn't affect your personal files or data, but rather only system files like the registry, drivers, and boot configurations. Also, until Windows 8, System Restore was enabled by default, but you'll have to enable it in Windows 10 and Windows 11 manually. The feature is quietly tucked away in the old Control Panel, and you will not find it in the revamped Settings app.
Windows 11 will also ask you to give up disk space to save restore points when setting up System Restore. You can set it to your preference, but keep in mind that when the allocated storage runs out, older restore points will be deleted to make space for new ones. After it has been configured, you can revert your machine to a previous point in time using the same Control Panel tab. If for some reason Windows is returning boot failures, you can also perform a recovery using the boot menu. Overall, the process takes anywhere between 10 to 30 minutes for a complete restore.
How to set up System Restore
First, we'll enable the System Protection feature, which automatically creates restore points, as explained by Microsoft. You'll have to enable the feature before you can utilize restore points, but the process is very simple.
- Click the magnifying glass icon in the Windows Taskbar.
- Type Control Panel in the search field, and then press Enter.
- In Control Panel, select the System and Security option.
- Click the System option.
- If you're redirected to the new Settings app, click "Advanced system settings" in that window.
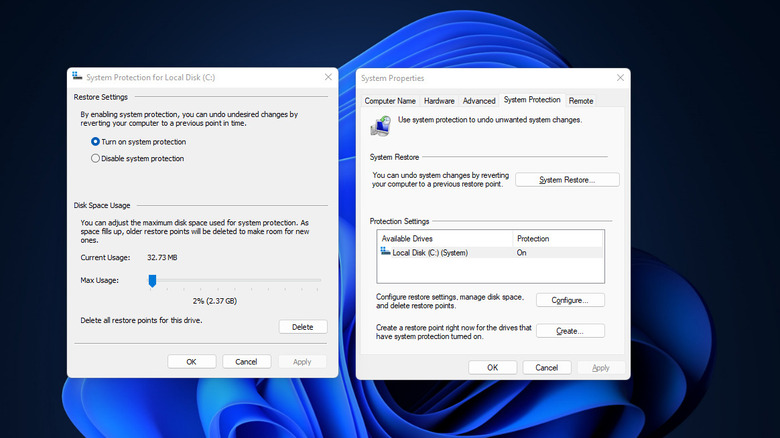
- Click on the System Protection tab in System Properties.
Under the System Protection tab, you'll find the System Restore button grayed out, but don't worry — it'll become active once you have created a restore point. In that same window, you'll need to:
- Select one of the available storage drives from the list.
- Click Configure.
- When the System Protection window appears, select "Turn on system protection."
- Use the slider to adjust how much storage space Windows can use for restore points.
- Click Apply, and then click OK.
The System Restore tool will automatically set up restore points every time a system-wide change is made, but you can also create them manually, as explained by Microsoft.
- Under the System Protection tab, click Create.
- Give your restore point a name.
- Wait for Windows to finish creating the restore point and then click Close.
Users may want to create restore points manually for any number of reasons, such as immediately after installing a fresh copy of Windows 11 so that it can be easily restored if a driver or program doesn't install properly.
How to use a system restore point

You can use a system restore point whenever you'd like; this process involves first heading back into the same System Protection tab listed above. Once you're in that same window and tab, follow these steps:
- Go to Control Panel, then System and Security, and then click System.
- Under the System Protection tab, click the System Restore button.
- When the System Restore utility pops up, click Next.
- Select from the list of restore points, which includes the date and time of each point's creation.
- Click Next.
- Windows also lists all of the changes the System Restore tool will undo. Click the Scan option for affected programs to see that list. You can skip this step if you don't want those details.
- Click Finish and confirm the System Restore when prompted.
- Your computer will restart, and when you sign in again, Windows should display a message that it successfully completed the restore.
If your issue remains unresolved, consider reverting your Windows to an older restore point — or, if you want to undo the system restore itself, repeat the steps outlined above but select Undo System Restore after you click the System Restore button. If your PC isn't booting up, you can also use the Windows menu to revert to a restore point.
Windows might drop into the Recovery menu on its own if it cannot start, but the process is somewhat involved when it doesn't. If that doesn't scare you away, you can enter the Recovery menu manually by pressing the power button once or twice while Windows tries to boot. After doing that, click Troubleshoot, Advanced Options, and then System Restore. You can follow the same steps to select and confirm your restore point there.