How To Check The Real-Time Audio Level On Your iPhone
We're almost all pretty good at using our phones to measure stuff, like counting calories, tracking walks, and ensuring our new shelf is level. But you know what we hardly ever think about? The volume of sound we're pumping into our ears. Who doesn't love cranking up the volume on their favorite playlist with those Airpods snug in their ears? Even when our iPhones give us that little warning, we just brush it off like it's nothing. Turns out, it's something. Sound is quantified in decibels (dB), and sounds above 70 dB for a long time can harm your hearing. The louder the sound, the shorter the safe exposure time. For instance, sounds at 85 dB are deemed safe for up to 8 hours, whereas those at 91 dB are considered safe for only around 2 hours.
Prolonged exposure to such elevated volumes can damage the delicate hair cells within the inner ear, which are responsible for transmitting sound vibrations to the brain. Once these hair cells incur damage, they are irreparable, resulting in permanent hearing loss. So, keeping an ear out for audio levels is important. Before attempting to monitor real-time headphone audio levels on your iPhone, ensure your device is running iOS 14 and up.
How to add the hearing icon to Control Center on iPhone
To easily monitor real-time headphone audio levels on your iPhone can be as breezy as flicking on your flashlight or Wi-Fi. All you have to do is slap that hearing icon onto your control center. This allows for quick accessibility, eliminating the need for extensive swiping to locate the feature. To do this:
-
Go to your App Drawer.
-
Open the Settings app.
-
Scroll down and tap on Control Center.
-
Keep scrolling and tap the green plus (+) icon next to Hearing.
The hearing quick access icon will now be added to your Control Center, and you can easily access it by swiping down from the top-right corner of your screen. Optionally, while in the Control Center settings, you can adjust the position by holding down the three-line icon on the right side and moving it up or down according to your preference before exiting.
How to check real-time iPhone audio levels
Now that you've added the hearing icon to your control center, connect your headphones to your iPhone using the lightning or USB-C port (for iPhone 15 users), or go the wireless route with Bluetooth. Once you've successfully paired them up, start playing any audio content on your iPhone. To keep tabs on those audio levels:
-
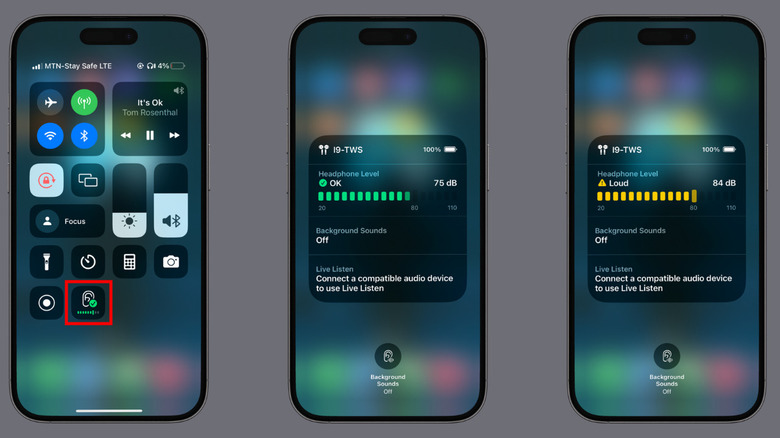
Swipe down from the top right corner of your screen to access your Control Center.
-
Below the Hearing button, a meter will showcase the current audio level.
-
Tap on the hearing icon for a closer look at the headphone level details.
Now, observe the live decibel bar -– it's your audio health indicator. If it's green, your hearing levels are okay. But if it goes up and turns yellow with a warning sign, your hearing levels are getting too loud. The Headphone Level meter in the Control Center is all about your headphones –- not the built-in speakers on your iPhone. If you push the limits, the Health app can be configured to show you a notification. To do this:
-
Open the Health app on your iPhone.
-
Tap Browse.
-
Tap Hearing.
-
Tap Headphone Audio Levels.
-
Scroll down to Headphone Notifications.
-
Toggle it on.
Plus, with this feature activated, it automatically dials down your volume. This serves as a protective measure to ensure the preservation of your aural health.