How To Set Up A Netflix Profile For Your Kid (& Use Other Parental Controls)

In the age of binge-watching TV shows and movies, having a subscription to a video streaming service is almost a necessity. At the forefront of the many options available to date is Netflix, mostly because of the platform's expansive catalog of titles that includes impressive original content. There are plenty of categories and genres to choose from, some of which should be highlighted in various carousels right on Netflix's home screen.
Of course, as is the case for most streaming services, not all shows and films that you can access on Netflix are appropriate for all audiences. If you live in a household with children, it's imperative that you only let them view content that is appropriate to their age. The most efficient way to do that is by creating their own profile on your Netflix account. In addition, you should explore and enable available parenting controls and make a habit out of reviewing your kids' viewing history.
How to create a profile for your kid on Netflix
As long as people live under the same roof, they can use one single Netflix account and have individual profiles on it. A Netflix account can have a maximum of five user profiles, each with its own preferences and recommendations. You can create a Netflix Kids profile — which is designed for viewers ages 12 and younger — which will only show shows and movies that are rated TV-PG, PG, and below. The most efficient way to do it is through your computer:
- Launch a web browser, go to netflix.com, and log in.
- Click Manage Profiles.
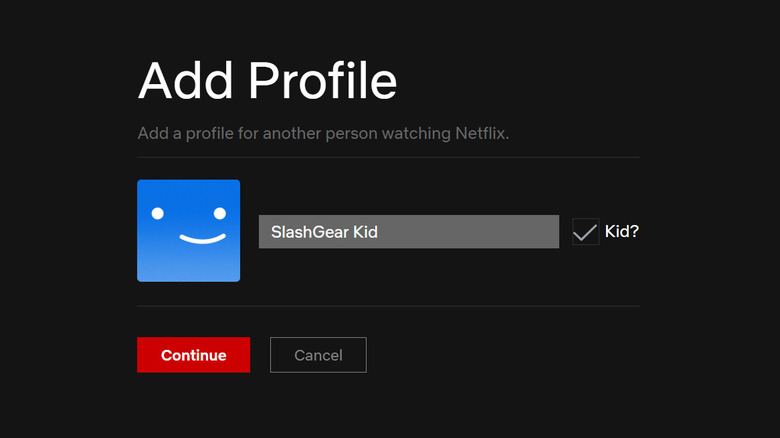
- Select Add Profile.
- Type a name for the profile.
- Click on the box for "Kid?" to create a Netflix Kids profile specifically.
- Hit Continue.
- Click Done.
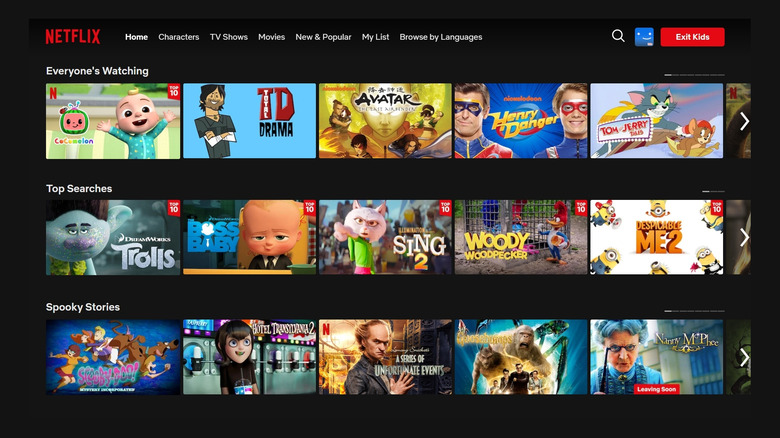
This should add the new profile to the list of profiles already on your Netflix account. The profile's icon will be emblazoned with the "Kids" logo so it will be easier to identify at a glance. It won't have access to account settings or any games. It's also possible to create a Netflix Kids profile on a smart TV and through the Netflix mobile app, but note that the exact steps may vary based on which platform you have.
How to configure maturity ratings on a Netflix Kids profile
By default, a newly created Netflix Kids profile will be restricted to titles that have a maturity rating of TV-PG, PG, and below. If you want to customize content restrictions even further, you can do so by accessing Netflix on a web browser and following the succeeding steps:
- Log in with your username and password.
- Click Manage Profiles.
- Hit the pencil icon on a Netflix Kids account.
- Under Maturity Settings, click Edit. You will need to enter your account password again to make viewing restriction changes.
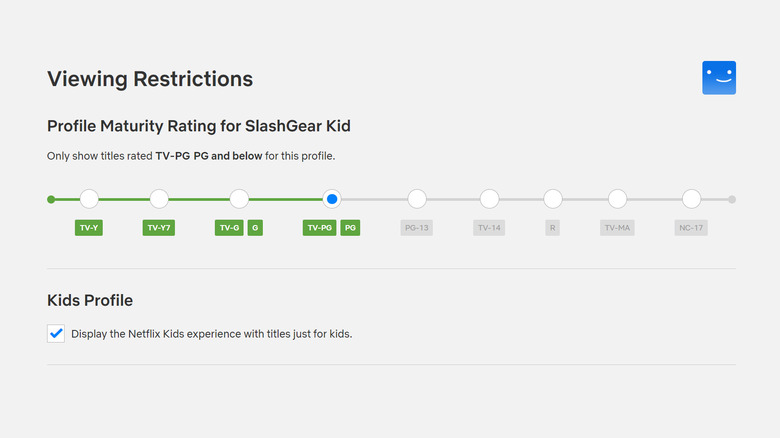
Once you're through, you should see the Viewing Restrictions page that contains a sliding scale of all available maturity ratings. Click on the radio button that's most appropriate for your kid's age:
- TV-Y — suitable for kids of all ages
- TV-Y7 — recommended for viewers aged seven and older
- TV-G/G — appropriate for general audiences
- TV-PG/PG — parental guidance is advised
- PG-13 — titles may be inappropriate for kids younger than 13
- TV-14 — titles may not be suitable for kids younger than 14
Note that if you choose a maturity rating above TV-PG/PG, the Kids graphic on the profile icon will disappear, along with other account settings limitations. In addition, because of potentially graphic content and subject matter that is not appropriate for young viewers, it is not ideal to set a Netflix Kids profile's maturity rating limit to R (restricted), TV-MA (mature audiences), or NC-17 (no children under 17).
Once you're satisfied with all the changes you've made, hit Save. You may need to refresh the device you're watching Netflix on for the updated settings to take effect. You can do this by switching to another profile and then switching back or signing out of your account and signing back in.
How to block specific movie and TV show titles on a Netflix Kids profile
On the same Viewing Restrictions page that you accessed in the previous section, you can also enter specific show or movie titles that you don't want your kid to see and watch using the Netflix Kids profile in question, regardless of maturity rating. Whether it's because a particular title has been in rotation in your household for far too long or an age-appropriate movie or show is still deemed scary by your child, you can easily stop content from showing up in a Netflix Kids profile. Simply follow the steps in the previous section to get to the Viewing Restrictions page on a web browser, type in the movie or show title to add it to the list of restricted content, and hit Save.
Any title that you block will only disappear from the specific Netflix Kids profile you're currently modifying. If you have more than one Netflix Kids profile on your account, you might need to jump into each one and repeat the blocking process. In addition, you can also unblock titles at any time by going back to the Viewing Restrictions page, clicking the "x" next to the title you want your child to start seeing again, and hitting Save. Again, for any changes to take effect on the device your kid uses to watch Netflix, you might need to sign in and out of your Netflix account on said gadget.
How to restrict your kid's access to your Netflix profile

If your child knows how to launch their own Netflix Kids profile on your TV, then they can also easily access other profiles saved on your account that may not be age-appropriate. To hinder them from viewing mature content, consider locking down unrestricted Netflix profiles with a PIN:
- On a web browser, go to netflix.com/YourAccount.
- Log in if necessary.
- Go to the Profile & Parental Controls section.
- Click the dropdown arrow next to your main account profile.
- Next to Profile Lock, hit Change. You'll need to enter your Netflix password again to proceed.
- Click the box next to "Require a PIN to access profile."
- Type in your preferred four-digit PIN (and make it hard to guess).
- Click the box next to "Require a PIN to add new profiles."
- Click Save to save all the changes made.
- Log out of Netflix and sign back in on the device your kid watches Netflix on so the updated settings take effect.
The "Require a PIN to add new profiles" setting is only available on the Netflix account's main profile. Ensure that you enable it to impede your kid from trying to access adult content outside their own Netflix profile via a new unrestricted one or deleting it after they watch so they don't get caught trying to get around your parental restrictions.
Moreover, if you have other unrestricted Netflix profiles on your account — maybe one that's set up for your spouse or a house guest — put a PIN on those as well. Just follow the aforementioned instructions and click on the dropdown arrow next to every adult account profile to assign a PIN to it. You can modify a profile's lock PIN at any time by repeating the process outlined above.
How to review your kid's watch history on Netflix (and other useful settings you ought to enable)

If you often let your kid watch Netflix without you in the same room, it's a good idea to occasionally check in to see what sort of shows and movies they like to view on the platform. Here's how:
- On a web browser, go to netflix.com/YourAccount.
- Log in if you haven't yet.
- Scroll down to the Profile & Parental Controls section.
- Click on the dropdown arrow next to the Netflix Kids profile you want to review.
- Next to Viewing Activity, hit View.
- You should be able to see a list of TV shows and movie titles they've watched recently, arranged by date. Click the Show More button below to expand the list.
After checking your kid's viewing history, consider going through their profile's playback settings:
- Go back to the Account page and click on the dropdown arrow next to your kid's Netflix profile again (or follow steps 1–4 above).
- Next to "Playback settings," click Change.
- Check the box next to "Autoplay next episode in a series on all devices."
- Check the box next to "Autoplay previews while browsing on all devices."
- Hit Save.
Autoplaying the next episode in a TV series is very useful when your kid loves a particular show and wants to keep going. Autplaying previews, on the other hand, is great if a sneak peek of a new title is desired in order to decide if it's something worth getting into. Both autoplay settings aren't really necessary in the parental restriction sense, so feel free to enable only when it works for you and your family.