How To Add Page Numbers In Google Docs Or Microsoft Word

Have you ever read through a long business proposal and went to reference something later but struggled to find the specific part it was on? Or perhaps you've printed your lengthy research paper at home, but the pages all got mixed up, and you can't remember which goes where? That's where page numbers come to the rescue.
With page numbers, handling both digital and physical documents becomes a whole lot easier. They enhance the overall readability and accessibility of any written material, providing you with a direct reference point to particular information within the document. That means no more aimlessly scrolling through endless pages or dealing with shuffled stacks of paper.
Lucky for you, adding page numbers to your digital documents, whether that's a technical manual on Google Docs or an eBook on Microsoft Word, is a pretty straightforward process. We'll walk you through the step-by-step guide on how to do so in Google Docs and Microsoft Word.
How to add page numbers in Google Docs web and mobile apps
You can add page numbers to your Google Docs document from either the web or mobile app. Here's how to use the web app to add page numbers:
- Open your Google Docs file.
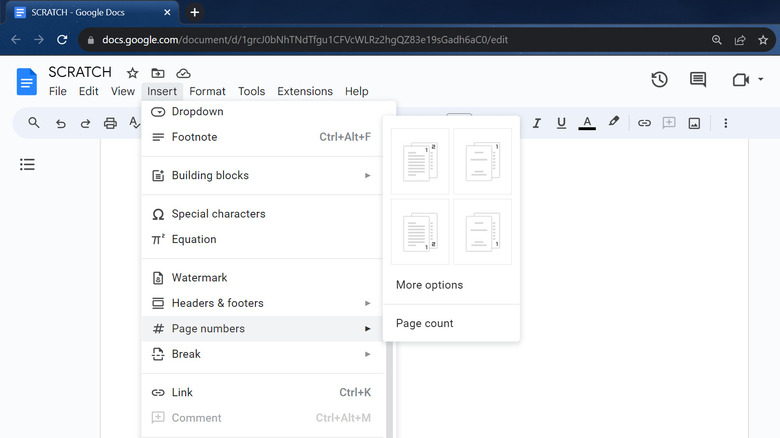
- Go to Insert on the menu bar.
- Choose Page numbers from the drop-down menu.
- Select one of the four available options:
- Page number in the header, starting from the first page
- Page number in the footer, starting from the first page
- Page number in the header, starting from the second page
- Page number in the footer, starting from the second page
- To customize the page number further, select More options. Then, do any/all of the following:
- Under Position, choose whether the number appears in the header or footer.
- Mark/unmark the checkbox for "Show on first page" to make the page number appear/disappear from the first page.
- Under Numbering, enter the starting number for your page numbering. For instance, you can start with 2 instead of 1.
- Hit Apply.
- If you want to add a page number right where your cursor is on the document, select Page count instead.
To add page numbers using the mobile app, here's what you need to do:
- Open your document in the Google Docs app.
- Tap on the plus sign at the top of the screen.
- Choose Page number.
- Select one of the four available options (this is similar to what's in the web app).
How to add page numbers in Microsoft Word on desktop and mobile apps

Similar to Google Docs, you can use your desktop and mobile app to add page numbers to your Microsoft Word documents. Follow these steps to add page numbers with the desktop app:
- Open your Microsoft Word document.
- Go to Insert.
- In the Header & Footer section, click on Page Number.
- Choose how you want the page number to appear:
- If you want the page number at the top, select Top of Page and click on your preferred style.
- If you want the page number on the bottom, select Bottom of Page and choose one of the available styles.
- If you want the page number on the margins, select Page Margins and then the style you want.
- If you want the page number right where your cursor is, select Current Position and then a page style of your choice.
- To change the page numbers' appearance, click on Format Page Numbers and edit these configurations:
- To change the number format (e.g., 1-2-3, i-ii-iii), select a style in the Number format drop-down menu.
- To add the chapter number in the style, check "Include chapter number."
- To start the numbering on a different page, click "Start at" and enter what page you want to begin on.
To add page numbers to your document using the Microsoft Word mobile app, here's what you need to do:
- Open your document in the Microsoft Word app.
- Tap the pencil icon at the top.
- From the bottom menu bar, choose Home > Insert.
- Select Page Number.
- Tap on the page number format you wish to apply.