9 Studio-Quality DIY Microphones That Could Save You Thousands

We may receive a commission on purchases made from links.
High-end microphones are wildly expensive. As of this writing, there are used U47s on Reverb for over $20,000. But parts are affordable if you shop carefully, and it's possible to build a reasonably good facsimile of an expensive mic for under $200.
Why can't you expect to build a perfect copy? Well, you probably can, but it's not likely. In general, mic tech doesn't change much, so mic quality is a matter of using good components and maximizing quality every step along the way. That means perfect solders, a little bit of wire shielded, and circuit boards populated perfectly with high-quality components whether assembled by you or a vendor. And then there are the mic capsules themselves. Most "make a $5,000 mic for $50" tutorials assume that WidgetCo's WID87 capsule is basically the same as the K87 you really want to use. Others, however, claim that even OEM capsules bought for cheap on the internet tend to be seconds, sometimes with substantial flaws.
But if you shop and build carefully, you can get close ... probably closer than the untrained ear can hear. Depending on your hourly rate doing whatever it is that you do, you might find that building a high-quality microphone isn't really a money-saving venture. What you're doing is building sweat equity — trading your effort for the lower cost. But there are other upsides as well, the main one being that you will learn a lot along the way.
A work of art with some cheap but good internals
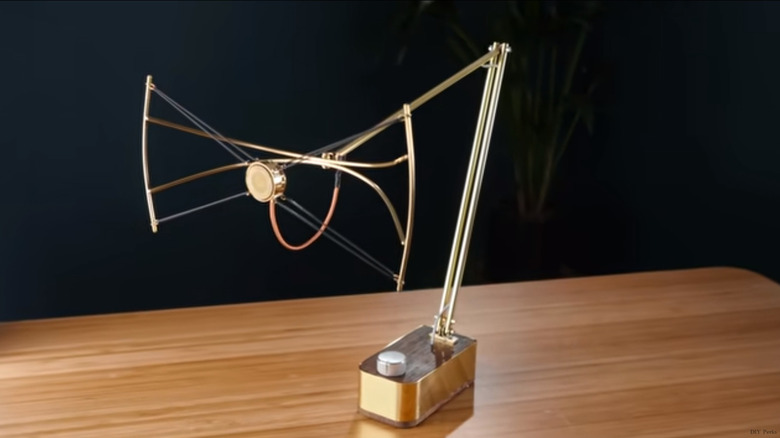
If you've encountered YouTuber DIY Perks before, you will have noticed that the man behind the channel, Matthew Perks, is a bit, umm, thorough with the quality and aesthetics of his builds. While most DIYers screw capsules and circuit boards to a prebuilt frame and stick it in the body of a trashed microphone, Perks designs a spectacular piece that might be worth having even if it didn't sound great.
This is an unusual project in that its goal is to create a high-quality USB microphone. The goal of these projects is typically to create a studio microphone, which almost invariably (with the exception of mics used by YouTubers and podcasters) means a balanced XLR mic. Some podcasters use XLR mics and others use USB mics, and what you're getting here is essentially a podcaster-grade USB mic: It's a beautiful build made with a cheap capsule, a homebrewed preamp circuit, and the ADC board from a consumer-grade digitizing device. Perks does provide a link that can be used to build an XLR version but gives no further instructions beyond that.
For the earnest DIYer, Perks' preamp circuit might be the most interesting part of the build. He designed it to use minimal components and to be easily assembled on an off-the-shelf stripboard. He provides a printable template for this, and a schematic as well, via a Google Drive link.
Cloning a DIY mic
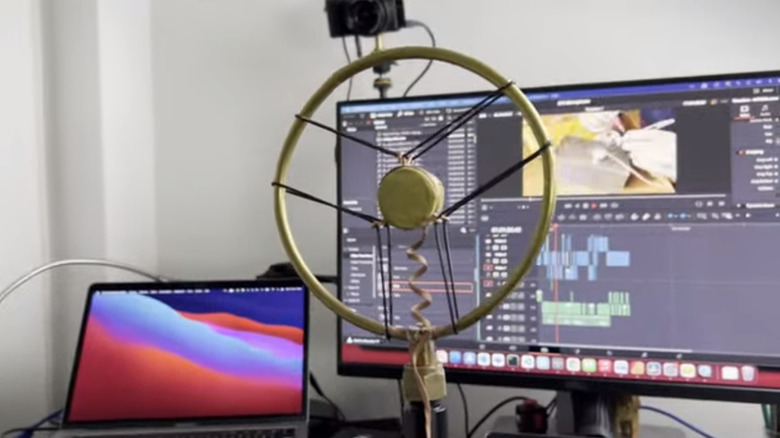
Modeled on the DIY Perks mic, this version was built by YouTuber Tim writes code, whose IRL name is Tim van de Vathorst. Van de Vathorst turns what at first looks like a DIY towel ring into a very presentable retro-styled mic. Like the DIY Perks build, this one eschews the donor body in favor of a more exposed design ... and maybe pays a price for that.
Rather than simply cribbing everything from Perks, van de Vathorst brings his own expertise to the endeavor. You see this in little details like the use of enameled wire (to prevent short-circuits), which is shielded with desoldering wick. And there are substantial differences from the Perks build. This is a 220v (110 works as well) XLR mic, and van de Vathorst redesigned the circuit using some surface-mount components that rendered his own soldering skills insufficient, so that might be something to think about if you're thinking about building your own.
In fact, it's always instructive to see where DIYers have difficulties. Van de Vathorst spent hours troubleshooting some noise in the mic, which turned out to be caused by the aluminum mesh headbasket. This would normally serve as a Faraday cage to block interference, but for some unspecified reason this didn't work and van de Vathorst had to fabricate a copper mesh headbasket instead.
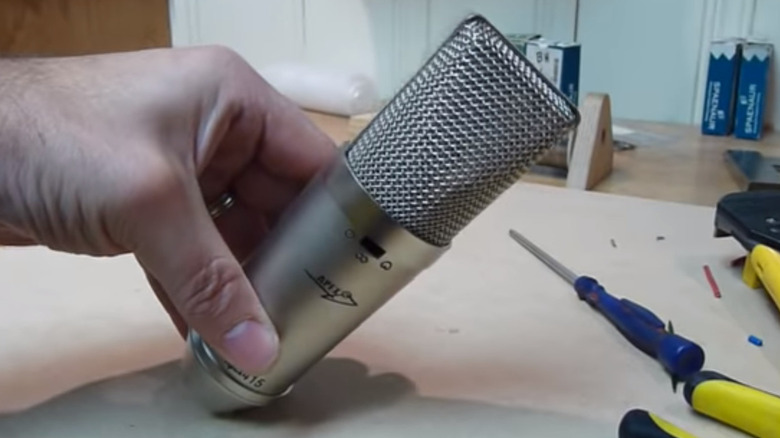
Altoids tin to USB condenser mic
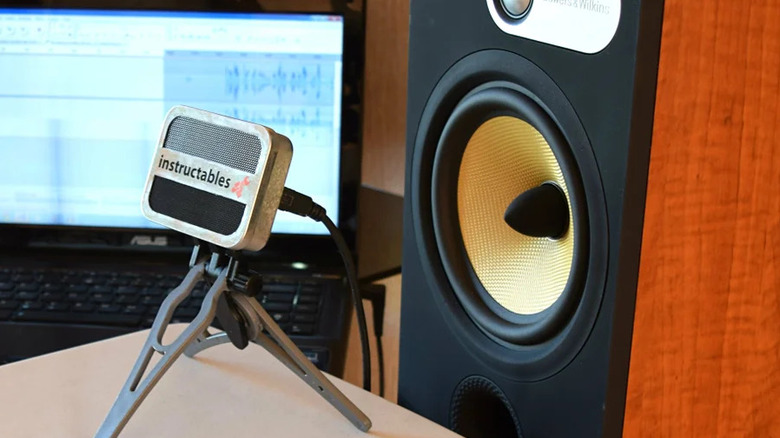
It's not a DIY project until someone shoves it into an Altoids tin — but this is one great-looking Altoids tin project. And it's built using a cheap USB mic circuit, to boot. There's also an aux prototype in the works, if you're allergic to USB mics. But it's really the USB functionality that makes this project interesting.
This project by much-decorated Instructables veteran ASCAS is ostensibly about creating a USB mic that sounds great (podcast-quality, that is) for $10. He accomplishes this by using two electret mics, a homemade preamp circuit, and scavenged internals from a cheap USB ADC/DAC.
There are a couple of nice but simple details about this project to take note of. For example, ASCAS glues in a ¼-inch 20 nut to serve as a tripod mount. The final product is a great-looking USB mic, and it's well worth building for the various experiences you'll encounter. Including how to use more hot glue than a Hobby Lobby customer at Christmastime.
Clone of a classic studio condenser mic
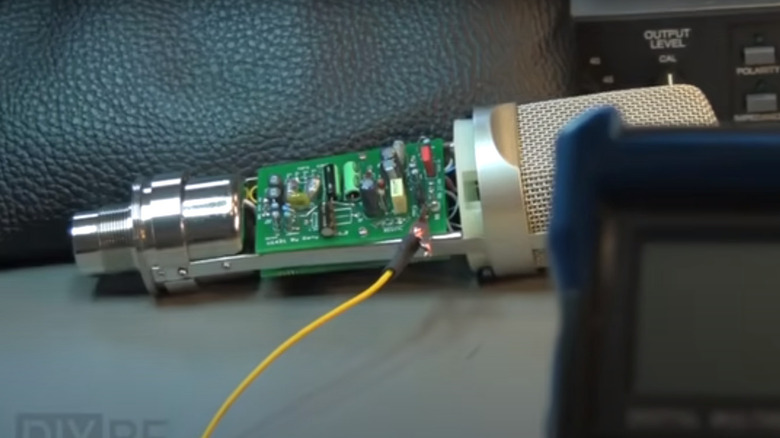
Home studio people love a good deal, but they also love to talk about their $3,000 Neumann U87 microphones, partly because they're excellent mics and probably also because they plunked down $3K and want to get some mileage out of it. But you can spend less, get a similar result, and have even greater bragging rights by making your own. The goal of this attempt by Matthew Jenkins on the DIY Recording Equipment channel was to build a mic comparable to the U87 for less than $500. The video includes some of the most thoughtful build instructions you'll ever find.
Jenkins uses prebuilt clone circuit boards from Dany Bouchard and a donor body and capsule, and it cost less than $500. The build actually ends up costing $342, and a post on the excellent DIY Recording Equipment website outlines some options. And here is where we learn something interesting about building clones. If you really commit to faithfully reproducing the sound of something like a U87, you're going to spend some money well beyond the usual "$12 mic capsule" hype. In this case, Jenkins spends over $150 on the capsule and transformer alone, and going with higher-end components could easily set you back $350 just for the capsule and transformer.
This video is worth a watch even if you don't plan to build this specific mic because of Jenkins' attention to detail. For example, he discusses the pads for connecting the transformer at length, explaining the cryptic PCB labeling, which turns out to be abbreviations of the German words for the original wire colors. These must be translated and then mapped to the actual wire colors from your particular transformer. It's the sort of detail it's good to be aware of since this sort of thing can easily turn an afternoon project into a three-day project.
The one shortcoming of this demonstration? Jenkins never shows the completed mic.
Making an Alice mic in a cheap donor body
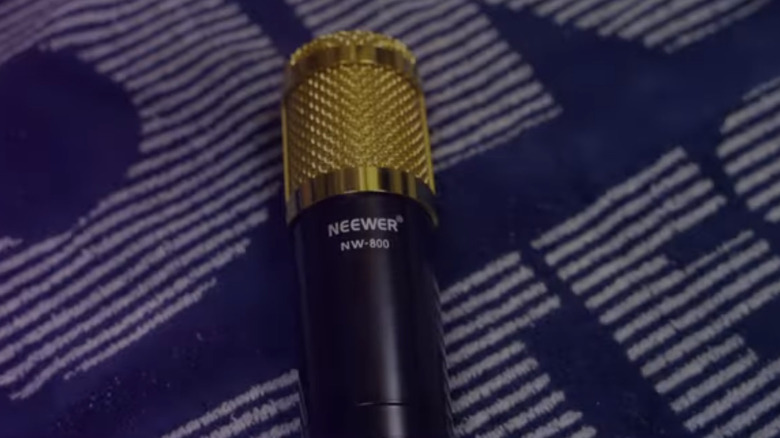
This project is based on the original Alice mic from Scott Helmke, a high-output hand-crafted mic built on a cardioid electret capsule with an external FET, constructed inside a copper water pipe. Here, Instructables maker DJJules creates a version using dual op amps for impedance conversion and to create a balanced signal (for XLR output). The result is reported to be a high-gain mic with virtually no noise, built using a TSB2555B electret capsule.
DJJules builds his mic in the body of a super-cheap BM800 condenser mic (in this case, it's actually a Neewer NW-800 version of the BM800). This is the sort of thing some studio gear snobs probably wouldn't do in case something thinks they're actually using a BM800. Considering the fact that donor bodies can cost $100-200, the $30-ish BM800 is worth a coat of paint to hide the gauche Neewer brand.
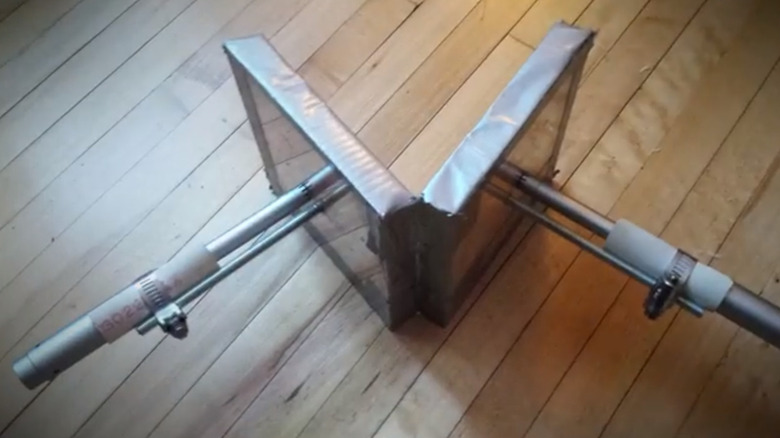
A second build is also described, a "figure-eight mic," which excels at isolating sound sources in front of and behind the mic while eliminating noise from the sides. In a different configuration, this basic approach might make for an excellent option with which to mic a room. Both build processes are described in a YouTube video that makes a necessary complement to the Instructables page, which suffers from having too few images of the build process.
Binaural PZM-style boundary mics from cheap measurement mics
This video is more about theory than build instruction, but the project is simple and you'll get the idea easily enough. Boundary mics are designed to capture accurate sound that isn't affected by phase distortion or comb filtering. What's interesting about this project is that it runs counter to one of the usual needs sound engineers experience. Often, sound recorded in a reverberant room is, if recorded well, disappointing in playback because all of the character imparted by the room is lost to the various corrections and perfections of professional audio recording. In fact, many recordists add an additional mic specifically to capture room noise and character that would otherwise be stripped away by the recording process.
In this case, though, the goal is to eliminate reverb and phase distortions introduced by the room using a boundary mic — typically an odd-looking flat device you see in conference rooms, where they help to eliminate such problems in rooms that are almost never properly acoustically treated.
Boundary mics, like those bearing the PZM brand, typically use omnidirectional electret condenser capsules. In this project, Brad Peterson accomplishes this by mounting a pair of cheap Behringer ECM8000 measurement mics to a couple of sheets of plexiglass. Peterson sketches out the boundary mic's function while describing his build, which is both interesting and useful. His boundary mics could benefit from being mounted to larger boundary platforms, but otherwise, this seems like a very useful and quite simple project to emulate.
Make a Shure SM7B clone from a Shure S58
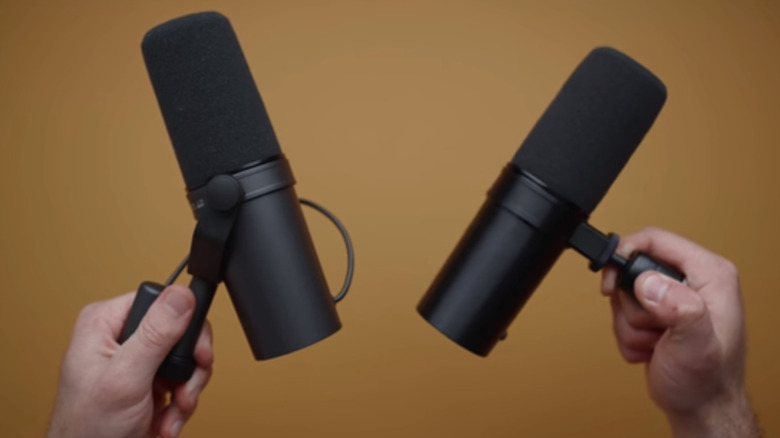
This is truly an odd one. Basically, it's a 3D-printed housing into which you stick a $100ish Shure SM58 with its grill housing removed to emulate a more expensive SM7B. It sounds a little suspect, but the creator, Caleb Pike of the DSLR Video Shooter YouTube channel, explains very thoroughly why this is pretty much what a $400 SM7B is. He walks through his build in a fair amount of detail, explaining why he varies his 3D-printed design from the Shure original to improve strength and usability. He also describes the same project using the Ultravoice XM8500, a $20 microphone. You're not going to plant a rockstar in front of a 3D-printed housing in your home studio, of course, so if you have a bunch of rockstars milling around this is not the mod for you. But if you have a particular need to spend $370 less on a single mic, give the XM8500 a shot.
Dark Corner Studios takes this a step further by removing the transformer from the SM58, making it even closer to the sound of the real SM7B, which is a flatter frequency response. Aiden Wolf simply walks you through how to remove the SM58 transformer, so you'd need to combine this project with the DSLR Video Shooter project to get as close as possible to the SM7B.
Of course, you're not creating an SM7B even with the Dark Corner build. The SM7B includes advanced integral shock absorption and onboard interference shielding, which yanking the transformer out of an SM58 won't recreate. And by removing the transformer you're also introducing the need for a sizable preamp.
Resurrecting a good mic as a great one
Here, luthier Fred Gabrsek strips out the internals from an Apex 415, itself a capable microphone, and builds a ribbon microphone that looks and sounds like the heyday of radio. It's a satisfying project, partly because of the novelty of the ribbon mic, but also because their comparative simplicity means you can mostly build the thing, not just solder together some prefab circuit boards. Ribbon mics are warm-sounding devices that tamp down the harshness you sometimes hear in percussion and brass instruments. They tend to be expensive, and some complain that they are comparatively fragile, though this might be the reputation of the earlier ribbon mics outliving the actual problem, since modern ribbon mics are pretty durable.
A lot of Gabrsek's build is fabricated in his workshop, which is blessed with great tools in the manner of luthiers everywhere. But some money does get spent as well. The Lundahl LL2913 ribbon mic transformer itself costs about $78. And while Gabrsek fabricates his ribbon and the "motor" it sits in, you can buy these components if you don't have $10,000 worth of tools sitting around and waiting to save you $2,000 on a ribbon mic.
Otherwise, the build is fairly simple: The ribbon/motor assembly connects to the transformer, which connects to the XLR jack at the bottom of the mic. All that's left is to get in the habit of saying "Good night, and good luck" at the end of each recording session.
Fix what you have or build something dirt cheap

As you might have concluded from the very existence of microphone donor bodies, a lot of the DIY mic hobby can be viewed as modding — that is, improving your existing mics. One such improvement is a 1988 hack of Realistic PZM microphones by Phil Rastocny, who added a 9V battery as a sort of phantom power to the mic via an XLR cable. You can read Rastocny's original write-up here and on Vocalist (along with a lot of explanation), but the easiest thing to do is to follow the video instructions by Donald Forrest Williams. This turns the already very useful PZM mic (see the bit on boundary mics above) into an even better beast, and the mod is so popular that you can commonly buy modded Realistic PZMs on Ebay today.
In Tape Op, Joel Cameron picks up this ball and runs with it, building two capable condenser mics for $20 each (in 2000 U.S. dollars). While a lot of DIY mic projects are focused on looks, Cameron's is 100% about function and is probably more like what you need if you're trying to record on a seriously restricted budget.
The power supply in Cameron's build is housed in a metal electrical box, and the mic itself is a Panasonic WM-66AY Omnidirectional Microphone Cartridge with a 6 mm diaphragm, which he embeds in an XLR connector. (You might want to build them into a pipe to create something like a pencil mic, just to avoid losing them, if nothing else.) The circuitry is dead simple and the sound is reportedly as flat as a reference mic.