How To Change Your iPhone Camera From HEIC To JPG (And Why You Should)
If you are an iPhone user and have tried to save or edit photos you've taken off your mobile device, chances are high that you've run into some difficulty doing so. By default, any iPhone running on iOS 11 or newer will be set to save images in HEIC format. If you've never heard of this format before, it's because it's exclusive to Apple, much like everything else the company has personally developed for its line of products.
HEIC stands for "high-efficiency image container" and is the vehicle for Apple's optimized media formats, namely HEIF or "high-efficiency image file format" for photos and HEVC or "high-efficiency video coding" — more commonly known as H.265 — for videos. When you take a photo on your iPhone, it is automatically saved in HEIF and is contained and compressed in a HEIC file, which compared to the more widely known JPEG format, takes up way less space on your device without sacrificing any of the quality. In addition, a HEIC file can house and compress multiple images within it, which is a great storage-saving feature to have for any shutter-happy iPhone user.
What can you do with a HEIC image?
If you're sharing iPhone photos with fellow iPhone users, provided that they have a newer version of iOS installed, they should be able to view them in their original format, resolution, and frame rate without issue. In some cases, depending on whether the recipient's mobile device has HEIC support or is an iPhone running on at least iOS 11, photos shared via AirDrop, Messages, email, or other third-party methods might be automatically converted into a more compatible format, namely JPEG.
iPhone images saved in HEIC can be saved and edited on a computer, as long as it has a compatible operating system and software. If you have a Mac that's running on at least macOS High Sierra, you should be able to view, edit, or duplicate any photo on it that's been taken with an up-to-date iPhone. Otherwise, you might need to install certain operating system upgrades and use a photo-editing platform that offers support for HEIC files. The latter should be easy to do for tech-savvy users who can navigate their way through their computer's operating system support pages (to install any necessary HEIC support tools) and use programs like Adobe Photoshop.
If you are hoping to view iPhone images on an older and incompatible computer or are sending them to someone who may have difficulty going through the process of manually converting the files into a format their machine can read, you can tweak your iPhone's camera settings so that moving forward, any photo you take will be saved in JPEG, which is considered more universal across a variety of devices and platforms. You can also ensure that any image files sent out from your iPhone are automatically received in a compatible format.
How to switch your iPhone's image format from HEIC to JPG
If you recently updated your iPhone's operating system, your photos might be saved in HEIC by default. To check a specific photo's file format, do the following:
- Launch the Photos app.
- Pull up the photo in question.
- Swipe up or hit the "i" icon on the bottom edge of the screen.
- Next to your iPhone's model name, if it says HEIF, then the photo is saved as a HEIC file.
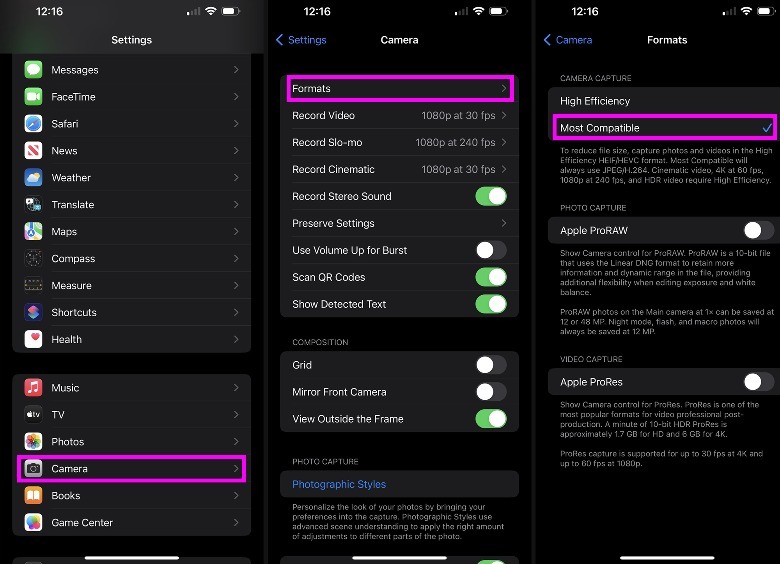
To set your iPhone so that it captures photos in JPEG instead, follow these instructions:
- Launch the Settings app.
- Scroll down and tap Camera.
- Go to Formats.
- Under Camera Capture, select Most Compatible.
 Jam Kotenko/SlashGear
After doing this, photos that you take on your iPhone will now be stored in JPEG format. This setting is only available on iPhones that can capture photos in HEIF format and run on at least iOS 11.
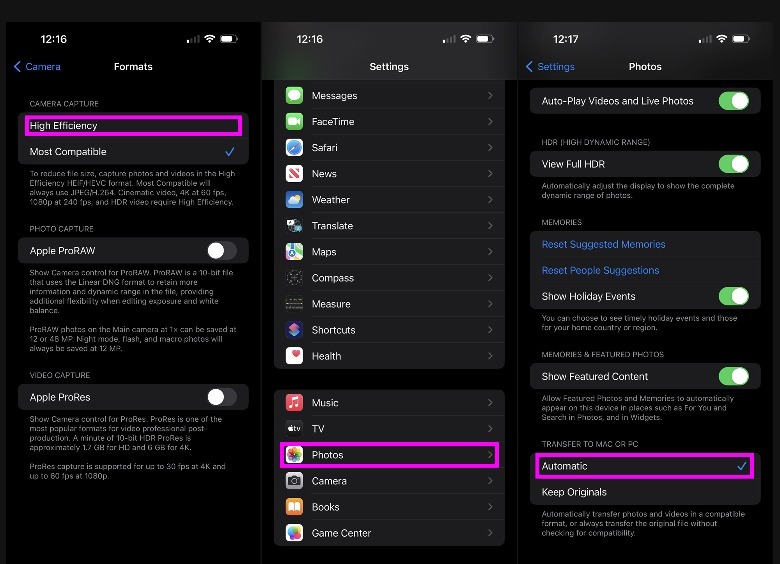
In general, capturing images in HEIF format is the most ideal for newer iPhone models. As previously mentioned, unless the image will be sent or viewed on an older computer, there's really no reason to manually convert images saved on your iPhone. You can, however, set your mobile device up so that you can keep taking iPhone photos in HEIC while also conveniently switching them to a format that's more compatible with any receiving device or platform. Here's how:
- Follow the steps previously outlined but instead of choosing Most Compatible, select High Efficiency.
- Go back to the main page of the Settings app.
- Scroll down and tap Photos.
- Scroll down to the bottom. Under Transfer to Mac or PC, select Automatic.
 Jam Kotenko/SlashGear
This will ensure that any time you transfer iPhone photos onto another device, they will always be sent in a compatible format.