6 Easy Tricks To Fix Low FPS On Windows 11

The virtualization and security in Windows 11 promise smoother, more integrated virtual machine support. But users have reported that the features can interfere with gaming, creating performance issues (via Microsoft). The gameplay stutters and the frame rate drops unexpectedly, often following an update. The FPS only dips momentarily; it is not consistently low. Nevertheless, it can take away from the gaming experience.
Microsoft officially suggests disabling the virtualization features to improve FPS in games. Turning off security settings is always risky, so we recommend re-enabling them after your gaming sessions. The Game Bar feature in Windows 11 is designed to retroactively record gameplay like a cable DVR (via Microsoft), but it utilizes additional system resources to use, and it has been found to impact frame rates in games.
Outdated or malfunctioning drivers (especially when upgrading from Windows 10) can also cause unsteady FPS. We'll lay out different ways you can clean up the previous drivers for a fresh installation. Strangely enough, a high mouse polling — the rate at which your mouse refreshes its sensors — is also known to cause stutter and low FPS in Windows 11. We'll outline easy tricks to resolve these known issues here.
Get your Windows machine ready for optimization
If they can't be resolved after messing with the in-game settings, framerate issues might be OS-related. Try a few tweaks in the settings to optimize Windows 11 for a better gaming experience.
Firstly, go to "Settings," then "Update & Security," and then "Check for updates" and install any updates for Windows that are found.
Next, search for the Task Manager in the Windows search bar, and terminate any processes that are unexpectedly draining a lot of resources.
Also, change your power plan to "high performance" when you're gaming, as the "balanced" power plan may not fully harness your hardware's power (via Microsoft).
When Windows 10 is upgraded to Windows 11, the older graphics drivers are carried over wholesale to the new installation. But outdated (or faulty) drivers can also cause frame rate issues. The easiest solution is to perform a clean installation of the latest GPU drivers. A clean install erases all leftover files that could conflict with the new drivers.
If your Windows 11 machine has an AMD GPU inside, you can use the official AMD Cleanup Utility to remove graphics drivers. Then, visit the AMD support page to download the "Auto-Detect and Install Graphics Drivers for Windows" tool. Follow the on-screen instructions to complete the fresh install.
For Nvidia GPUs, visit the Nvidia Experience website, and download the GeForce Experience tool. Once it's installed, select "perform a clean install", and follow the on-screen instructions. Reboot your machine and test with your favorite game.
Disable gameplay capture via the Xbox Game Bar
The Xbox Game Bar lets you capture your gameplay with a quick shortcut. But this "Game DVR" also hogs the resources that would otherwise power your game. Initially featured in the official Xbox app, it's now built into Windows 11 (via Microsoft). Turning off gameplay capture should boost FPS immediately if your machine doesn't have much memory and processing to spare.
You can choose two ways to disable the gameplay capture feature — the Xbox Game bar, or the Windows registry. We'll explore both.
To turn off gameplay capture using the Windows 11 Xbox Game bar:
1. Launch the "Game Bar" by searching for it in the Start menu, or pressing the Windows key + G.
2. Click "Settings" (the gear icon on the right).
3. Select "Capturing" from the list.
4. Toggle off "Record in the background while I'm playing a game."
You can even disable the Xbox Game Bar itself from the Settings menu, freeing up extra resources.
Disable Game DVR via Windows Registry
The Registry is a repository where Windows stores all its configurations, including the DVR settings (via Microsoft). If you can't turn off Game DVR using the Game Bar, try the Windows registry (although it is a slightly more involved and long-winded process). You'll also need administrative privileges to make these changes.
1. Start by opening the Registry Editor. Search "regedit" in the Start menu, or press "Win Key + R" to launch Run and type in "regedit," then click OK.
2. In the input bar where it says "Computer," copy-paste the following path:
Computer/HKEY_CURRENT_USERS/SystemGameConfigStore
3. You can also navigate to that path manually. Either way, once you're in the correct directory, find the entry labeled "GameDVR_Enabled."
4. Double-click to edit it.
5. Replace the "1" in the Value data field with "0" and click OK. The Base toggle should be "Hexadecimal."
In the same directory, look for "GameDVR_FSEBehaviourMode."
1. Double-click it to edit the entry.
2. Replace the Value data field with "2," keep "Hexadecimal" checked for the Base, and click OK.
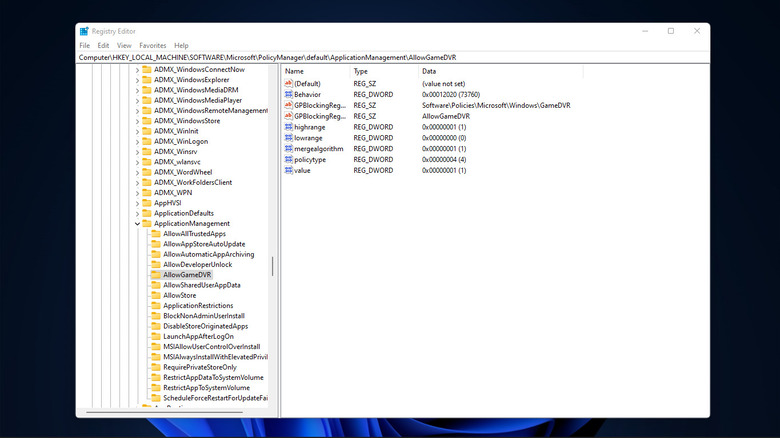
Next, we'll edit the "AllowGameDVR" registry key.
1. Go to (pictured above): Computer/HKEY_LOCAL_MACHINESOFTWARE/Microsoft/PolicyManager/default/ApplicationManagement/AllowGameDVR
2. When you're in0 0the correct directory, look for the registry key labeled "value."
3. Double-click it, change the Value data to "0," keep "Hexadecimal" checked, and click OK.
Game DVR is now disabled. Reboot your machine for the changes to take effect, and test if the low FPS issue is resolved. You can continue to the next trick if it isn't helping.
Turn off virtualization
Windows 11 comes bundled with the Virtual Machine Platform (VM) for native virtualization support. It's enabled by default, and so is Memory Integrity — an extra security layer that protects the machine from loading malware-infected drivers. But Memory Integrity and VMP running in the background can impact gaming performance. Microsoft recommends temporarily disabling these features during your gameplay, but it leaves the device vulnerable, so re-enable the feature when you finish your gaming sessions (via Microsoft).
To turn off Memory Integrity:
1. Open the Windows Security app, or search "core isolation" in the Start menu.
2. Pull up the Core isolation page and find the "Memory Integrity" toggle.
3. Turn off Memory Integrity.
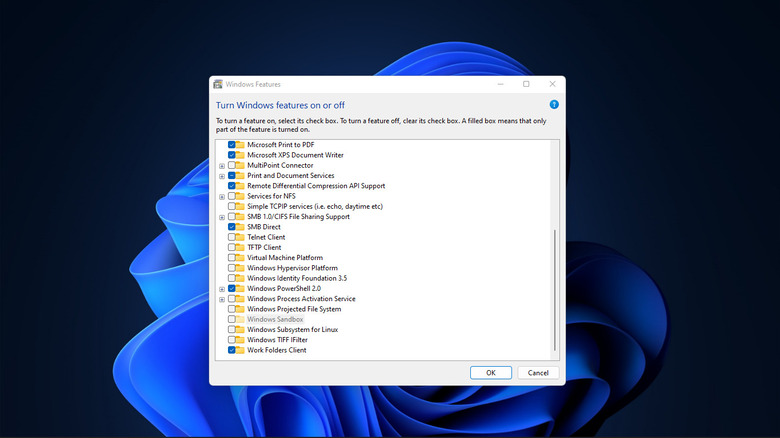
Next, let's disable the Virtual Machine Platform.
1. Search for "Windows features" in the Start menu.
2. Select and click "Turn Windows features on or off."
3. When the "Windows Features" menu opens, scroll down to find "Virtual Machine Platform."
4. Uncheck Virtual Machine Platform, and press OK.
5. Restart your machine.
Clean up and update your graphics drivers
When Windows 10 is upgraded to Windows 11, the older graphics drivers are carried over wholesale to the new installation. But outdated (or faulty) drivers can also cause frame rate issues. The easiest solution is to perform a clean installation of the latest GPU drivers.
A clean install erases all leftover files that could conflict with the new drivers (and aren't otherwise deleted).
If your Windows 11 machine has an AMD GPU inside, you can also use the official AMD Cleanup Utility to remove graphics drivers (your system will reboot after). Then, visit the AMD support page to download the "Auto-Detect and Install Graphics Drivers for Windows" tool. Follow the on-screen instructions to complete the fresh install.
For Nvidia GPUs, visit the Nvidia Experience website, and download the GeForce Experience tool. Once it's installed, select "perform a clean install", and follow the on-screen instructions. Reboot your machine and test with your favorite game.
Adjust the mouse polling rate

Every time you flick the cursor with your mouse, there's a delay between the mouse's movement and the cursor's flick. But unless you're gaming, the lag is imperceptible in daily usage. For gaming, you need a high-definition precision mouse that minimizes that delay. Mouse polling is how many inputs the computer receives from the device every second. A higher rate makes for smoother cursor movements and shorter delays. At a polling rate of 1000Hz, the game interactions become life-like and more responsive (via Razer).
But Windows 11 has a bug that drops the gameplay to a lower FPS when the mouse is polling at 1000Hz (via Microsoft). Check your mouse polling rate if none of the other tricks worked for you. And, if it's above 500Hz, consider lowering it to help restore your FPS.
The exact process varies between manufacturers. Some brands offer devices with physical buttons to adjust the polling rate. Others have companion apps that let you change the sensitivity of the mouse reporting. Look for a setting labeled sensitivity, polling rate, reporting rate, or DPI, and lower it to 500Hz for optimum FPS.