Here's How To Take A Screenshot On Your Chromebook

Chromebooks are hybrid devices that offer the usability of the Android ecosystem in the form factor of a laptop; they run on Chrome OS and have access to almost all of the apps available on the Google Play Store. While there are multiple ways to take a screenshot on your Chromebook, knowing about the keyboard shortcuts and the screenshot menu will save you time. A couple of years ago, Chromebooks weren't as popular, but thanks to the pandemic, their sales grew exponentially in Q2 2021 (via Canalys). As more consumers are investing in affordable yet capable Chromebooks, several mainstream manufacturers such as Lenovo, HP, and Dell are turning their attention toward the category.
However, using a Chromebook could be daunting for some users, especially if one does not know how to perform basic tasks such as taking a screenshot. Depending upon the type of Chromebook (tablet or laptop) and the devices it is connected with (external keyboard or stylus), there are multiple ways to grab what's showing on the screen. In some ways, the screenshot options on a Chromebook are similar to those on an Apple MacBook. For instance, you can take a screenshot of the entire screen, a particular window, or select the area you want to capture as a screenshot. In addition, you can even choose where you want your screenshots to be saved.
Take screenshots using the screenshot menu in Chrome OS
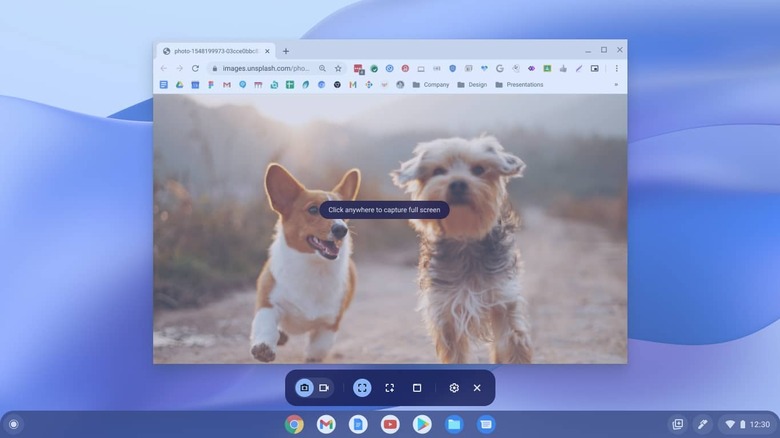
The simplest way to take a screenshot on a Chromebook, irrespective of whether it is a tablet or a laptop, is the Screen Capture tool. With Chrome OS 88, Google added the Screen Capture tool that helps users take different types of screenshots. To invoke the tool, press Shift + Ctrl + show windows key or tap on the section that displays the battery and time to open the Quick Settings menu. Now click or tap on the Screen Capture icon. A rectangular box with a total of seven options will appear toward the bottom of the display. Here are the steps for taking a partial screenshot.
- Head to the Quick Settings menu and click/tap on Screen Capture.
- Ensure the camera icon is highlighted and select the partial screenshot icon as shown above.
- You'll notice that the screen dims. Now with your finger or the touchpad, drag and select the area you wish to capture.
- Once done, click/tap on Capture on the screen.
There are other screenshot options presented within the rectangular box, however. Starting from the left, there's the camera/video toggle, which lets users switch between taking screenshots and recording their screen. Toward the right are three options that enable you to capture a fullscreen screenshot (everything on the screen), partial screenshot (particular area), or window screenshot (active or selected window). Then there is a cog icon for changing related settings and a cross to close the menu (via Google).
Keyboard shortcuts and other ways to take a screenshot on a Chromebook
Now that you know how to take a screenshot and record your screen via the Screen Capture tool, let's explore more ways to capture your screen. If you're using your Chromebook without an external keyboard, you can take an all-screen screenshot by pressing Ctrl + show windows key. This will capture a screenshot immediately and save it to the Downloads folder in My Files. On the other hand, if you're using a Chromebook with an external keyboard, it might have a dedicated screenshot button. Pressing the screenshot button should open the Screen Capture menu, which enables you to take a screenshot on your Chromebook. In case the external keyboard does not have a screenshot button, pressing Shift + Ctrl + F5 will also open the screenshot toolbar.
Since Chrome OS takes most of its characteristics from Android, the classic power button + volume down combination can also take screenshots on Chromebooks. Those who use their Chromebook with a stylus can capture a screenshot with the help of stylus tools. To do so, head to the Settings section, open Device, and enable "Show stylus tools in the shelf." Now tap on the small pencil icon in the bottom right corner and select from the available options. The "Capture region" option takes a partial screenshot (drag and select via the stylus), and the "Capture Screen" option takes a screenshot of the entire display.
Where to find the screenshots on a Chromebook
After you take a screenshot on your Chromebook, it appears toward the bottom right corner of the screen for a couple of seconds. If you want to edit it, tap on the Edit button at the bottom of the thumbnail. By default, the screenshots that you take on your Chromebook are saved in the Downloads folder. You can access the Downloads folder by tapping on the search key (if your Chromebook has one) and typing Downloads or opening the launcher by clicking on the circular icon at the bottom left corner (via Google). Alternatively, you can open the app tray on your Chromebook and select Files, then from the menu on the left, select Downloads. Here, you can view screenshots alongside other items you've downloaded from the internet.
If you wish to change where your Chromebook saves screenshots, summon the Screen Capture tool by pressing Shift + Ctrl + show windows key, and then tap on the settings icon. Under "Save to," you'll see a couple of options, including Downloads and Screenshots. You might choose from these options or select a particular folder where you wish to save your screenshots. Another important thing to know is that as soon as you take a screenshot, it is automatically saved to your clipboard. Hence, you can paste the screenshot using the Ctrl + V shortcut in several apps such as Gmail, Google Doc, and some photo editing apps.