How To Install Android 14 On Your Raspberry Pi
How does one become a computer engineer? Going to college or taking online courses will definitely give you the necessary knowledge, but how do you practice those skills and put them to the test? Building your own PC could cut it, but not everyone has the cash for that. Using a Raspberry Pi, by comparison, is a more beginner-friendly and open-ended option.
The Raspberry Pi is a small-form hobbyist PC originally designed to help teach computer engineering skills. Consisting of nothing more than a simple motherboard, Raspberry Pis are blank canvases you can customize in countless ways. The internet is full of Raspberry Pi projects designed for beginners and ones that won't break the bank. You can turn a Raspberry Pi into a game console, a wall-mounted Google calendar, or the world's most inexpensive computer. All you really need is a power source, a screen, a mouse and keyboard, and an operating system.
If you're stuck considering which operating system to use, why not the latest version of Android? That way you can practice installing operating systems on computers, while also taking advantage of the new features and updates of Android 14.
Download Android 14

Before you can start installing Android 14 onto your Raspberry Pi, you need to obtain a copy of the OS. Well, that and make sure it isn't full of viruses that will destroy your Pi.
To download Android 14, you just have to find it on the internet. Many Raspberry Pi aficionados recommend the builds available through emteria and KonstaKANG. If you use the emteria edition, you don't need to actually download Android 14 to your PC, just make an account on the website (don't worry, it's free to start). The KonstaKANG copy, however, is a bit more complicated.
At the top of the KonstaKANG page, select the device you plan to use, i.e., Raspberry Pi 3, 4, or 5. Then click on the Android 14 build you want. Read through the page to make sure the build will cooperate with all of the hardware you want to use, and finally click on the download link. You will receive a .zip file, and you don't need to (and shouldn't) unzip it.
Depending on your internet speed, your Android 14 build will be available shortly, after which you can move on to the next step.
Use Raspberry Pi Imager
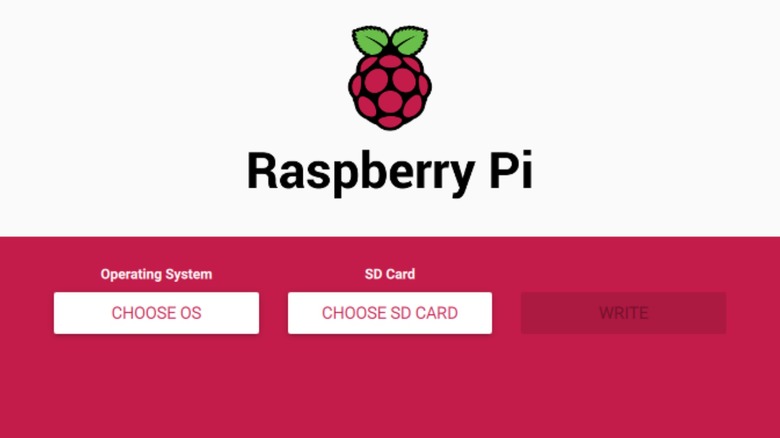
Raspberry Pis are just $35 motherboards, so they can't store much data. Any software will need to be put on a piece of physical media storage. To add Android 14 to a Raspberry Pi, you have to use a Raspberry Pi Imager, which will write the OS onto an SD card or USB drive. Simply download the imager onto your computer and run it. For the process to work with your specific device and build, you will need to fiddle with some settings.
First and foremost, click "Choose Device" and select the Raspberry Pi you are using (e.g., Raspberry Pi 3, 4, or 5) from the list. Make doubly sure you click on the correct one, or the operating system will not work. Next, select "Choose OS." Where you got your copy of Android 14 will determine what to pick from the subsequent list that pops up. If you signed up for emteria, select "Freemium and paid-for OS" and then pick "Android by emteria." If you downloaded Android 14 from KonstaKANG, select "Use Custom," and then pick the build's .zip file. Finally, click on "Choose Storage" and pick whatever SD card or USB drive is attached to your computer.
Depending on your version of the Raspberry Pi Imager, click the "Next" or "Write" button. Don't apply OS customization settings. This process will wipe the physical media clean of all data and replace it with the Android 14 image, so make sure there's nothing you can't live without on it and that there's enough room for Android — 32 GB is usually plenty.
Fix config.txt if necessary
While SD cards and USB flash drives can hold the same data, they are functionally different types of storage, and computers recognize them as such. If your Raspberry Pi tries to grab Android 14 OS data from an SD card when the info is actually stored on a USB drive, it won't work.
After the Raspberry Pi Imager has done its work, click "Continue." You can remove it and move on to the penultimate step, but you should double-check your work first. While the SD card or USB drive is still inserted in your computer, find it on your computer's taskbar, open it, and select the portion labeled "boot." Open by clicking "mount" and then open the config file (config.txt).
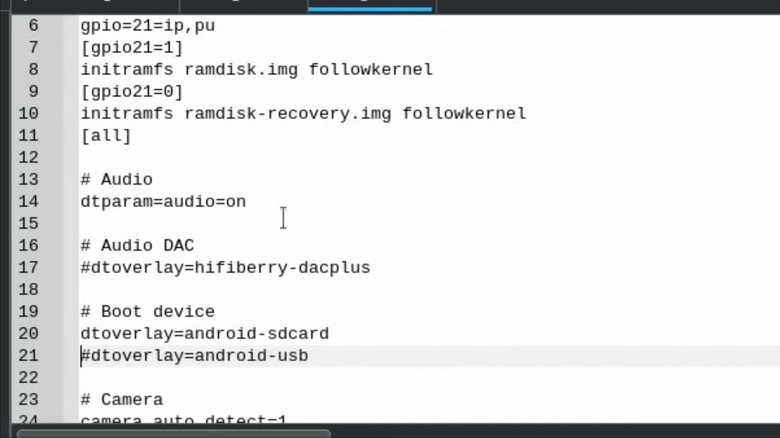
Scroll down to the lines directly under the label "# Boot device" and check which line has the hash (#) in front of it and which one doesn't. If you wrote Android 14 to an SD card, the line "dtoverlay=android-sdcard" should not have a hash in front, and the line "dtoverlay=android-usb" should. If you used a USB drive, the opposite should be displayed. If this is not the case, delete the hash in front of the line with the proper boot device command and add it at the start of the line with the incorrect one.
Once the hashes in the config file are correct, save it and continue to the next step. If you didn't find any hashes amiss, better safe than sorry.
Place media in your Raspberry Pi
Once you are done writing Android 14 in readable media, it's time to put everything together and see if your hard work paid off.
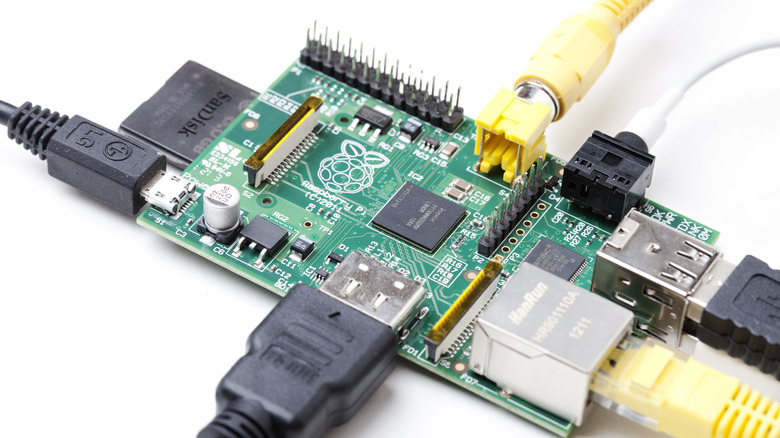
After the imager is finished, and you've double-checked your work, shut everything down and remove the physical bootable drive from your computer. Next, insert it into the Raspberry Pi's appropriate slot. The Pi board's SD card socket is the sole slot on the underside — insert the card with the printed letters facing down — and the USB drive can go into any USB 2 or 3 slot.
Once the bootable drive is secure, it's time to start hooking the Pi up to your hardware, namely a keyboard, mouse, and monitor. Plug the keyboard and mouse into the USB slots and connect the display to one of the board's two micro HDMI ports. Finally, plug the power cable into your Raspberry Pi's USB-C slot and connect it to a wall outlet. Oh, and don't forget to plug your monitor into an outlet, too. Remember: writing Android 14 onto an SD card frees up all four of the Raspberry Pi's USB slots.
Assuming everything is inserted correctly, your Raspberry Pi's red LED should light up immediately after it is connected to an outlet, and you should see the Android bootup screen appear on the monitor. If so, you've successfully installed Android 14 on a Raspberry Pi.
Set up
Now that you have Android 14 running on your Raspberry Pi, that should be it, right? If only that were true. You will still need to set it up, as with any other computer. Accept the end user license agreement, select your language of choice, set up the date, and connect to the internet. For that last task, you can either activate the built-in wi-fi module or hardwire your Pi into the world wide web by plugging in an ethernet cable.
Nine times out of ten, you should be ready to go after you're finished setting up, but every now and then a Raspberry Pi will refuse to cooperate with some components. It's impossible to go through all of the potential incompatibilities, so you have to do your research beforehand and cross your fingers when you power things up. If for some reason something doesn't work, just ask around on the internet. There are tons of forums and websites dedicated to helping new people to the scene. Many of these sites are also great places to find new Raspberry Pi projects and you get started on your next customization adventure. The Raspberry Pi community is as big as it is welcoming and helpful.