How To Use Wallet & Apple Pay On Your Apple Watch
Newer versions of the Apple Watch have all sorts of tips and tricks that owners should know about, but arguably one of the most useful features has been part of the device since the very beginning. Indeed, every single model of the Apple Watch supports integration with Apple Wallet and Apple Pay, allowing owners to use their wrist-bound accessory to make transactions with the click of a few buttons while they're out and about.
Setting up the Wallet and Apple Pay features of the Apple Watch gives users an easy and quick way to purchase items without ever needing to reach for their physical wallet or credit card. With that in mind, some users may want to learn more about how to set up this feature and how to activate it once it's ready. Fortunately, there are multiple ways to get Apple Watch's payment functions up and running depending on how the user prefers to go about it, and using the feature once it's available is quite intuitive.
How to set up Wallet and Apple Pay through Apple Watch

Apple Wallet can be set up on an Apple Watch directly through the peripheral itself without the need for any other devices. The only thing necessary to get started is to follow a few short steps.
- Ensure that your Apple Watch is linked to your Apple ID account.
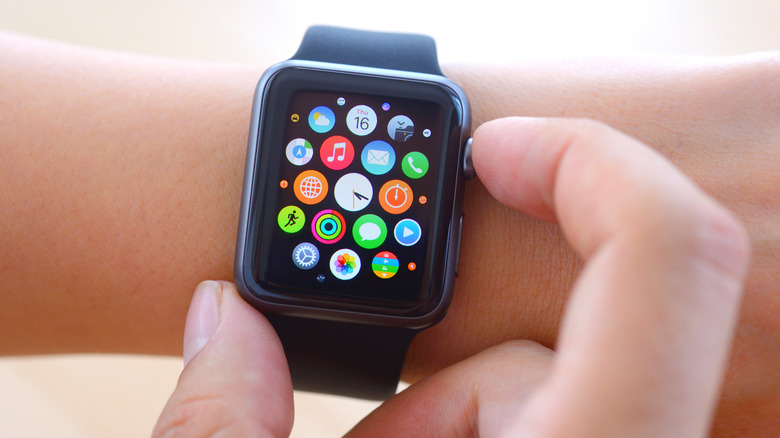
- Locate the circular Wallet app icon on your Apple Watch face and tap it. The icon resembles a stylized wallet, with lines of blue, yellow, green, orange, and gray in descending order.
- Once the Wallet app is open, select the circular icon with three white dots.
- Tap Add Card.
- Select which type of payment method you would like to add to Wallet. Options include your Apple Account balance, a compatible debit or credit card, or a transit card.
- Follow the on-screen instructions based on the type of payment method you chose to add that card.
- Once the card information has been filled out, the card provider will be automatically contacted and the card will subsequently become available for use through your Apple Watch's Wallet.
Users can repeat this process with multiple cards to add additional payment methods to the Wallet app. You can subsequently swap between the payment method they want to use for any given Apple Pay transaction, and you can even set a given card to be the default payment method when using the Apple Watch to make purchases.
How to set up Wallet and Apple Pay on Apple Watch through iPhone

While Apple Wallet and Apple Pay can be set up directly through an Apple Watch itself, some users may find the setup process rather awkward or confusing due to the small size of the device's screen. Fortunately, Apple Watch owners also have the option to enable these features through the use of a connected iPhone if they so desire.
- Ensure that your Apple Watch and iPhone are connected.
- Select the Apple Watch app on your iPhone.
- Select My Watch.
- Tap Wallet & Apple Pay.
- If the card you want to add is already added to one of your connected Apple devices, it will display as an option to quickly add it to your Apple Watch's Wallet as well.
- If the card you want to add hasn't already been added to one of your connected Apple devices, select the Add Card option underneath the Payment Cards On Your Watch tab.
- Select which type of payment method you would like to add.
- Follow the on-screen instructions based on the type of payment method you selected.
- Once the card information is added, the card provider will be automatically contacted and the card will now be available for use through your Apple Watch's Wallet.
Accessing the Wallet & Apple Pay settings through the Apple Watch iPhone app allows users to tweak a few other settings. For instance, they can toggle the ability of their Apple Watch to send or receive peer-to-peer transactions with Apple Cash.
How to use Wallet and Apple Pay on Apple Watch

Once Apple Wallet and Apple Pay have been set up and enabled on your Apple Watch, using this feature to complete a transaction is a simple matter of a quick button shortcut.
- Locate the side button on your Apple Watch. This button is the oblong rectangle on the right side of the Apple Watch's face, located directly beneath the Digital Crown.
- Press the side button on your Apple Watch two times in quick succession to bring up the Apple Pay screen.
- Your default payment method will display on the screen automatically. If you want to choose a different card to complete the transaction, scroll down to see and select your other stored payment methods.
- Hold the Apple Watch's screen up to the vendor's Apple Pay-compatible reader. The exact spot to hold it up to is often denoted by a symbol of a wireless signal with a hand holding a card next to it.
- Continue holding the Apple Watch's face up to the reader until you feel a haptic tap from your device and an audible beep sounds.
- The Apple Watch's payment method has now been read. Follow any additional instructions on the display of the vendor's reader to complete the transaction.
The Apple Watch's standalone nature means that having the device on hand is all users need to be able to make purchases. Of course, it's important to make sure your Apple Watch is charged if you plan to rely on it as your primary method of payment.
Wallet features on Apple Watch to know about

Once they are set up, the Wallet and Apple Pay features on the Apple Watch function pretty similarly to any other compatible Apple device — albeit, in a simplified fashion befitting the device's small display. However, the Apple Watch's Wallet functionality actually hides a few nifty features away from plain sight that users may find useful.
For one thing, Apple Watch users actually have the ability to track their transaction history with each Wallet-linked card. Simply tapping on a given card in the Wallet app will display recent Apple Pay purchases with that payment method and the amount of money that was paid in each instance.
Meanwhile, Express Mode can be enabled in the Apple Watch settings to make certain transactions even snappier. Turning on Express Mode for certain cards, such as a transit card or a student ID, allows the user to hold up their watch up to a compatible reader and have it instantaneously register the necessary card without even needing to use the double-click Apple Pay shortcut.
It's also worth checking out which specialty cards or services are compatible with Apple Watch's Wallet feature. It's possible to manage boarding passes and tickets with your Apple Watch, among other things. Even the Walt Disney World Resort's trademark MagicBand can be linked to an Apple Watch, allowing the visitor's personal device to accomplish many of the same tasks as the proprietary wristband.