Anycubic Kobra Plus: A Great Next Step
- Great Documentation
- Designed for Easy Repair
- Super easy tuning and tweaking
- Quality parts
- Beautiful glass build plate
- No Wi-Fi printing
- Single rail Y-axis
We may receive a commission on purchases made from links.
Not all 3D printing is created equal, and while the concept of making a 3D model may be shared, there's more than one way to achieve it. Building on the beginner-friendly Anycubic Photon M3 SLA printer, next to my test bench is another model from the company's range, this time an FDM / PLA printer. FDM printing is an entirely different beast with entirely different goals, and it can present more of a challenge to novice users looking to scale up the size of the things they want to print.
I have more experience with SLA printers than FDM printers, but I've printed some fun things on my FLSUN QQ-S Pro and my little workhorse, the QIDI X-Maker. I've printed terrain for tabletop games, costume pieces, and lots of little useful boxes and bins with those older two friends. Question is, with my workshop running out of room for printers, can this Kobra snake its way onto my workbench?
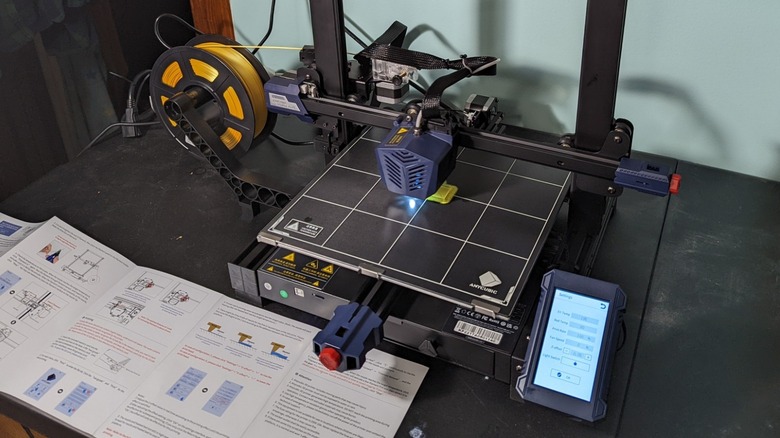
What's in the box?
As before, Anycubic impresses me with the packing. I originally got into 3D printing because I bought a Creality printer for a partner's birthday, so she could make her own gaming stuff, and it was a reminder that it can be a pretty intimidating hobby. She had such a hard time assembling and calibrating that very first Ender 3 that she quit, and though I later got her an Anycubic Photon S, the barrier was already there from that first frustration and she ended up giving up on the idea of 3D printing altogether. In short, a subpar experience when it comes to the packaging and assembly of FDM printers can drive a new person entirely away from the hobby.
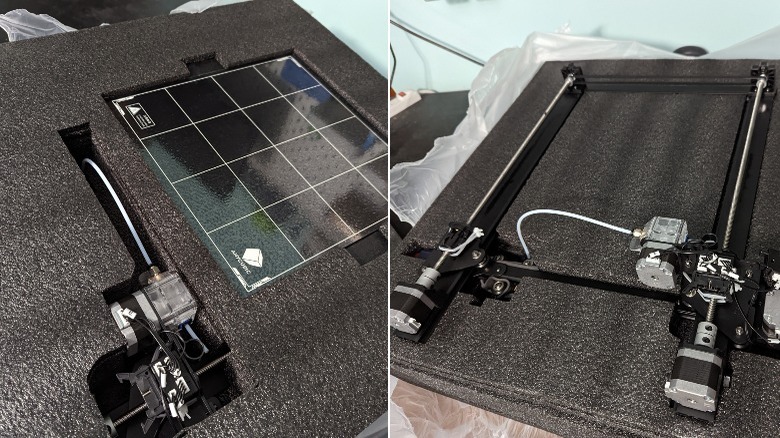
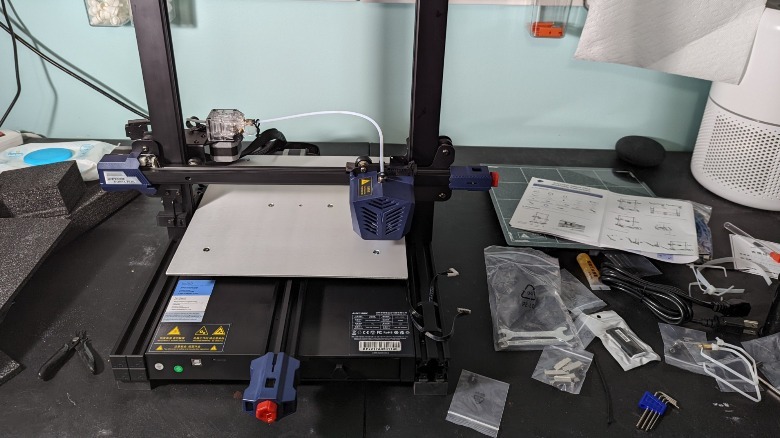
The Kobra Plus comes in just four pieces: the bed, the gantry, the glass build plate, and the touchscreen panel. Assembling it means attaching the gantry to the bed with four screws — they're thumb screws, making it even easier — clipping the glass bed on, slotting in a handful of screws for the touchscreen, and then removing lots of zip ties and foam bits.
 Kimberly Leatherman/SlashGear
Even with that straightforward process, Anycubic's documentation goes above and beyond. It even details the specific number of zip ties to be found and removed in each spot, the zero insertion force connectors for the cables, includes basic if/then troubleshooting steps right in the manual, and then lists clean instructions as to how to adjust for the z-index height, belt tension, bed wobble, extruder force, and more. There is an art to providing clean, concise, and thorough information without being overwhelming and I was very impressed with their efforts: as a printer targeted at the intermediate user, it's perfect.
The components
In a world where 3D printing has become downright affordable and competition has driven manufacturers to refine their designs and products, the little things that go into a printer can add up to make a big difference in the quality of the unit. When I bought my FLSUN QQ-S, friends warned me that I was in for headaches in maintenance which I stubbornly dismissed. That led to some "learning opportunities" and, in turn, my coming to really appreciate how small decisions can make a big impact on tuning and caring for a printer.
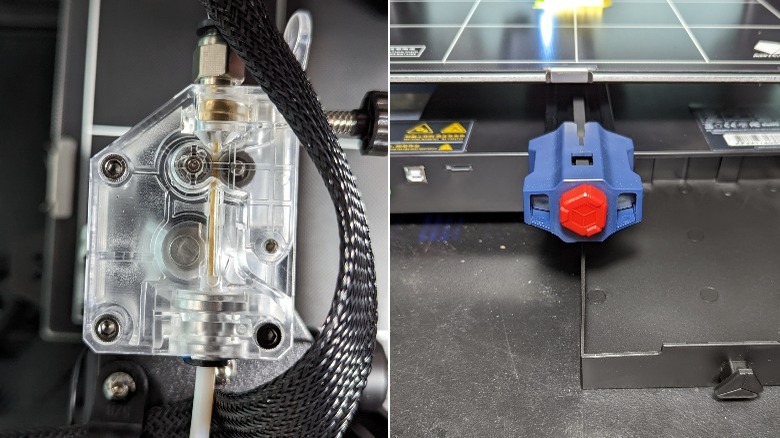
The Kobra Plus has an all-metal extruder with a transparent body, plus a handy tension knob right on the side; the manual it explains how to adjust it and what to expect if you do. The X-axis belt on the arm has a simple adjustment knob, as does the Y-axis belt under the bed. Too much tension and your belt will stretch and you'll end up with jerkiness in spots during your print, which will ruin them.
On the other hand, too little tension and you'll end up with wavy, inconsistent prints. Your printer needs that belt to be just the right degree of tightness to get smooth movement. These tensioners used to be add-ons in the "old days," so seeing that they made the knobs big and red and easy to adjust is really nice. The glass bed is solid and nicely textured, but I've ruined these with bad setup before.
Auto-leveling
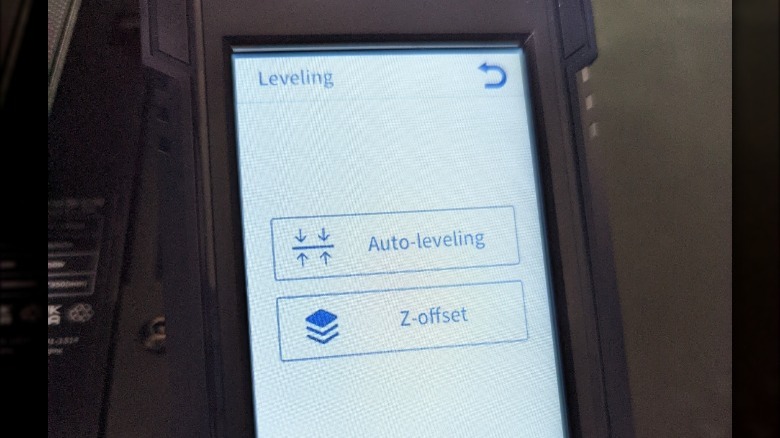
One of the big reasons I bought the FLSUN was because of the auto-leveling capabilities of that beautiful delta printer. Again, there are add-ons to other printers like the Ender 3 to add auto-leveling, but having it built in is fantastic. The FLSUN requires you to magnetically attach a calibration unit to the hot end, and woe unto the user who forgets to add it or remove it before pushing buttons. I mentioned that I've ruined beds before in learning this hobby, well, these are the sorts of mistakes that cause that. Not knowing how to level your bed properly, or forgetting to add or remove a component can drive the hot end into the bed, scratching it, scuffing it, or — in extreme cases — even gouging it.
So, to have it native to the Kobra Plus is a big deal. Anycubic made it super easy to use, too: no components to add or adjust, the sensor is built into the carriage and it worked exactly as advertised, right out of the box. With the bed auto-leveled, height adjustment becomes the tap of a button rather than sliding paper back and forth under the nozzle, adjusting knobs, and praying you didn't forget something.
Our first test print
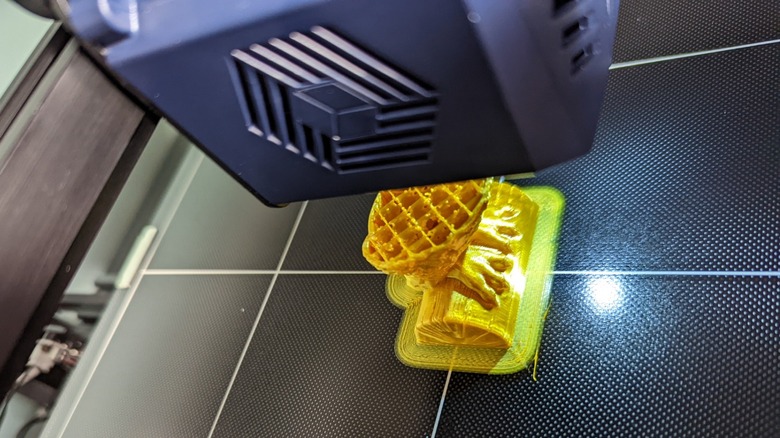
As usual, I like to see what the printer can do at its base settings, with no tweaks at all, using the provided, pre-sliced model. A manufacturer usually pulls out all the stops on these, as they want a perfect first demo. So, I hit print and let Anycubic impress me with their hooter.
 Kimberly Leatherman/SlashGear
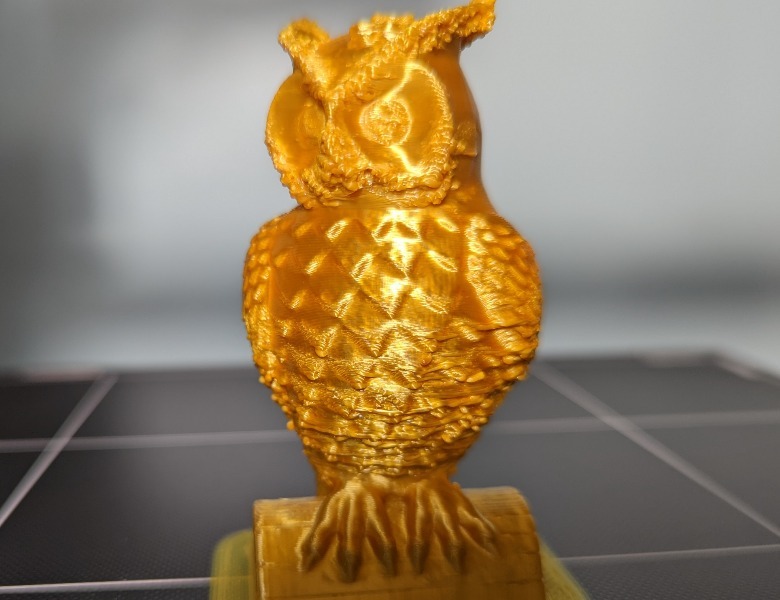
And I wasn't impressed. After three hours (which is a reasonable time for a model this size) we get an owl with some globby bits here and there, a lack of definition in many places, and a general look that would worry ornithologists. It looked like the extruder was putting out extra filament, so I consulted the printed manual to see what the base documentation recommends. It's wise when you're troubleshooting to change just one variable at a time, so I gave the extruder tension dial a quarter-turn to the right — assuming that it could've been jostled from its optimal position in shipping — and hit print again.
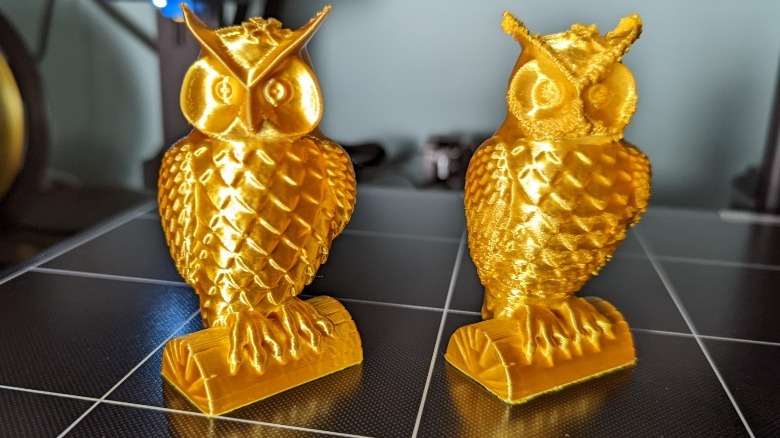
After another three hours, we get to compare the results side-by-side.
 Kimberly Leatherman/SlashGear
Just like the manual said, the adjustment to the extruder tension dial cleaned it up nicely, and pretty much instantly (well, beyond that second three hour wait). It underscored how the Kobra Plus can be a great friend to the intermediate printer. This still would have been frustrating to the absolute beginner, but the easily-accessible tension controls and good documentation made it very easy to recognize, identify, and correct the problem.
Some more tests
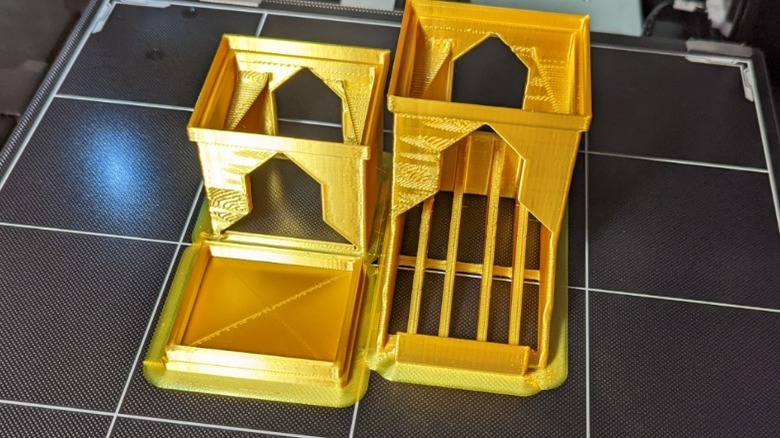
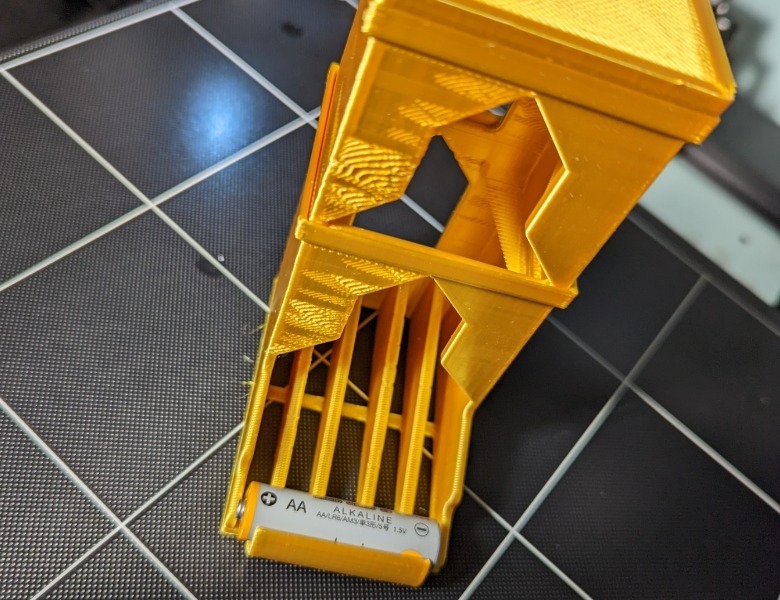
Next, I decided to test something practicalL a quick design from Thingiverse to make an AA battery tower. These are the sorts of items that I think everyone should have a 3D printer for, and I look forward to the day when we can have a completely novice-friendly appliance that can churn out such things. Small, square, and practical: my favorite things in an FDM print. From the get-go I can see that I'm getting some waviness in my prints, so I should probably adjust the tension on those belts.
 Kimberly Leatherman/SlashGear
I'll be honest, my FLSUN has made me a little paranoid regarding belt-tension, because replacing a belt on that tall boy is quite a lot of effort. The belts are long and the printer has to be opened from the bottom to replace them. Anycubic looks to have taken some sensible steps to make sure the replacement on the Kobra Plus are smooth and easy, without needing to disassemble much at all.
Spiralizing, spiralizing!
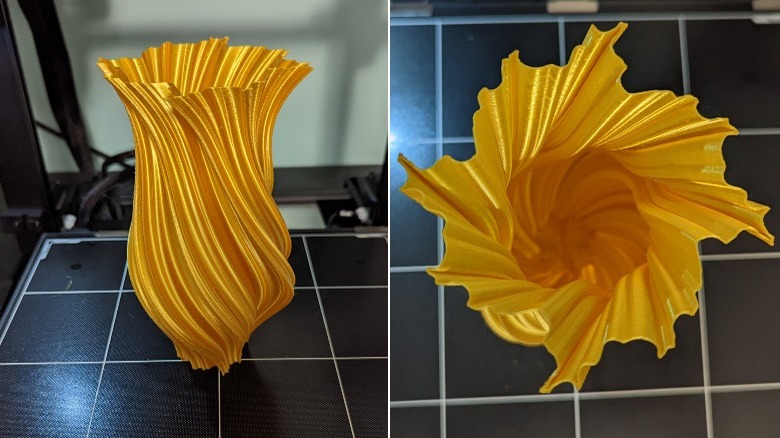
We've got two tests down, time to play with the spiralizer. This is a setting that makes seams disappear in prints, but it has to be done in one continuous print. It involves printing a little hotter to get a wider line width than your nozzle diameter, but the results can be stunning and it's quite fun to listen to the printer hum along with no interruptions to increment that Z-height. The Anycubic Kobra Plus handles it beautifully!
This vase came out absolutely beautifully with just some basic tweaks to the Cura profile. Anycubic provides their filament profile on the MicroSD card that comes with the printer, which gives you some nice starting settings, but as I've said many times so far, FDM printing requires a little more fine tuning than SLA printing.
Cura also requires manufacturers to submit a pull request to their GitHub for new products, so even though Anycubic has designed Cura profiles, they're not built-in yet. This is usually an issue with brand-new models, so hopefully Cura will integrate those pull requests and make it easier for the Kobra Plus buyers soon. The final test I'm going to put this new friend through is unrealistic, unfair, and fun. Here we go.
The Sphinx
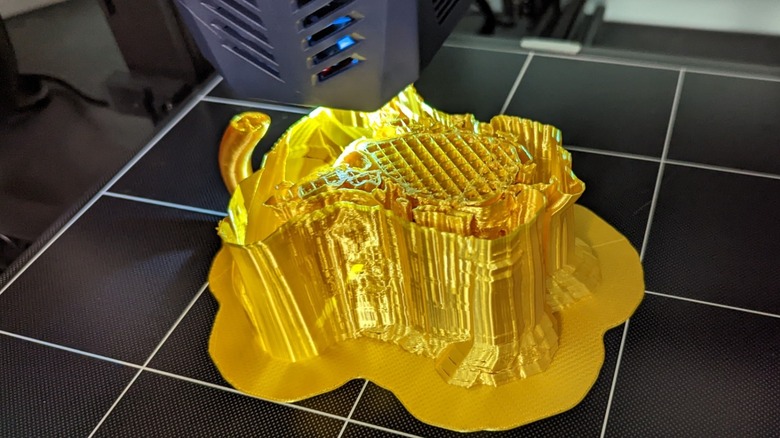
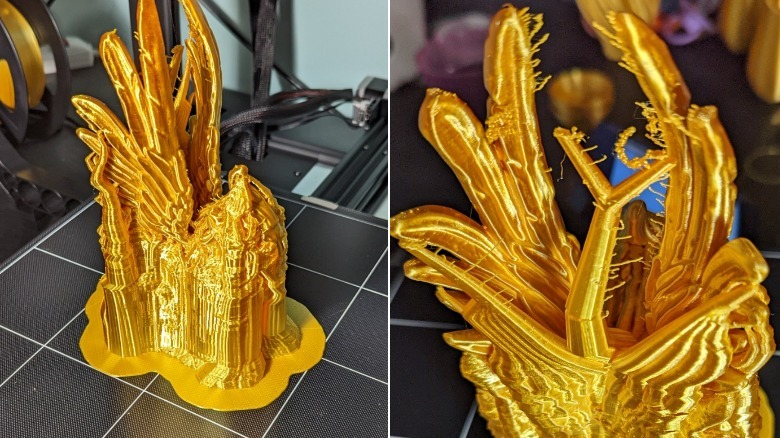
Since Anycubic provided me with a spool of nice gold filament, I wanted to be cruel to the printer in return and ask it to do something that FDM printers are typically bad at: print me a miniature designed for SLA printers. I used our friend the Sphinx from Printed Obsession again, as I wanted to see a big golden version sitting next to our resin version from the Photon M3 review. Unfortunately, supports are an entirely different matter in FDM printing and we can't expect that resin-smooth finish in our PLA print, but some pretty basic tweaks to the Cura settings can help matters. That means turning on auto-generated supports in ZigZag mode, and adding a brim to the print job.
 Kimberly Leatherman/SlashGear
Even so, that's a whole lot of support material. Thankfully Anycubic also sent some useful little clippers, very handy in removing the extra. It's also clear that we have some stringing issues, which is typically temperature and extruder tension related. They're relatively easy things to tweak, but we'll have to spend some time dialing in those perfect settings.
 Kimberly Leatherman/SlashGear
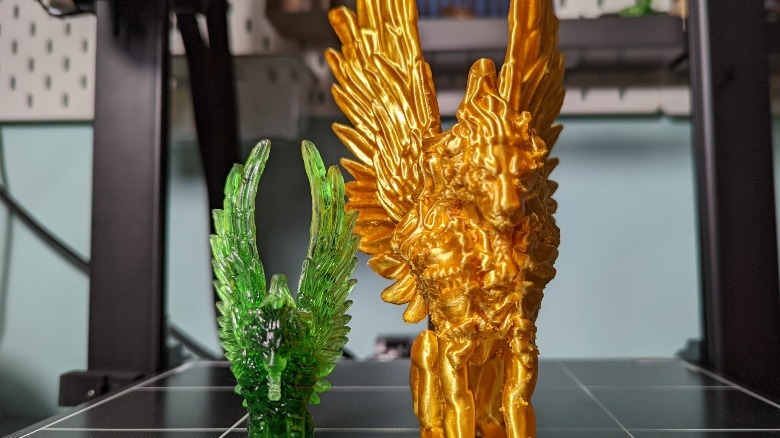
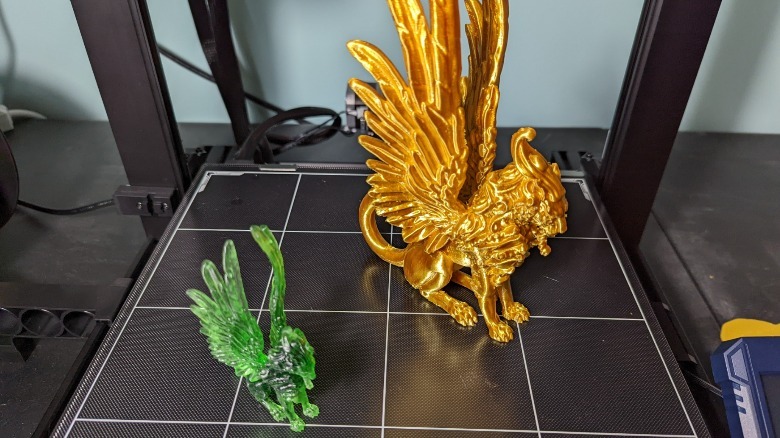
Viewed side-by-side with our previous, resin print, the freshly-freed Big Daddy Sphinx certainly looks impressive.
 Kimberly Leatherman/SlashGear
It's a reminder of one of the big advantages of FDM printing: the size you can produce models at.
 Kimberly Leatherman/SlashGear
Though typically they're also lower resolution than resin-based SLA printers, there are times when sheer build volume is key. For that, you probably need to go FDM.
Anycubic Kobra Plus Verdict

The Anycubic Kobra Plus is a perfect printer for someone who has learned the basics on a simpler printer with a smaller build volume. The thought put into the design as far as tweaking and tuning goes is fantastic, and the auto-leveler is exactly as easy as promised. I'm very impressed: for the price — currently $459 at Anycubic or $449 at Amazon – it has a very large build volume with that lovely glass plate measuring 300mm by 300mm and a maximum height of 350mm. The separated extruder makes it easy to tweak and repair, and the fact that it's clear makes it simple to see exactly what's going on. Anycubic has taken lots of extra steps to make sure their customers are set up for success.
As for downsides, it doesn't have wireless printing. That can be a drag, but then again I've found it can also be hit-or-miss with my FLSUN for larger build jobs and I end up slicing and transporting with a MicroSD anyway. Still, for small tasks, not having the wireless capability is a barrier to printing. Meanwhile the Y axis is only a single-rail, but the six adjustable eccentric nuts do a good job of keeping the platform steady and eliminating wobble.
The stepper motors are all exposed, and the carriage bulk is minimal. This printer is designed with the understanding that certain parts are going to wear and break, and it takes extra steps to make sure that repairing it and getting the Kobra back to hissing happily is going to be easy and smooth. Then there are the thoughtful extras, like the little tool drawer on the front. In short, I think one of my older FDM printers is going to have to find a new home, as the Anycubic Kobra Plus is a worthy workshop upgrade.