How To Set A Data Limit For Specific Apps On Your Android
An app can use up a lot of data, which can be a frightening notion for those with extra tight cellular data plans. This can get even worse if you add other data-hogging apps into the mix, such as social media, news, games, and video streaming apps, to name a few. Fortunately, Android comes with built-in features that can prevent apps from consuming too much data. Now, some might be asking themselves, why would that be necessary when I don't even spend too much time on a single online app to begin with?
The thing is, you don't have to be actively using an app for it to continuously siphon data from your allotted mobile internet plan, as some unused apps still do so even when they're just sitting in the background (via Google). Once your allotted mobile data has been fully depleted, your cellular internet will either slow down to a crawl, be cut off completely, or you'll be charged extra on your next monthly billing cycle, depending on your carrier and chosen data plan.
How to set data limits for apps on Android
The process of setting app data limits requires multiple steps, but it shouldn't be too difficult after following the right sequence. It's worth noting that some settings options might be missing or appear differently if your smartphone isn't on Android 8.0 or later (via Google).
- In the Android app menu, tap on the settings app, which looks like a circular icon bearing a gear symbol.
- Then, choose the "Network and Internet" option.
- Tap on "Mobile Network" or "Internet," depending on your Android version.
- Select the option which appears as either "Data usage" or "App data usage."
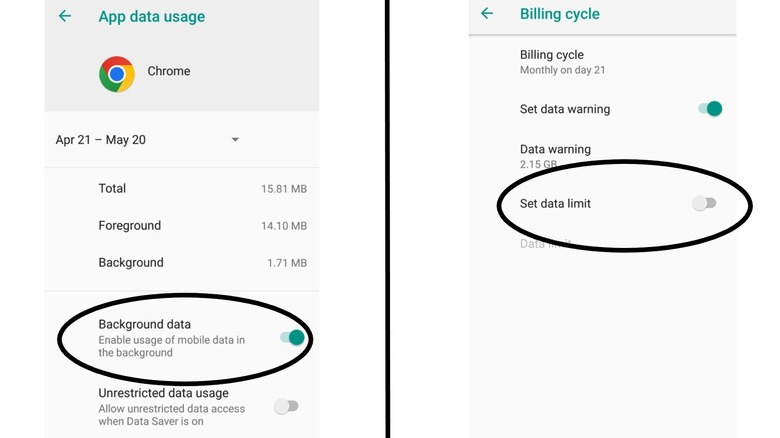
- From here, you'll be able to see a list of your apps along with their respective data consumption so far – apps that take up the most data will be placed at the top.
- Select an app from the list, then tap on the "Background Data" option to toggle between allowing or disabling it from consuming data when not in use.
You can also prevent mobile data consumption entirely after hitting a specified amount. To do so, just repeat the same steps above starting from step 3.
- From the "Mobile Network" menu, you will either need to select the "Data usage" option before tapping on the gear icon in the upper right corner or, depending on your Android version, select the "Data warning & limit" option if available.
- In this menu, tapping on the "Set data limit" option will allow you to enter a specific amount in either MB or GB.
- After inputting your desired number, select "Set," then your mobile data will automatically turn off after the specified amount has been reached, preventing any app from further consuming your data..
What is Android's Data Saver mode and why use it?
Data Saver is a nifty Android feature that helps reduce mobile data consumption by limiting background apps to only connect to the internet through WiFi. In this mode, mobile data will only be used by the app you're actively using, but you can allow certain apps to be an exception to this (via Google). Now, the steps in enabling Data Saver mode are similar to the steps in limiting data usage and are just as straightforward.
- Tap on the "Settings" app from your Android menu.
- Select "Network & Internet."
- Find and tap on the "Data Saver" selection.
- In here, you can find a toggle up top – tapping on it lets you enable or disable Data Saver mode.
- Once enabled, choosing the "Unrestricted data" option below the toggle lets you choose which apps can still use mobile data even when running in the background.
- Alternatively, you can also make Data Saver exceptions by selecting apps from the "Data Usage" or "App data usage" menu, then using the "Unrestricted data usage" toggle in "Background data."
If done properly, only the app you're currently using and the ones you've allowed as exceptions will be capable of touching your mobile data, preventing any unnecessary data-leeching in the process. As always, make sure you've updated your Android operating system to the latest version your smartphone supports, as some steps might be different on devices still using Android 7 or older.