What Is An Off-Road Hi-Lift Jack & How Do You Use One?
Sure, the hydraulic bottle jack is one of the most common tools in most garages. But when it comes to the more demanding worlds of off-roading and farming, it's the Hi-Lift Jack that's the undisputed tool of choice, thanks to its rugged durability and unmatched versatility. A standard jack only lifts, but the Hi-Lift is a complete recovery system in one purely mechanical device, capable of lifting, winching, pulling, clamping, hoisting, and spreading.
One look at the jack and you'd feel it looks deceptively simple. In fact, it is a design invented all the way back in 1905 by the Bloomfield Manufacturing Company. The Hi-Lift is actually a direct descendant of the "Automatic Combination Tool," and its core design has changed little over the decades. Remarkably, it's still produced by Bloomfield.
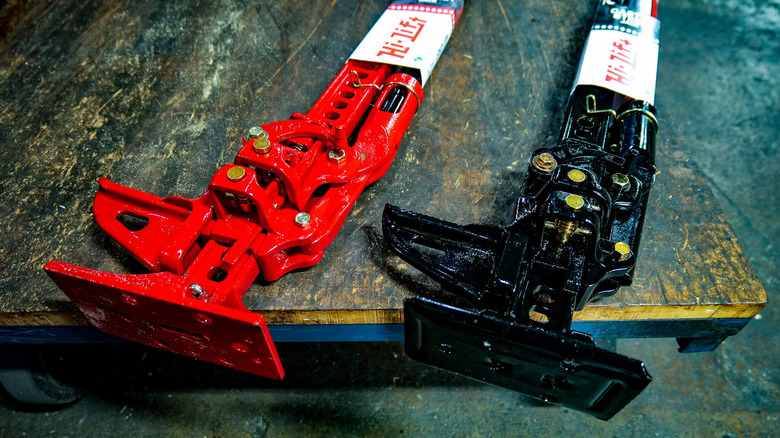
The jack's design is what makes it so effective off-road. It lifts a vehicle from its chassis or rock sliders rather than the axle, which is perfect for when your truck is stuck in the sand or you need to clear an obstacle. These jacks are built to last, constructed from cast steel with a tested capacity of 7,000 pounds. As a crucial safety feature, a shear pin is designed to fail if you ever manage to overload the jack. This freezes it in place instead of letting the vehicle drop catastrophically.
It's worth mentioning here that while "Hi-Lift" is the original brand, several other companies offer alternatives. One of these is the Torin "Big Red" Farm Jack, a budget-friendly option priced at about $110. You can also pick up a Smittybilt Utility Jack, which is nearly identical in function, though it costs a bit dearer at $175 for a 54-inch model. That said, the tool works similarly regardless of the brand you pick, so let's dive into how to actually use this thing.
How to use the Hi-Lift Jack
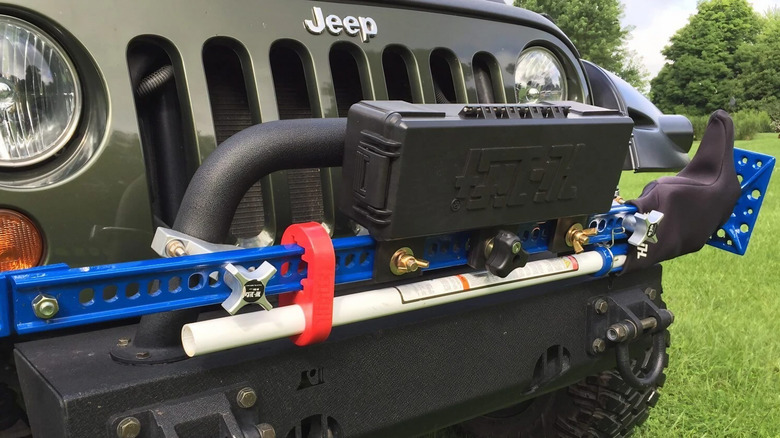
Properly using your recovery gear is just one of several factors to keep in mind before setting out on your first 4x4 off-road adventure. Before you get started with your Hi-Lift, take a moment to inspect your jack for any damage or wear. Make sure the climbing pins are in good shape and the steel bar is straight. Set the jack's base on a firm, level surface, and don't forget to chock the wheel on the opposite end of the vehicle to keep things stable.
To begin lifting, flick the direction lever into the "up" position. You can slide the lifting mechanism up the bar by hand until it makes contact with a solid lifting point, like a steel bumper or rock slider. Grab the handle with both hands and start pumping. Hi-Jack advises never to use an extension for extra leverage here. Also, since the load lifts on each downstroke of the handle, be sure to keep your head out of its path. Once the vehicle is at the right height, secure the handle upright against the bar and support the load with properly rated blocks or stands.
Lowering is the trickiest part. The jack needs to have at least 150 pounds of load on it to lower step-by-step. Otherwise, the mechanism will slide freely down the bar. Now with the handle still secured in the upright position, move the reversing latch to the down position. Start pumping the handle again, except you'll notice that this time, the load lowers on each upstroke. Be careful here — the handle would want to fly upwards, so stay in control throughout. If your hand slips, get away from the jack immediately. After a day of use, it's wise to clean the mechanism with a degreaser and apply a fresh lubricant to keep things nice and smooth.