How To Troubleshoot And Fix Browser Downloads Stuck At 100%

Encountering a slow or stuck download can be a source of frustration, especially when you're eagerly awaiting that crucial file or exciting new software. Picture this common scenario: you're watching the browser download progress hit 100%, and then suddenly, it seems to freeze, leaving you in a state of anticipation with no tangible result. This issue isn't exclusive to one browser — it can manifest across Chrome, Firefox, Safari, and Edge. When it happens, you're left wondering why the download, seemingly complete, fails to conclude successfully.
Several factors could contribute to this perplexing problem. It might be conflicts with browser extensions, network issues, corrupted browser caches, or even problems with the file being downloaded. Sometimes, it's a combination of these factors conspiring to impede the seamless completion of downloads. The good news is that multiple strategies and solutions are available to help you troubleshoot and resolve this issue, allowing you to get back to your downloading endeavors without undue delay. Below, we provide step-by-step guidance on how to troubleshoot and fix the problem across different browsers.
Check your internet connection

When troubleshooting browser downloads stuck at 100%, the first step is to ensure a stable network connection. Begin by confirming that your device is indeed connected to the internet. Look for the Wi-Fi symbol or network icon in your system tray or menu bar, indicating an active connection. You can try to access another website to validate the connection's stability and check your internet connection speed.
If you suspect an issue with the internet connection, consider restarting your router or modem. Unplug the device, wait approximately 30 seconds, and then plug it back in. This simple power cycle can often resolve temporary connectivity issues. Additionally, check for any physical obstacles or electronic devices that might interfere with your Wi-Fi signal.
Running network diagnostics is another effective step. On Windows, open the Command Prompt and type "ipconfig /all" to examine your network configuration. For macOS users, utilize the Network Utility and explore tools like "Ping" or "Traceroute" to identify and address connectivity problems.
To further isolate the issue, test the download on another device connected to the same network. If the problem persists across multiple devices, it suggests a potential network-wide concern. In such cases, it is best to launch your router settings by accessing the router's web interface through a web browser. Check for firmware updates and consider resetting to default settings if necessary.
Clear browser cache and cookies

When your browser downloads are stuck, it's often because of accumulated cached data and cookies. These elements, meant to enhance browsing, can sometimes become outdated or corrupted, causing download hiccups.
Cached data includes temporary files your browser stores to speed up website loading. Over time, as these files accumulate, they can lead to issues with downloads. Similarly, cookies, which are small pieces of data stored by websites, can occasionally become corrupted, disrupting the smooth functioning of downloads.
To clear browser cache in Google Chrome:
- Open Chrome and click on the three dots in the top-right corner.
- Select Settings and scroll down to Privacy and security.
- Click on Clear browsing data.
- Choose Cookies and other site data and Cached images and files.
- Click Clear data.
In Microsoft Edge:
- Open Edge and click on the three dots in the top-right corner.
- Choose Settings and scroll down to Privacy, search, and services.
- Under Clear browsing data, click on Choose what to clear.
- Select Cookies and other site data and Cached images and files.
- Click Clear now.
In Mozilla Firefox:
- Open Firefox and click on the three horizontal lines in the top-right corner.
- Select Settings and go to the Privacy & Security tab.
- Under Cookies and Site Data, click on Clear Data.
- Check both Cookies and Site Data and Cached Web Content.
- Click Clear.
Temporarily disable your antivirus or whitelist the destination folder
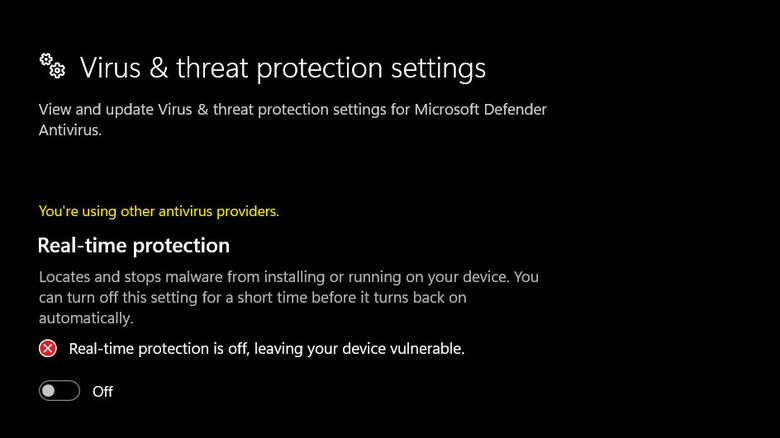
There is also a chance that your antivirus software is interfering with the download process. Antivirus programs often have real-time scanning features that can mistakenly flag downloads or interrupt the process. If you are sure the file you are attempting to download is safe, consider temporarily disabling your antivirus to see if it resolves the issue. Disabling antivirus can be done through the antivirus settings or system tray icon. For Windows Security (Windows Defender):
- Open Windows Security.
- Go to Virus & Threat Protection > Virus & Threat Protection Settings.
- Choose Manage settings.
- Turn off Real-time Protection.
If you're using a third-party antivirus, right-click on the antivirus icon in the system tray and look for options like Disable, Pause Protection, or Snooze.
Another approach is to whitelist the destination folder where you're trying to save the downloaded files. Antivirus programs may sometimes block certain folders, considering them a potential threat. In Windows Security, you can add the destination folder to the Allowed Apps list under Ransomware Protection. For third-party antivirus software, check the settings for options like Exceptions, Exclusions, or Whitelist, and add the destination folder to the list.
Remember, it's crucial to exercise caution when temporarily disabling antivirus, as it reduces your system's protection against potential threats. After troubleshooting, re-enable your antivirus to ensure ongoing security.
Download in incognito mode
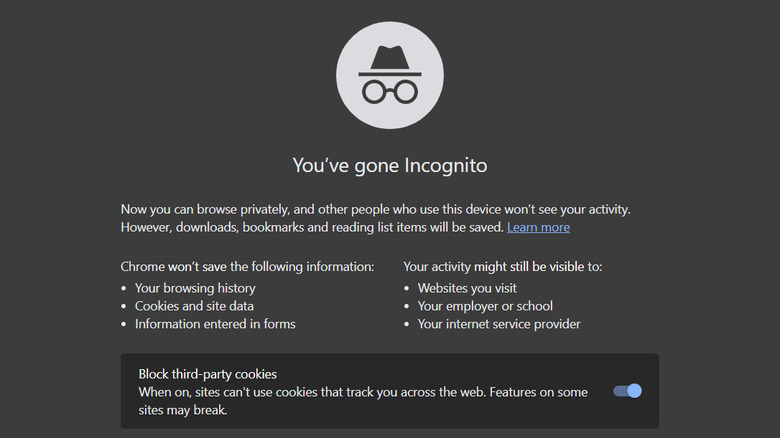
Incognito mode, also known as private browsing mode, can help you download files easily, particularly if the culprit is suspected to be browser extensions or add-ons. In the standard browsing mode, we often have several third-party extensions installed and running, and some might inadvertently interfere with the download process, leading to disruptions or failures. By jumping into incognito mode, the browser temporarily disables all extensions and add-ons, providing a clean environment for the download.
To launch incognito mode:
- Click on the three dots in the top-right corner of Chrome, the three lines in the top-right corner of Firefox, the File menu in Safari, or select Settings and more in Microsoft Edge.
- On Chrome, choose New incognito window. On Firefox, click New private window. On Safari, hit New Private Window. On Edge, select New InPrivate window.
If the download completes successfully in incognito mode, it suggests that the problem may be specific to the browser's regular settings or extensions. To tackle this, begin by identifying potentially problematic extensions. Navigate to the extension or add-ons menu and disable extensions one by one in Chrome or any other browser you're using. After each disable, test the download in regular mode. This method allows for the pinpointing of the specific extension causing the problem.
It is also important to ensure that both your browser and extensions are up to date, as outdated software can lead to compatibility issues. You can update your browser by launching the menu and going to the About section.
Reinstall your browser

If you have exhausted all other solutions and the issue persists, you can try reinstalling your browser. Over time, installation files may become corrupted, and a fresh reinstall ensures a clean set of files, minimizing the risk of ongoing issues. Moreover, a reinstall resets configuration settings to default, offering a clean slate for the browser. This is particularly effective if the problem stems from misconfigurations or unintended alterations to settings impacting downloads.
The process also resolves conflicts with other software on your computer, contributing to a smoother browsing experience. Before reinstalling, remember to back up essential data like bookmarks. After the process, you can import this data, restoring your browser to a familiar state. On macOS, go to Finder > Applications, right-click on the browser you wish to delete, and choose Move to Bin. (Note that Safari cannot be deleted.) On Windows, follow these steps to uninstall the browser:
- Go to your computer's control panel or settings.
- Navigate to Programs or Apps and locate your browser.
- Select the browser and choose Uninstall.
And then follow these steps for a reinstallation:
- Visit the official website of the browser you want to reinstall.
- Download the latest version of the browser from the official download page.
- Run the installer file that you downloaded.
- Follow the on-screen instructions to install the browser.
These generic steps apply to most browsers, but slight variations may exist depending on your operating system and the specific browser you are using. Hopefully, after the reinstall, you will be able to download the targeted file successfully.