Changing Your IP Address Is Easier Than You May Think
Whenever you browse your favorite website or use your internet-reliant apps, your router automatically assigns you an IP address. This changes every time you connect to the internet, so for every session, you'll have a completely new IP address.
But what if you want to stick to just one address? You may be hosting a server that needs a single local IP address for clients to easily connect to. Or maybe you're sharing data with another device on the same network, so you'll need a static local IP address to maintain the connection.
In either case, learning how to change your IP address to a static one is important. The process is actually very simple and straightforward, whether you're using a Windows, Mac, Linux, Android, or iOS device. You won't need to install any fancy apps or go too technical with command lines. Your local IP address can be changed right in the Settings/System Preferences app.
How to change your IP address in Windows 11
To change your IP address on your Windows computer, follow these steps (via Microsoft):
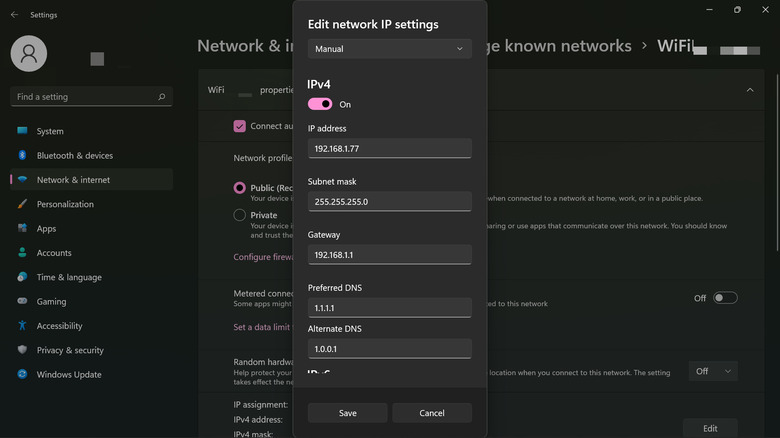
- Launch your Settings app.
- Navigate to Network & internet.
- This step depends on whether you're using a wired or wireless connection. For Wi-Fi, choose Wi-Fi > Manage known networks and pick the Wi-Fi connection you're currently connected to. For wired internet, click on Ethernet.
- Look for IP assignment and click on the Edit button next to it.
- In the drop-down menu, select Manual.
- Turn on either the IPv4 or IPv6.
- Fill in the text fields for IP address, Subnet mask/Subnet prefix length, Gateway, Preferred DNS, and Alternate DNS.
- Hit Save.
- Hop on your favorite website and check if it loads.
If you're unsure what to put as your new IP address, here's a quick guide:
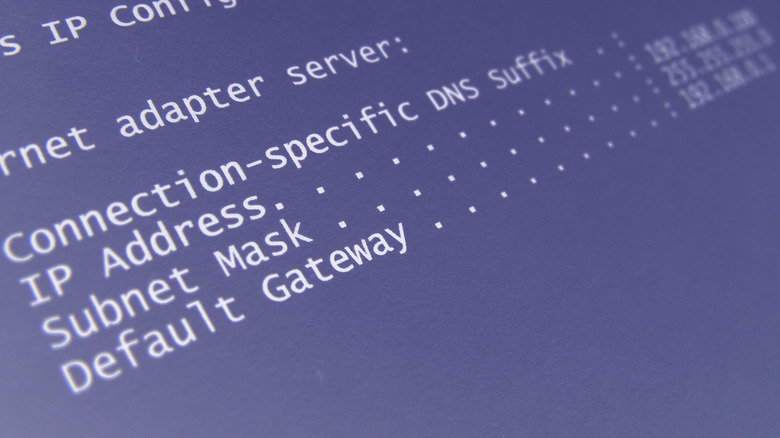
- Open Command Prompt, and type ipconfig.
- Under "Wireless LAN adapter Wi-Fi" (for Wi-Fi) or "Ethernet adapter Ethernet" (for wired), look for the IPv4 Address, Subnet Mask, and Default Gateway.
- Remember the Subnet Mask and Default Gateway as these numbers stay the same.
- For your IP address, you typically only need to change the last block of digits of the IPv4 Address.
- For your Preferred DNS and Alternate DNS, you can choose from one of the popular DNS services available online, such as Google and Cloudflare.
How to change your IP address on Mac
If you're a Mac user, here's how you can change your IP address (via Apple):
- Click on the Apple logo on the top-left corner of the screen.
- Open System Preferences.
- Select Network.
- On the left, choose the network (Wi-Fi or Ethernet) you're currently using.
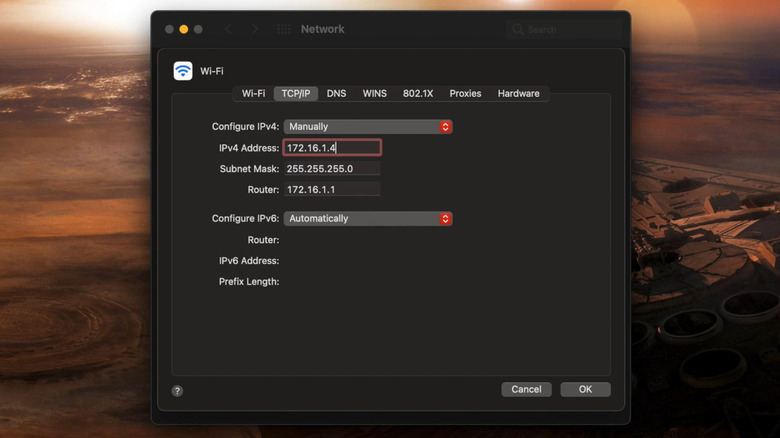
- Click on the Advanced button at the bottom-right corner.
- Go to the TCP/IP tab.
- In the "Configure IPv4" drop-down menu, select Manually.
- Enter your new IP address in the IPv4 Address text field.
- If you're unsure what to put here, simply copy the address in your Router field and change the last block of numbers. For instance, if you have 192.168.1.1 as your Router address, your IP address can be 192.168.1.124.
- Hit OK.
- Select Apply.
- Check if the IP address listed under Status has changed to your new IP address.
- Make sure you can reconnect to the internet using your new IP address.
How to change your IP address in Ubuntu 22.04
For Ubuntu users, the easiest way to change your IP address is from the Settings app. To do so, follow these steps (via Ubuntu):
- From Activities, launch the Settings app.
- Select Network on the left panel.
- Click the gear icon next to the network connection you're currently using. This is next to Wired if you're connected via a wired internet or the name of your SSID if you're using Wi-Fi.
- Remember the IPv4 Address and Default Router listed under the Details tab.
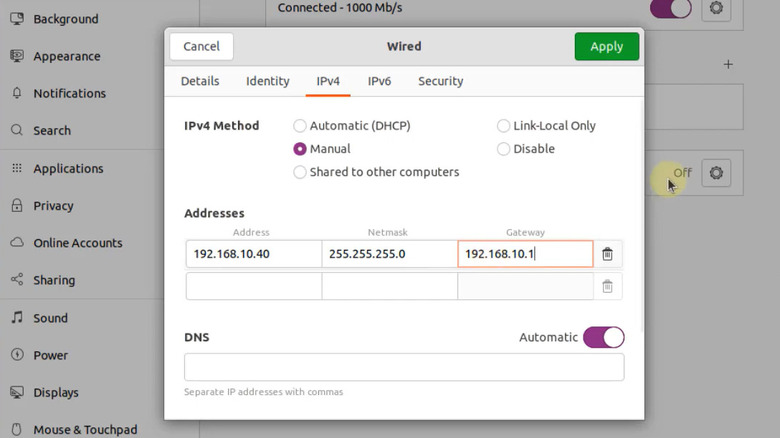
- Click on the IPv4 tab.
- Select Manual in the IPv4 Method.
- Under Addresses, enter your new IP address in the Address field. Use the first three blocks of numbers from the IPv4 Address you noted earlier.
- Under Netmask, type 255.255.255.0, which is the typical netmask for home networks.
- Under Gateway, copy your IP address but change the last block of numbers to 1. So if you have an IP address of 172.16.1.152, your Gateway should be 172.16.1.1.
- Click on the Apply button in the top-right corner.
- To check if your IP address has been applied, open a terminal and type hostname -I. It should list your new IP address.
How to change your IP address on Android
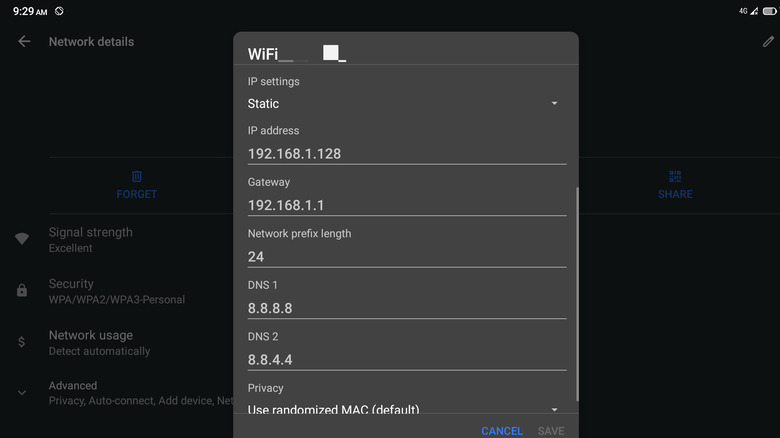
Here's how you can change the IP address on your Android phone.
- Launch your Settings app.
- Open Network & internet.
- Select Wi-Fi.
- Tap on the gear icon next to the Wi-Fi network you're currently connected to.
- Select the pen icon on the top-right corner of the screen.
- Expand Advanced options.
- In the IP settings drop-down menu, choose Static.
- Type your new IP address under the IP address text field. Copy the suggested IP address, only changing the last block of numbers.
- Keep the address under Gateway the same.
- Tap on Save.
- To check if the IP address did change, expand the "Advanced" options. Under Network Details, look for IP address. It should reflect the new address you've set.
- Open your Android browser and check if you can connect to the internet.
These steps can vary depending on your manufacturer's skin. For instance, in a Samsung phone, you'll have Connections instead of Network & internet.
How to change your IP address on iOS

For iOS users, here's how you can change your IP address.
- Launch your Settings app.
- Select Wi-Fi.
- Tap the info icon next to the Wi-Fi network you're currently connected to.
- Scroll down to the "IPv4 Address" section.
- Take note of the current IP address, Subnet Mask, and Router as you will use these later.
- Tap on Configure IP.
- Select Manual.
- Retrieve the IP address you've taken note of earlier and type it in the IP Address text field. Make sure to change the last block of numbers.
- Copy the Subnet Mask and Router from earlier. These addresses stay the same.
- Tap on Save to save your new IP address. You will now see your new IP address listed under IPv4 Address.
Take note that these manual methods don't necessarily mask your location as you're practically using the same IP address range as your router. If you want to completely change your public IP address for security and privacy reasons, you can do so by simply using any of the top VPNs available on the market.