5 Preview App Features On macOS You Should Be Using
If you thought Preview was just another built-in macOS app for opening images on your Mac, you would only be partially correct. Preview has been a low-key powerful multipurpose tool you can use for a huge chunk of your digital errands. Think of it as a Swiss army knife with all kinds of features that you can use to interact with documents, images, and videos.
Diving deeper into Preview reveals a suite of functionalities that go beyond mere image viewing, transforming it into an indispensable asset for productivity and content management. From editing PDFs on your Mac to batch-converting images, this app is packed with hidden gems that can significantly streamline your workflow.
Whether you're a student compiling research notes, a professional preparing a presentation, or just someone looking to organize their digital life, Preview's capabilities are designed to enhance efficiency and convenience. Here are five powerful features of the Preview app on macOS that you should utilize to their fullest potential. Each one is a testament to the app's versatility and power, hidden in plain sight.
Open all kinds of files and convert them
The range of files that macOS's Preview can open might surprise you. Before we delve into how to convert them, take a look at the types of files it can open:
Image formats:
- JPEG
- PNG
- GIF
- BMP
- TIFF/TIF
- PSD
- ICNS (Apple Icon Image files)
- ICO (Windows icon files)
- HDR (High Dynamic Range Image files)
- JPEG 2000 (JPEG 2000 files)
- SGI (Silicon Graphics Image files)
- TGA (TARGA image files)
- XBM (X BitMap files)
- PICT (QuickDraw image files)
- PNTG (MacPaint Bitmap Graphic files)
- QTIF (QuickTime image files)
- FPX (FlashPix files)
- RAD (Radiance Scene Description files)
- DAE (Collada 3D files)
Document formats:
- PDF (Portable Document Format files)
- PS (Adobe PostScript files)
- EPS (Encapsulated PostScript files)
- PPT (PowerPoint files)
Raw and high-efficiency
- RAW (Raw image files)
- DNG (Digital Negative files)
- OpenEXR (OpenEXR files)
Other formats:
- AI (Adobe Illustrator Artwork files)
- FAX (faxes)
Most of these will launch in Preview when you click them open. If not, simply secondary-click the item and choose Preview from the Open With menu.
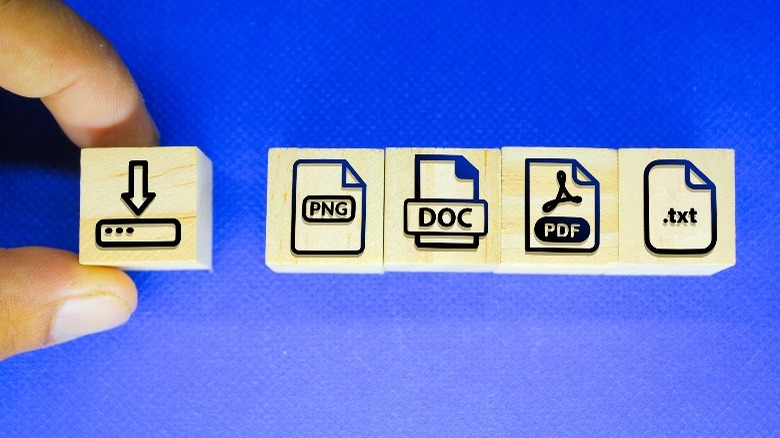
Suppose you want to convert the file; move the cursor to the menu bar and go to File > Export. A Finder window will open to select where to export the file. After finding a folder, select the Format dropdown menu and choose a new format. If you don't see the Format dropdown menu, click Show Options. You can also batch-convert files by holding Command and clicking the thumbnails in the left panel. Now export like previously explained.
Fill out forms and sign documents
One of Preview's most useful everyday uses is its ability to fill out forms and affix your signature to them. It is one of those fundamental Mac features that will change how you use your laptop.
Once you have a form you want to fill, open it in Preview. If it's not already in PDF format, look for the Form Filling button at the top of the window and click it. Scroll through the form, click on the slots you want to fill out and enter all the necessary information. Preview automatically detects spaces you need to fill up and highlights them in blue. If there's a slot it didn't detect, just double-click the space, and your cursor will create a text box for that right there.
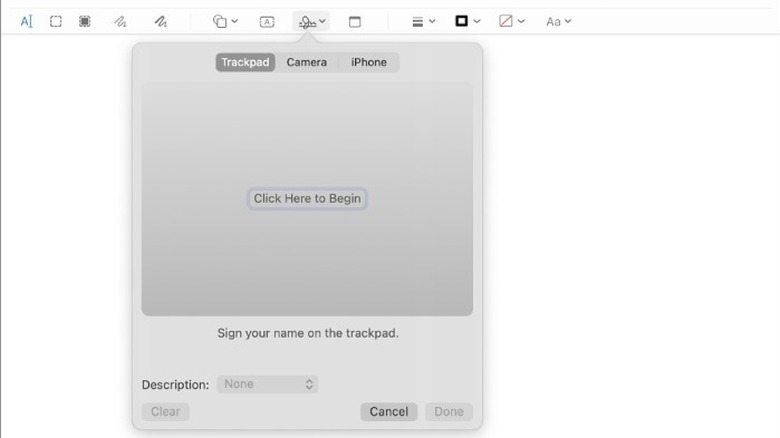
You can also affix your signature to the document. But first, you must create and add the signature to Preview. Follow these instructions to learn how to do it:
- Look for and select the Sign button in the top-right region of Preview (its icon looks like a signature).
- Click Create Signature and choose how you want to add your signature — via the trackpad (or mouse), Mac's webcam, or signing on your iPhone or iPad.
- Choose Done when you're satisfied with your signature.
- Open the Sign menu again and click the signature.
- Place it where you like, and use the border corners to adjust the size.
Remove image backgrounds and create new images from existing ones

If you're running the latest version of Preview, it offers a few ways to separate a subject from the background. Essentially, you can turn pictures into transparent PNGs, which can be placed in other images.
The first method is copying the subject from an existing picture. Say you have an image of a cat on a stool; you can isolate the cat subject and create a new PNG image from it. Follow these steps to figure it out:
- Open the image in Preview.
- Secondary-click the image and choose Copy Subject.
- Go to the menu bar and click File.
- Select New From Clipboard to create a new image with your subject as the only element.
If you had something like a logo instead with one solid color as the background, you could delete the background by following these steps:
- Open the image in Preview.
- Click Markup to open the editing tools.
- Choose the Instant Alpha button (its icon looks like an active magic wand).
- Use the tool to paint the background and hit Delete.
- If your image isn't in PNG, you'll be prompted to convert it. Select Convert when prompted.
With these two methods, you should be able to get any image you want isolated as a PNG.
Edit PDFs and GIFs and export their individual pages
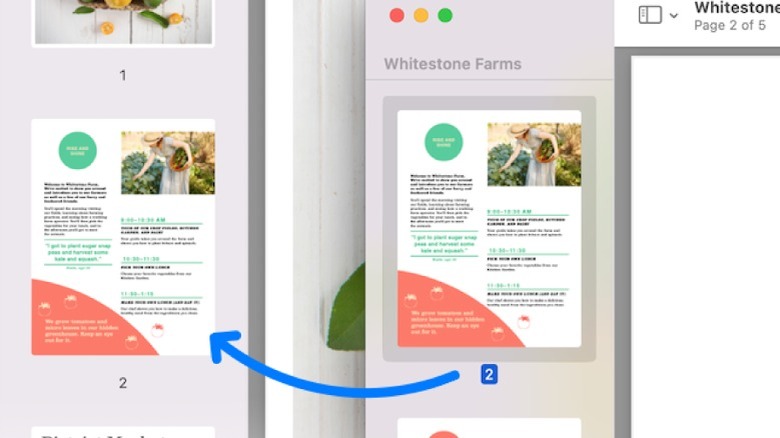
Preview can view and edit pages in a PNG or GIF. After you open it in the app, you should see all the pages as thumbnails in the left-side panel. You can drag out whichever page you want from there and place it in a new position to change the arrangement of the pages. You can also open multiple Preview windows of different PDFs and GIFs and combine their pages to create a new combination. Of course, doing this for GIFs may break the flow of the animation, so you should save it only when you're absolutely sure you know what you're doing.
Tip: You can view more pages at once by clicking View on the menu bar and choosing Contact Sheet.
You can also use the steps outlined earlier to fill out forms on these pages. But if you want to edit the pages, click the Markup button, and you'll find all kinds of drawings, shapes, and text tools available at the top of the window.
If you want only a single page from the collection in the PDF or GIF, simply secondary-click the thumbnail and choose Export As. Choose the format and the location, then click Save to finish.
Edit images, adjust their color balance, and view their metadata

It's nothing as powerful as the popular Photoshop software, but Preview gives you some image editing and color-balancing capabilities. When you open a compatible image on Preview, you won't see these options outright; you'll have to click the Markup button, which we've highlighted in other tips. If you're having trouble finding the Markup button, it's represented by a marker icon in a circle. You might not see the button if your window is small; in that case, just click the chevron-like arrow button in the top-right region to reveal more options.
Clicking Markup will reveal the Instant Alpha, Sketch, Draw, Shapes, and their corresponding border tools, amongst others. However, if you want to adjust the colors and size, you must go to the menu bar and click Tools. In that menu, you'll find Adjust Color and Adjust Size. The former will let you adjust exposure, contrast, saturation, and more.
Finally, if you would like to see the information for the image (metadata), you only have to click the Inspector button (represented by an "i"). Here, you'll see the size of the image, its creation date, what file extension it has, its size, and other useful bits of information.